When it comes to purchasing a new camera, most of us are incredibly excited to jump right in and start using our new creative tool…but that process can also be frustrating. Learning all of the new camera menus, features and functionality can be challenging, especially if you are coming from a completely different camera brand. With the release of Sony’s latest flag ship full frame mirrorless camera, the highly sought after a7R III, many of you might find yourself in a similar situation.
Even Sony shooters might be a little surprised with all the new changes to the brand new menu system, differences in button layout and new features that make the a7R III one of the best cameras I have ever used. Fortunately for many of you, I have put together this extensive guide to getting the most of your brand new a7R III. As a Sony Artisan, I was fortunate to be able to take an a7R III with me to Myanmar prior to its release, where I was able to pour over the camera menus, dive into the new features and fully customize my own Mark III. While my full in-depth review won’t be available for another week or so, this mini-guide should drastically help reduce the learning curve when it comes to figuring out how to make the most out of what will probably be Camera of the Year in 2017.
Additionally, if you haven’t picked up a Sony a7R III yet, be sure to scroll down to the bottom of this post as I will be giving one away one Instagram soon!
Enjoy the guide!
Initial Setup
After unboxing your a7R III for the first time & charging the camera battery, I know many of you are probably pretty eager to start shooting right away. I know I was! But before we do that, there are a number of basic settings on the camera that we need to adjust first. While the following 11 settings aren’t game-changing when it comes to your a7R III experience, they are important never the less!
Set Your Time & Area
When you first turn on your camera, you will be greeted with an option to set the system language right off the bat. After choosing whatever option suits you best, it is now time to set the Area/Date/Time. While many photographers set this up initially, they don’t think much about it afterward. This can quickly become an issue if you use multiple camera bodies like I do and especially if you travel to different time zones. Making sure that you correctly adjust the area/time zone for each of your cameras every time you travel will help to make sure that your images line up correctly in whatever photo editing/organization programs you use such as Adobe Lightroom or On1 Photo RAW 2018.
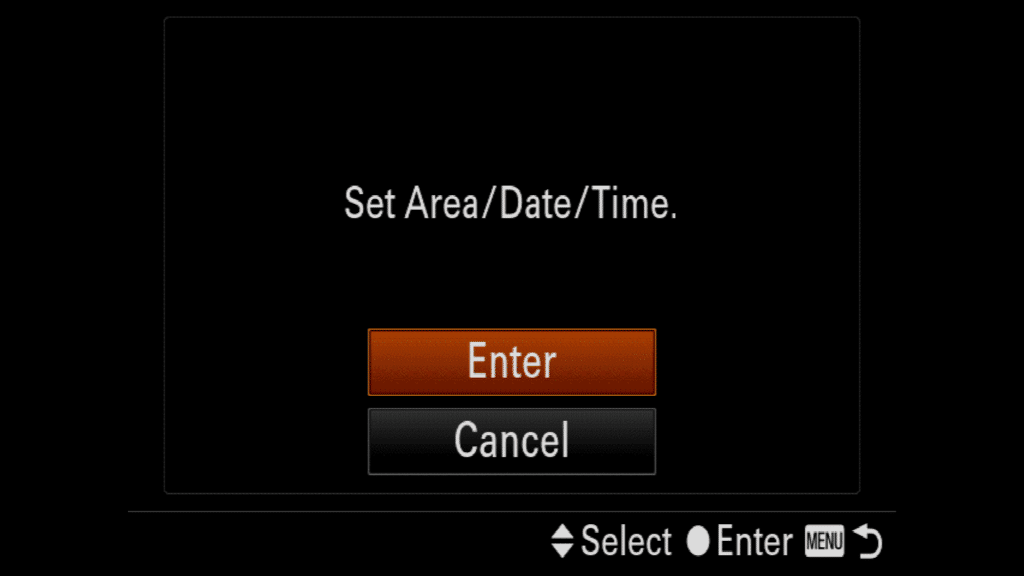
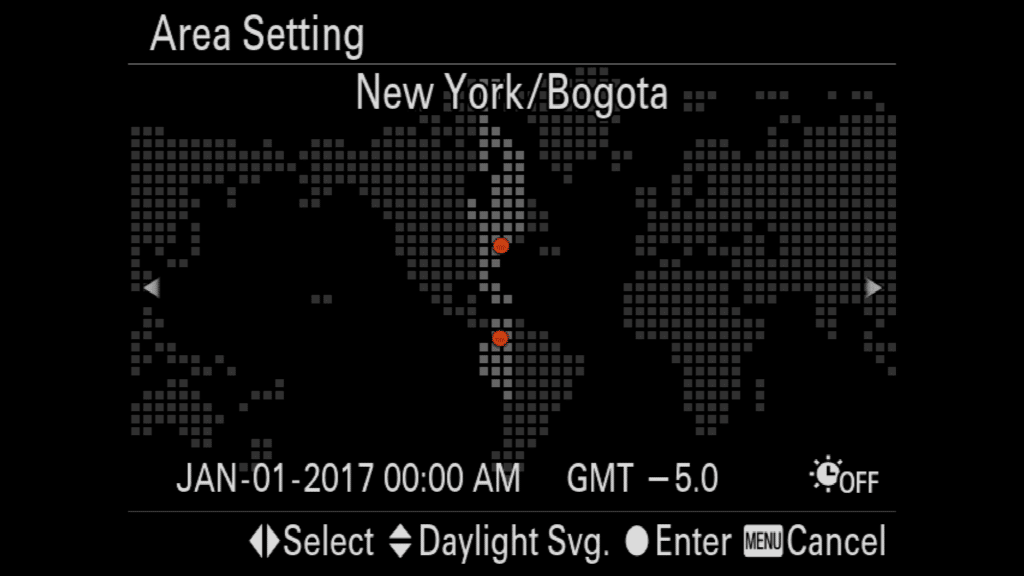
After initially setting up your camera, you can find the Date/Time Setup in the “Area Settings” options in the Toolbox Menu Tab on page 5.
Selecting RAW or JPEG
Aside from choosing the language and setting the date and time of your camera, the very first thing most photographers do is make sure they are shooting in the right image file format. By default, most digital cameras are set to shoot in JPEG. Personally (and professionally), I prefer to shoot in RAW so that I have access to all of the image data that the incredible sensor inside the a7R III is capable of capturing.
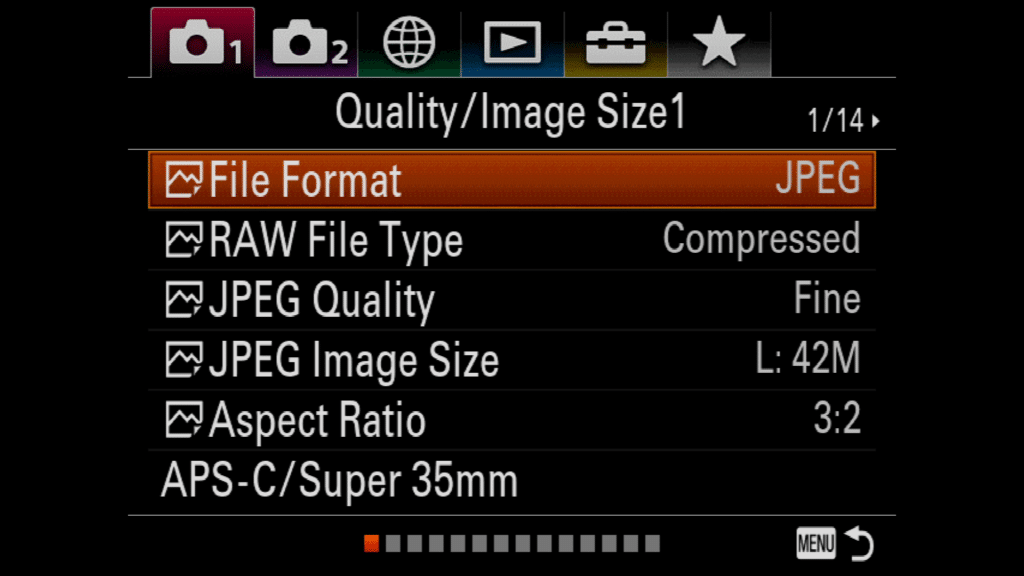
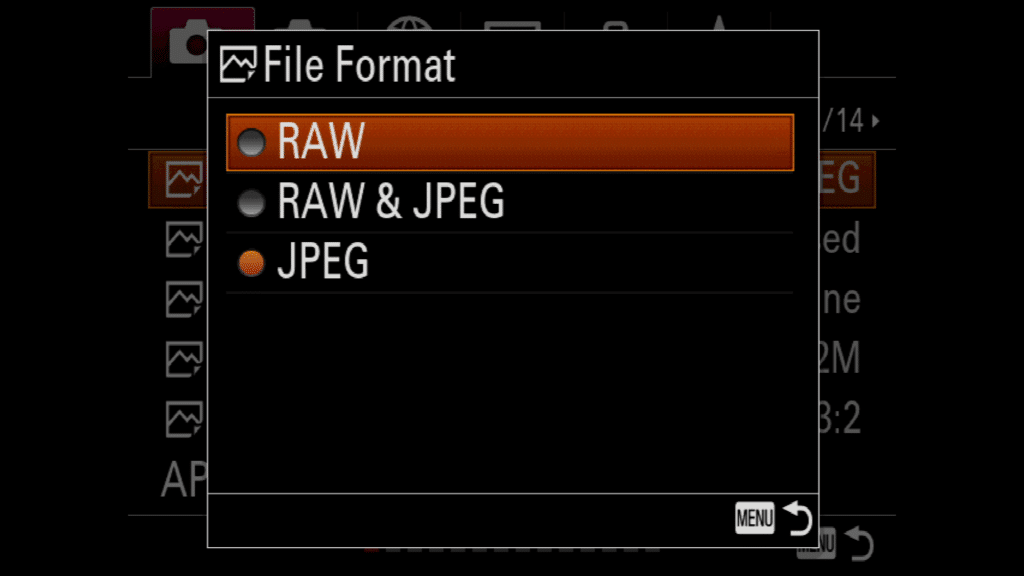
It is, however, important to note that you also can choose the RAW file type with the a7R III: Compressed or Uncompressed. The default RAW file type is Compressed, which is essentially a smaller RAW file size (40mb vs 80mb) that is considered “Lossy” as Sony’s algorithms have helped to shrink down the RAW image file size. It does this by removing what Sony considers as unnecessary or redundant image data while still providing a RAW image that can be fully edited to your heart’s content. The uncompressed file type has had no algorithms run through it, providing pure RAW image data. The distinction between the two options are negligible in 95% of shooting situations, however, if you shoot in many high contrast situations, such as Astro/night photography, I recommend that you use the Uncompressed RAW file type.
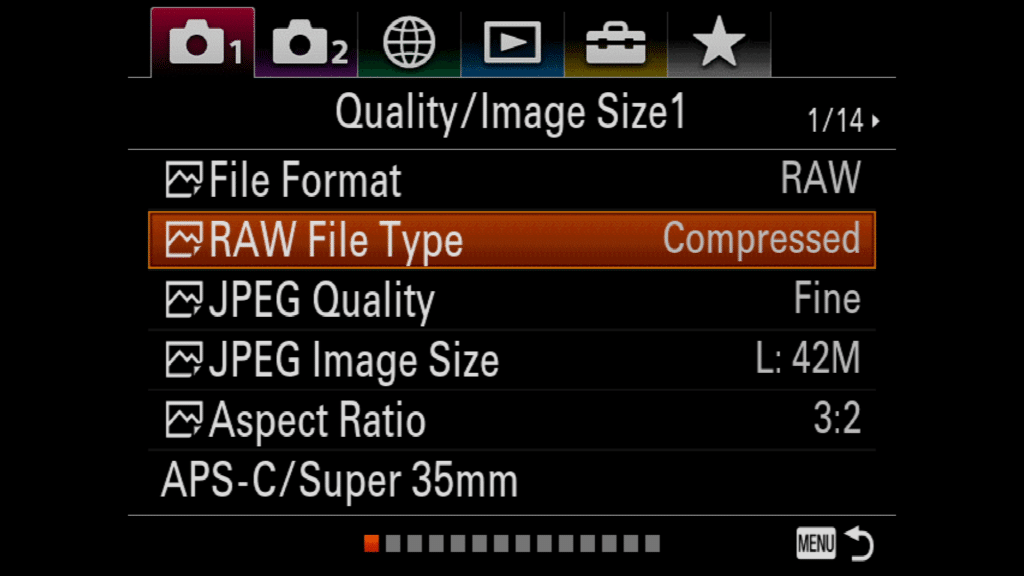
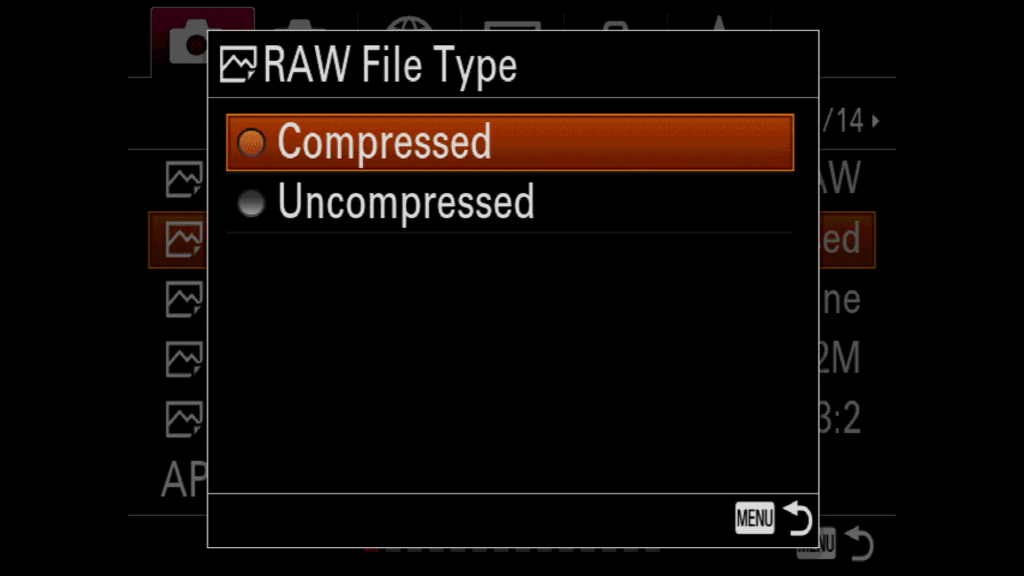
Both of these settings can be found in the Camera Menu Tab (1) on Page 1.
Turn Off Long Exposure NR, High ISO NR & Auto DRO
While Sony typically does a great job of providing useful features and settings in its cameras, I generally prefer to handle things such as Noise Reduction and Expanded Dynamic Range on my own through post-processing. This is why I generally turn off Long Exposure Noise Reduction, High ISO NR (JPEG only) and Auto DRO (which artificially increases dynamic range). Each of these settings are on by default with the a7R III. However, if you aren’t as familiar with processing techniques that deal with noise or expanding dynamic range, you might want to subjectively leave some of these settings on.
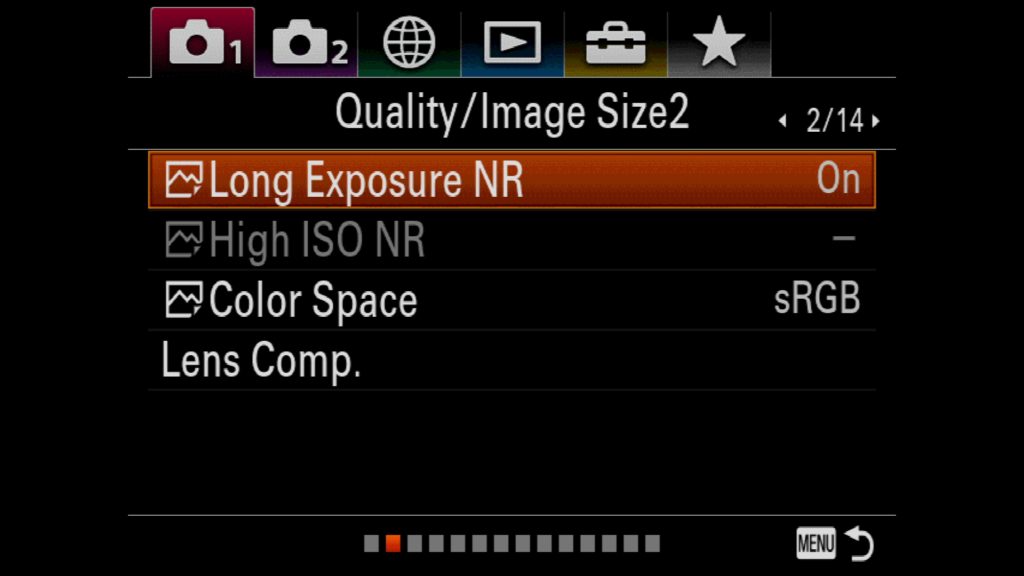
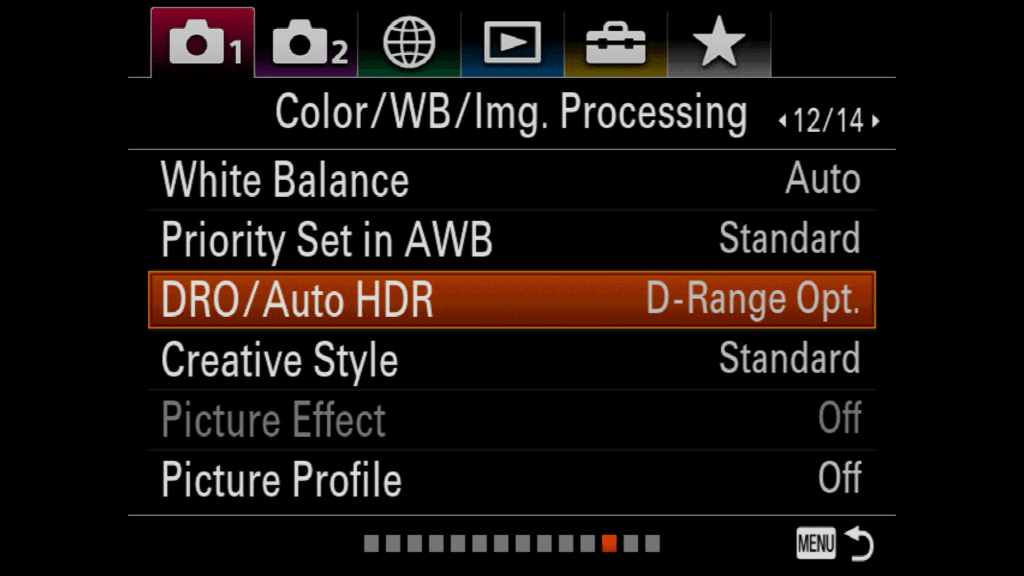
These settings can be found in the Camera Menu Tab (1) on Page 2 & 14 respectively.
Set Color Space to AdobeRGB
By default, the a7R III is set to shoot in the sRGB color space, which is the most universally used & accepted color space for the vast majority of the internet and nearly all mobile devices. That being said, it isn’t a very large Color Profile, meaning that it doesn’t capture any many variances of different colors as other Color Profiles out there. For example, if you do a lot of printing, you will want to use the AdobeRGB Color Profile instead as it contains a larger spectrum of possible colors to capture. While this isn’t a big deal if you are shooting in the RAW file format, it is one less thing that you might have to change in the digital darkroom.
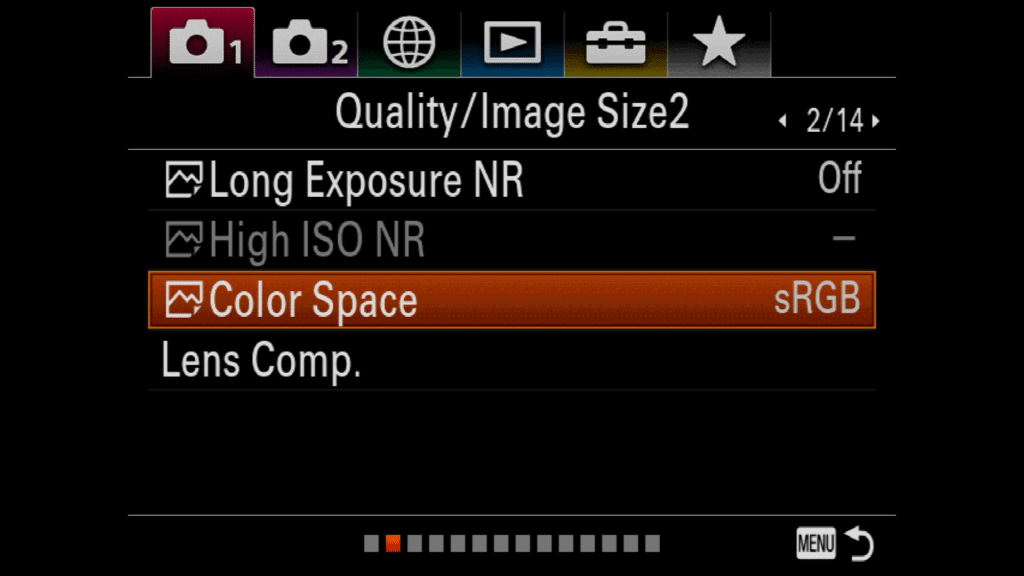
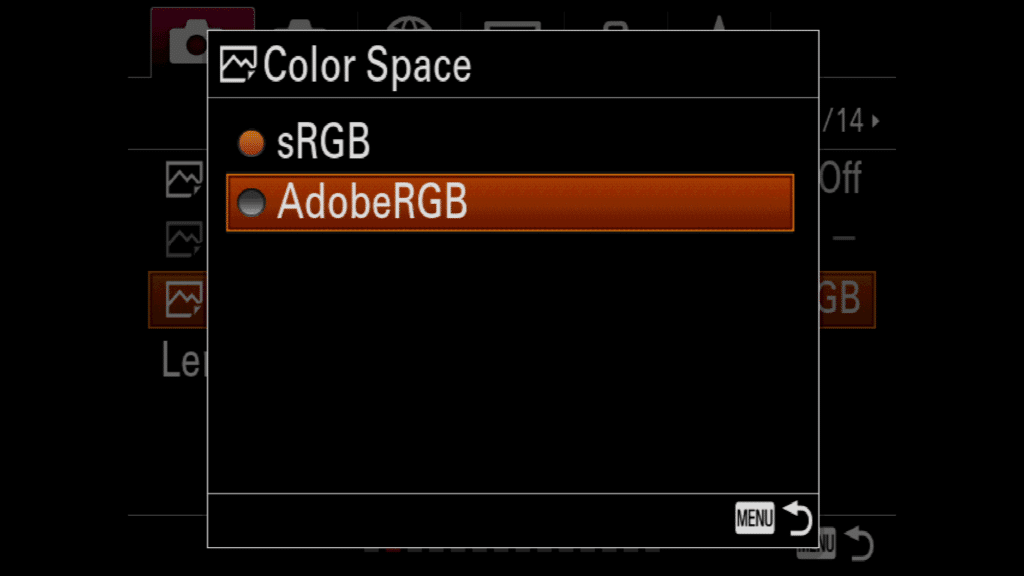
This setting can be found in the Camera Menu Tab (1) on Page 2.
Setup Auto Bracketing
If you are a landscape or travel photographer that likes to have the ability to shoot bracketed images (multiple images of the same exact scene with different exposures) to help capture a much wider dynamic range of image data, you will want to make some minor adjustments to your Bracketing Settings and Drive Modes. As usual with bracketed images, it is always recommended that you use a tripod.
First, within the “Bracket Settings” menu option, you will want to change “Selftimer during Brkt” from “Off” to “2 Sec”.
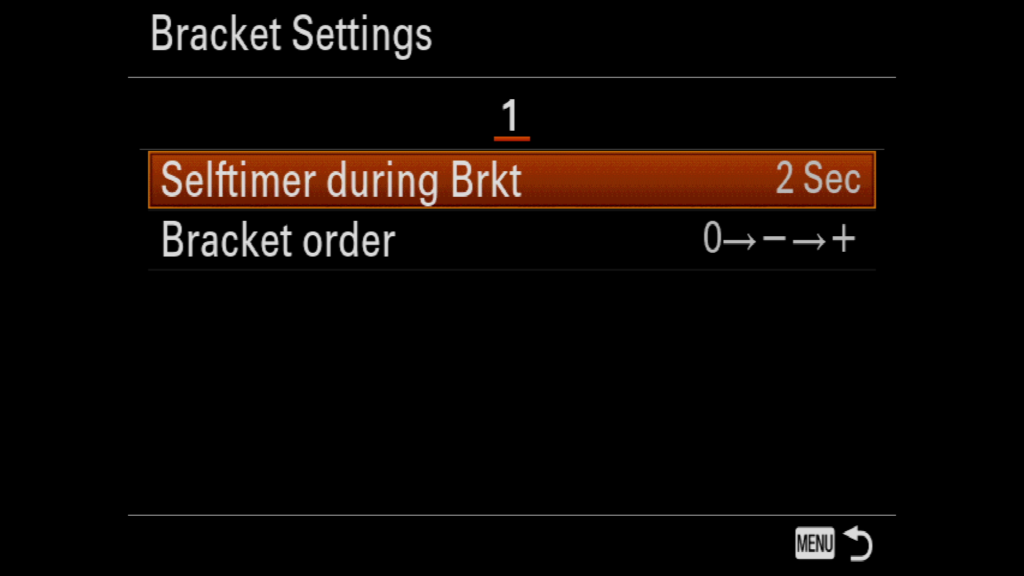
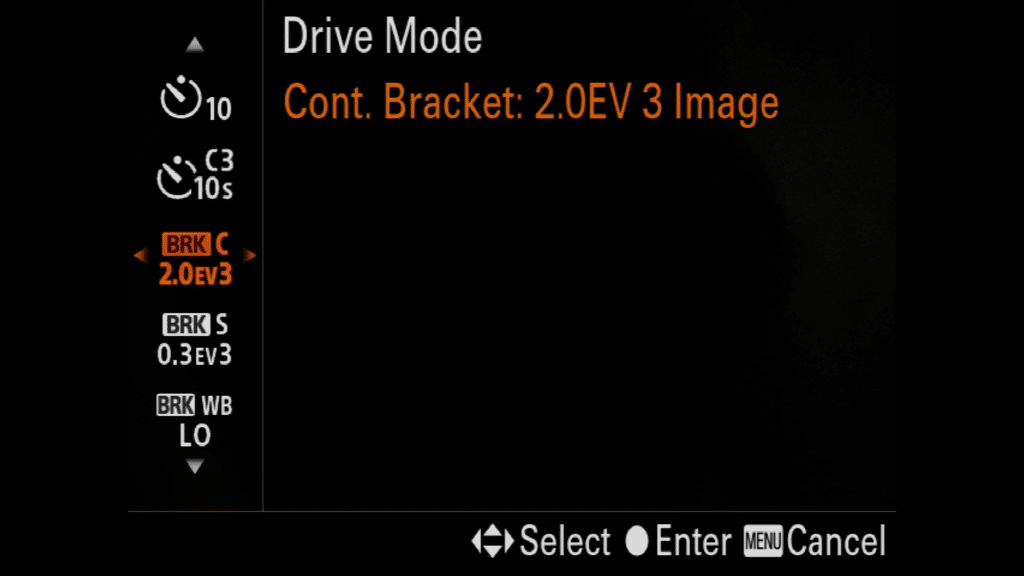
Next, within the “Drive Mode” menu you will want to scroll down until you see “BRK C – .3EV3” and then press right on the rear Control Wheel until you see “BKK C – 2.0EV3”. This setting allows you to shoot a 3 image bracket with 2 stops of exposure difference between each image, which is my go-to when it comes to Auto Bracketing. By setting the self-timer to 2 seconds and using this mode, the a7R III will take all three images in quick succession of each other.
These settings can be found in the Camera Menu Tab (1) on Page 3 or via a Custom Button you assign the Drive mode to.
Change Peaking Settings
If you find yourself shooting in Manual Focus modes often, one of the handiest features found in the a7R III might be “Focus Peaking”. As you dial the MF ring on your lens, a color overlay will appear over your image as things become sharp, making it easy to know when you are close to getting tac sharp results.
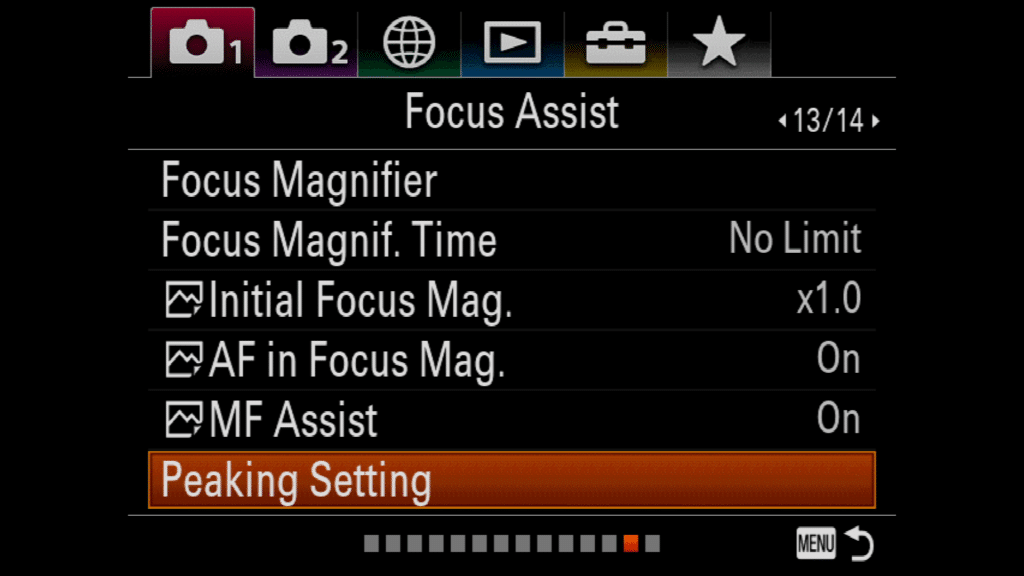
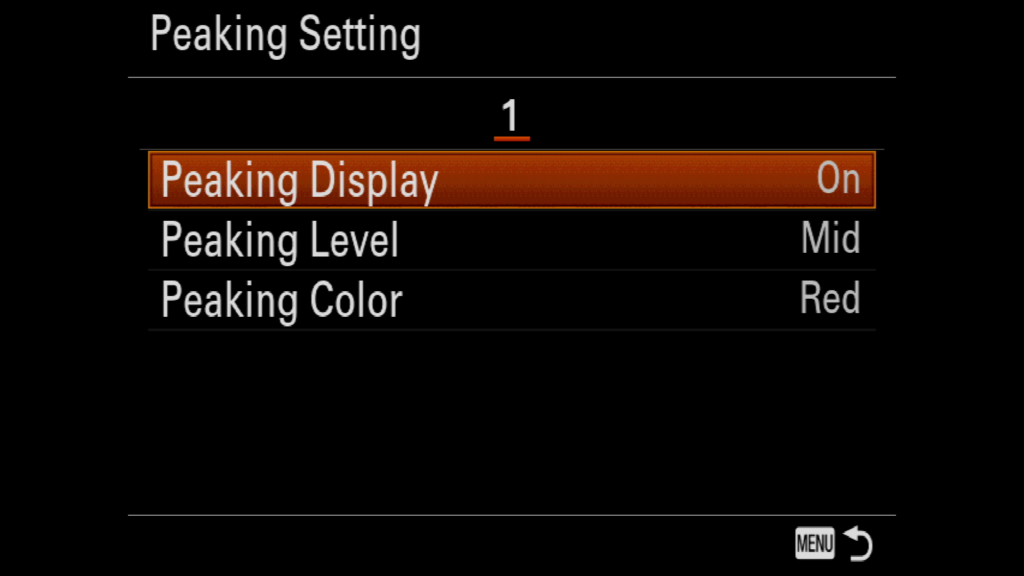
For the best results, I highly recommend that you change the “Peaking Settings” to the following options: Peaking Display: On – Peaking Level: Mid – Peaking Color: Red These settings can be found in the Camera Menu Tab (1) on Page 13.
Turn On Grid Lines
While the Horizon Leveling tool can be extremely handy to use with the a7R III when you are on a tripod, I find it harder to use when shooting handheld. A simple solution to help give you some guiding lines can be found by adding Grid Lines to your displays.
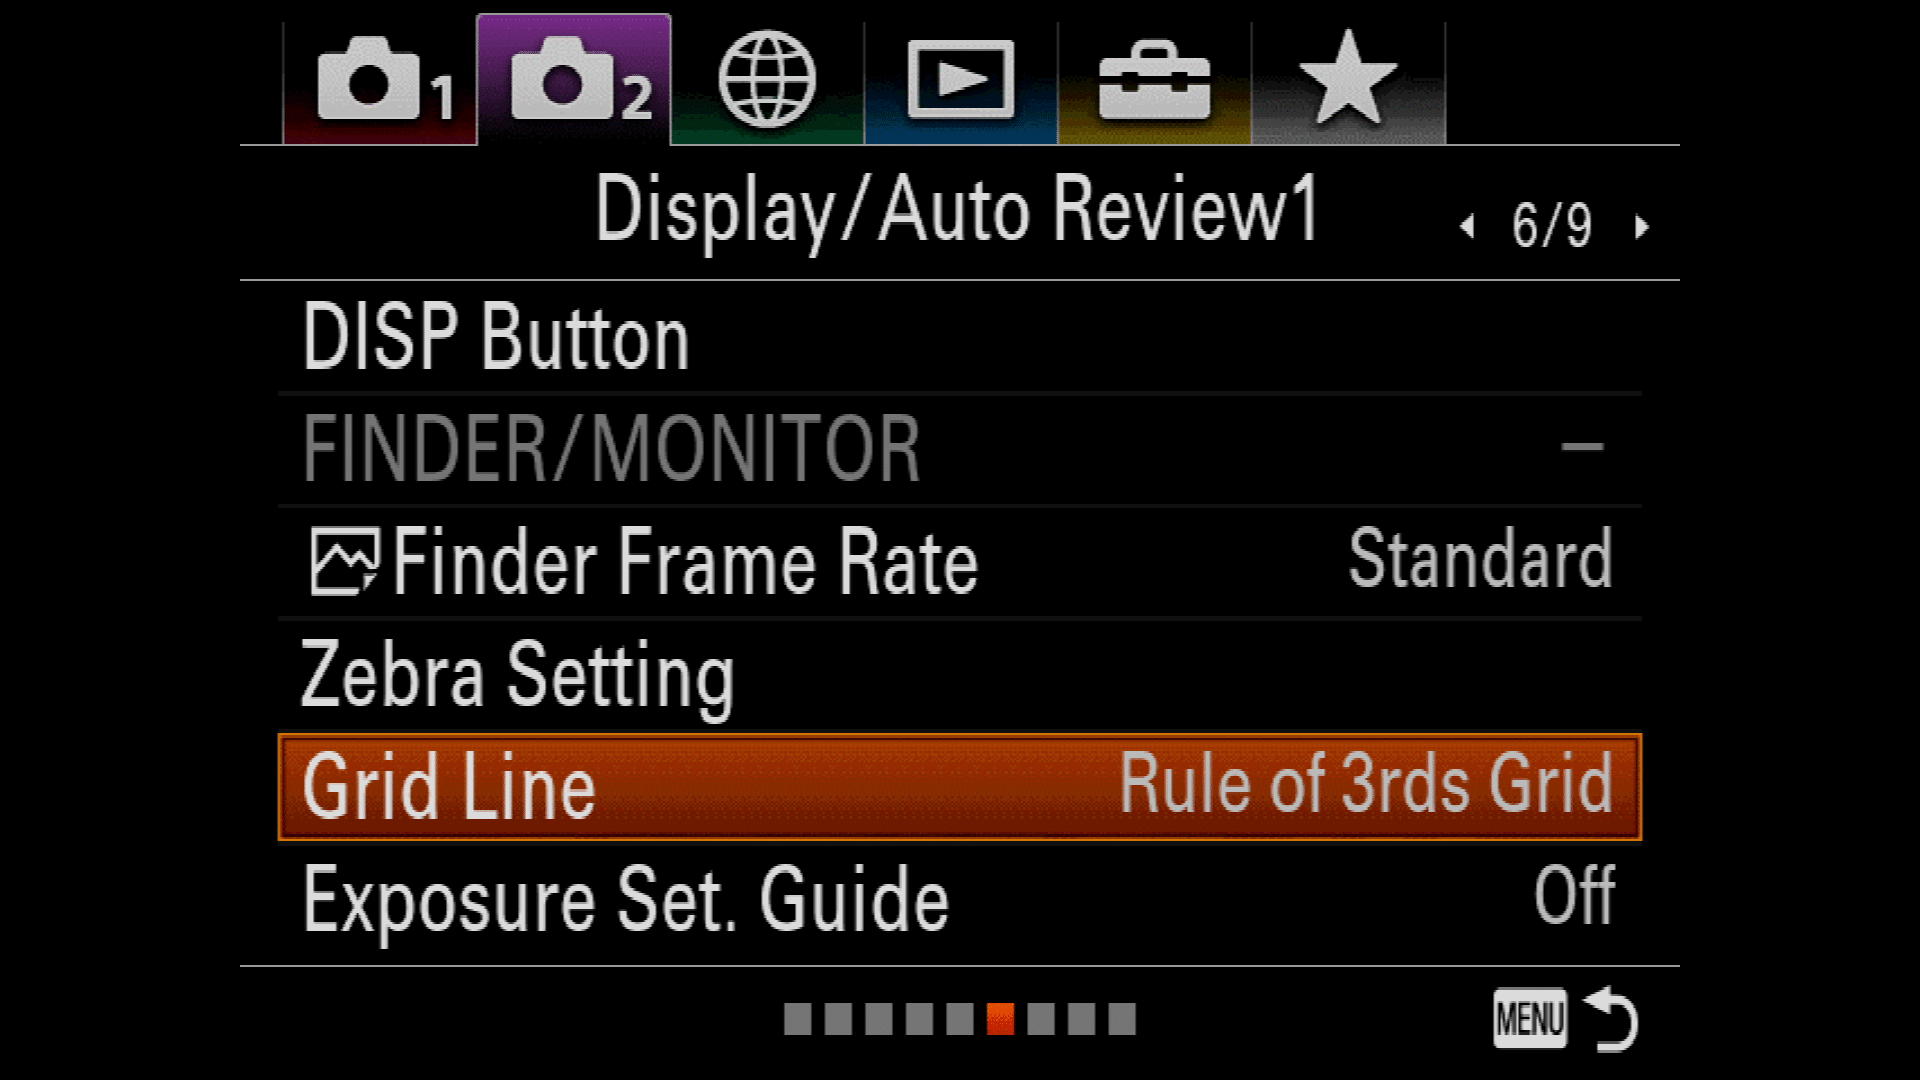
The “Rule of 3rds Grid” is the one I use most often as it not only helps me level my horizons when shooting on the go, but it can also help me with subject placement when I am shooting on the run. This setting can be found in the Camera Menu Tab (2) on Page 6.
Turn Off Audio Signals
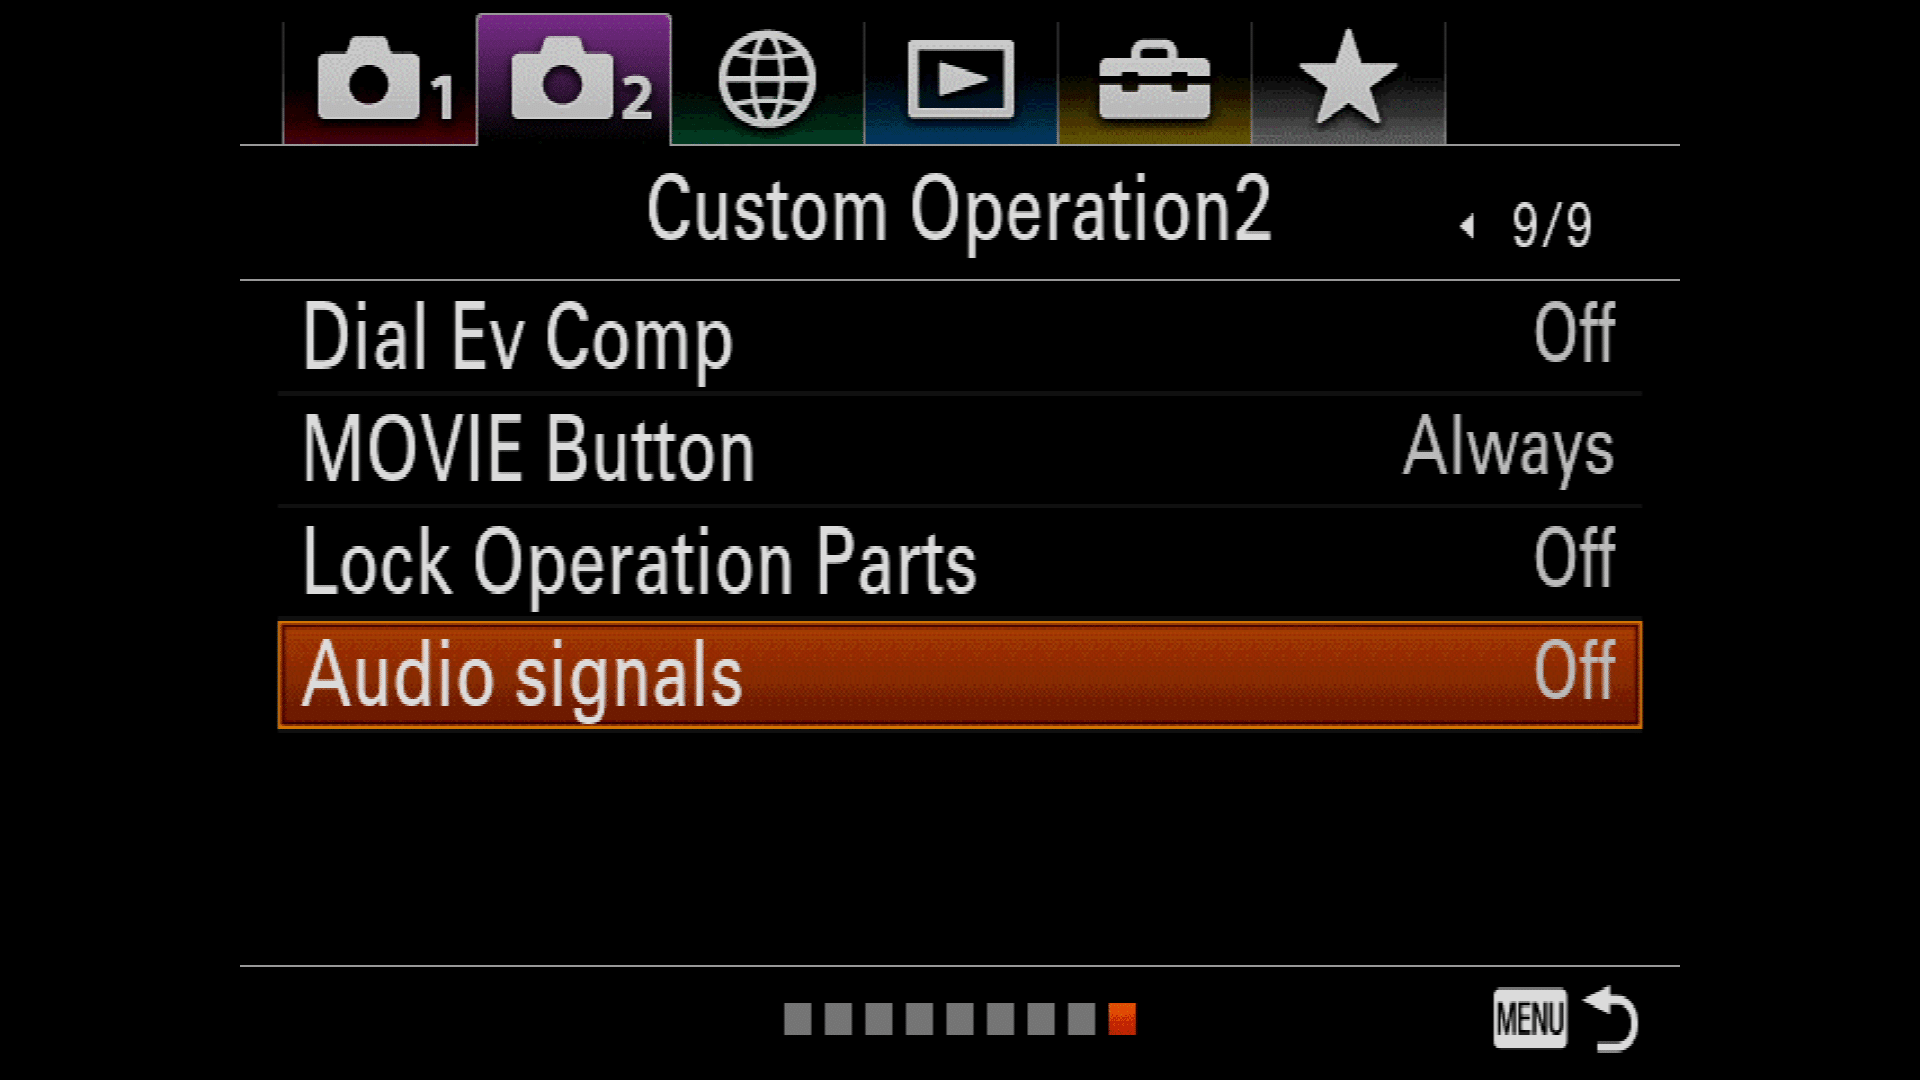
One of the most annoying sounds to come out of any digital camera these days are the audio beeps to let you know when you are either shooting or when you use a shutter delay. While it might not bother you personally when you are alone, you might find other photographers giving you the stink eye if you all line up to shoot a beautiful sunset and your camera happens to be the one making all the noise. Simply select the “Off” option in the “Audio Signals” option found in the Camera Menu Tab (2) on Page 9 to fix this.
Turn Off Auto Brightness for Viewfinder
In one of the more surprising settings found in the a7R III, Sony has left “Viewfinder Brightness” to “Auto” by default. This means that the brightness of the Viewfinder can change based on the outside lighting conditions. Personally, I found this to be problematic because one of the benefits of a mirror-less camera is the fact that the Rear LCD and the Viewfinder generally show you exactly what your exposure is going to look like (outside of low light situations). With this setting set to Auto, I found that occasionally a scene appeared brighter when viewed through my viewfinder then what my RAW image file actually looked like when I began to process it.
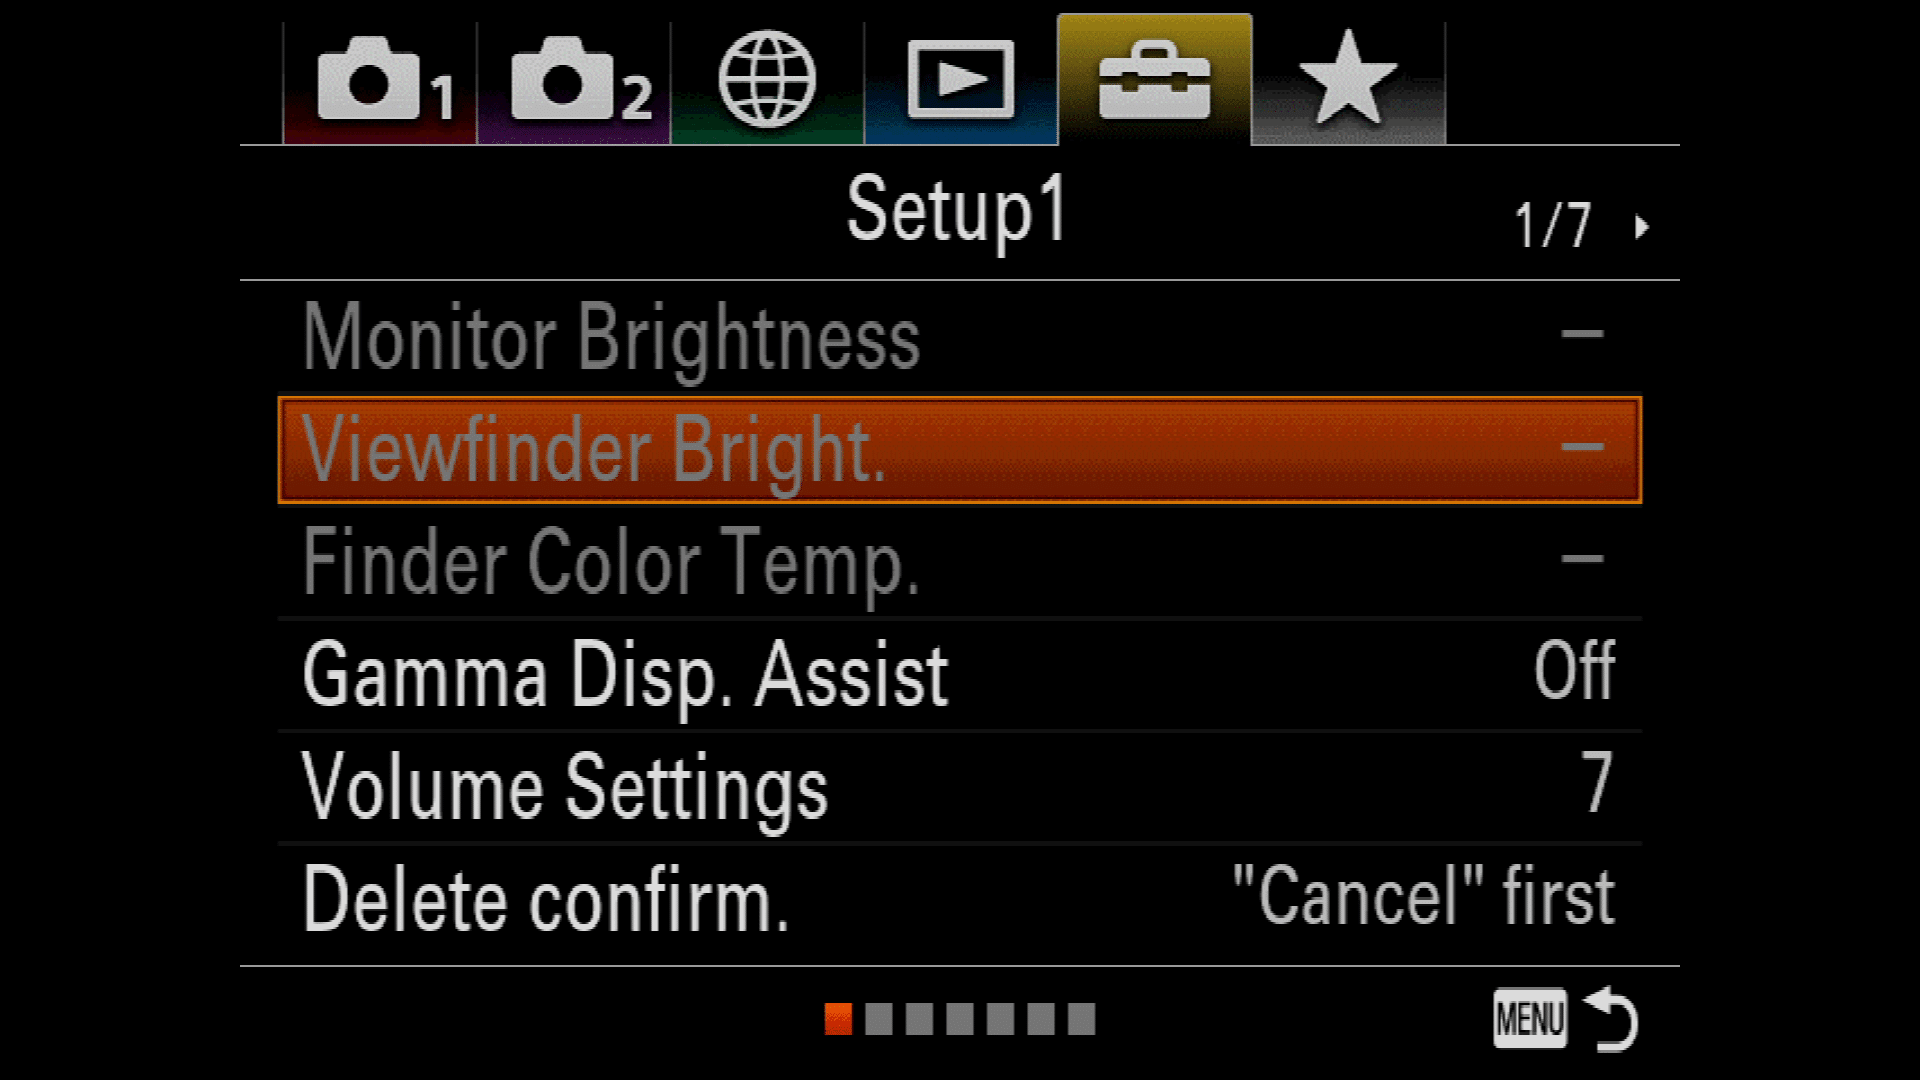
The solution is to switch Viewfinder Brightness into manual mode and leave it on the default brightness. At least this way, you have a much better indicator of the kind of exposure results you can expect with your images when using the Viewfinder. This setting can be found in the Tool Box Menu on Page 1.
*The setting is greyed out in the screenshot above because I had an external monitor attached to the camera to capture these screenshots
Set ISO Auto & Minimum SS with Auto ISO
Another handy features found on the a7R III have to do with Auto ISO. When you find yourself shooting in Manual, Shutter Priority or Aperture Priority modes (in both Stills & Movie modes), you have the option to set your camera to Auto ISO, so that the camera choose your ISO setting for you. This can be handy when shooting in an environment with changing lighting situations, such as street photography.
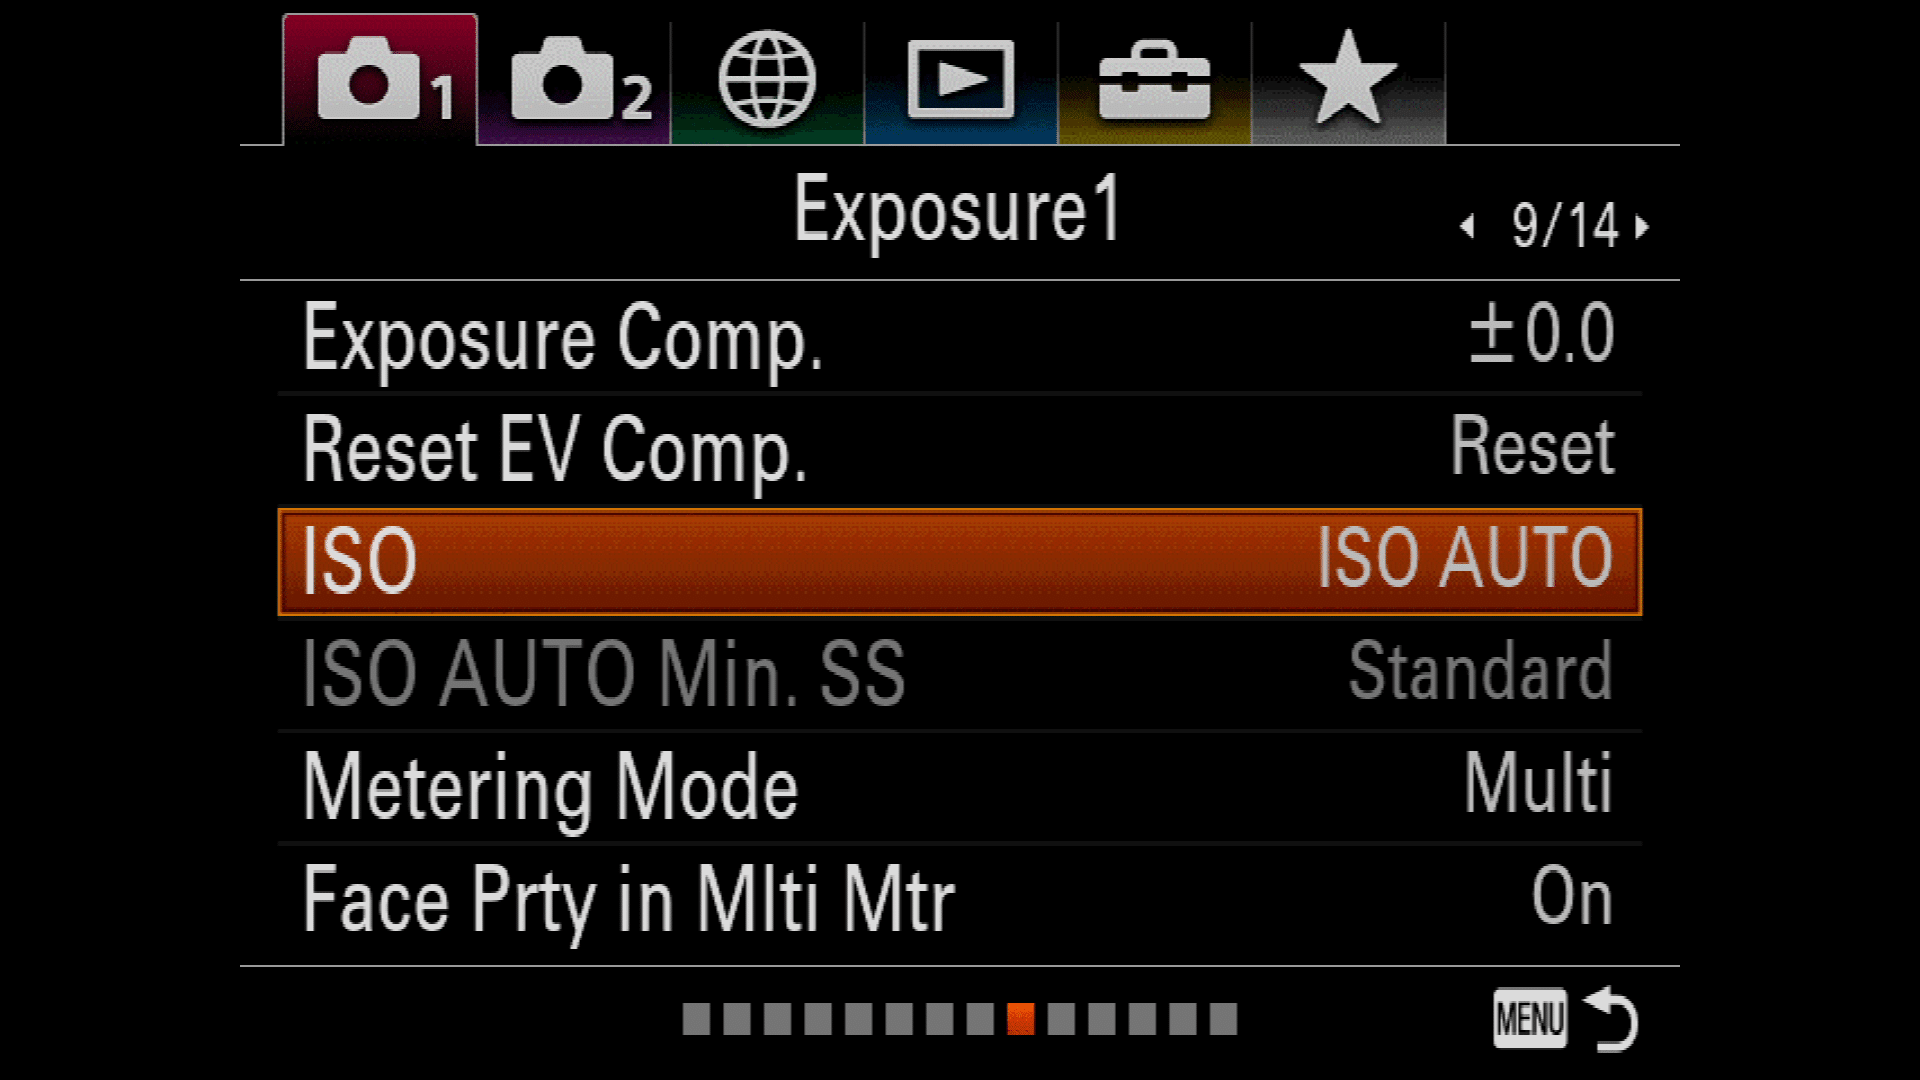
But if you really want to take advantage of this feature, you will want to also set your “ISO AUTO Min. SS”. To engage this feature, you need to be using the Aperture Priority camera mode (The “A” icon found on the top camera mode dial). Once in the mode, you have the ability to set the minimum shutter speed you are willing to let your camera shoot at before the Auto ISO feature engages. How does this work? Let’s say you are shooting in Aperture Priority mode while you are walking around your hometown. Light is changing on your subjects as you walk up and down your street. By setting your “ISO AUTO Min. SS” to 1/125th of a second, you are telling your camera that if your shutter speed doesn’t drop below 1/125th of a second, your ISO should stay at 100. However, if your scene all of a sudden becomes too dark, your camera will pump up the ISO to maintain that minimum shutter speed, making sure that your shutter speed never drops so low that your images become blurry in the process.
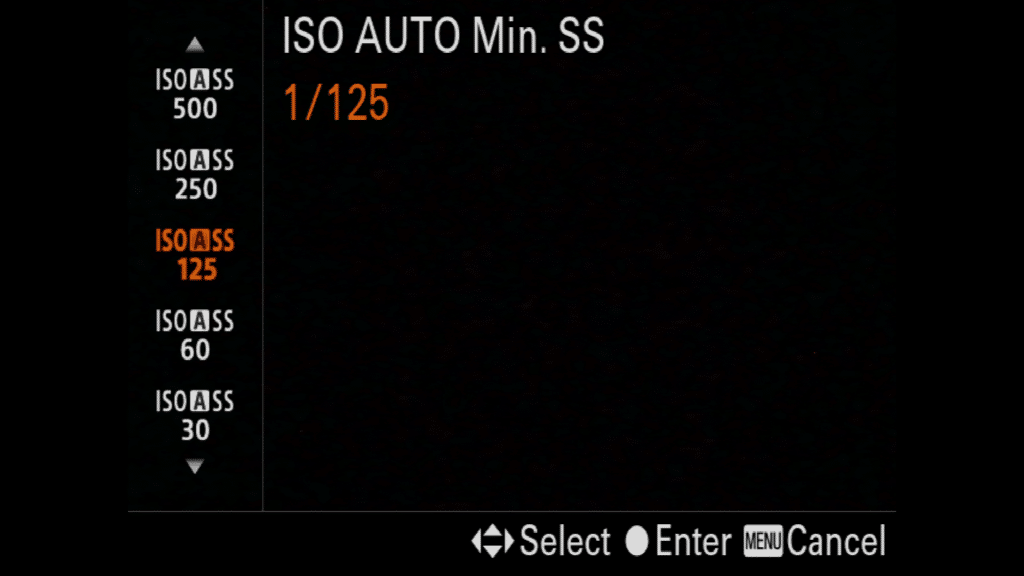
Both of these settings can be found in the Camera Menu Tab (1) on Page 9.
New to the a7R III
While the a7R III might seem pretty familiar, especially for those coming from the a7R II, there are a number of new features that you will want to configure and learn how to use to really get the most out of this camera. Here are some of my favorites!
Determine your Multi SD Card Workflow
One of the most sought-after feature requests from Sony mirror-less camera users has been multi SD card support. Now you not only have it with the incredible a9 but also the a7R III. But that begs the question of what kind of workflow system do you want when it comes to having the ability to write to two different SD cards? For many of you, you will probably want to make sure that anything that is captured to Card 1 (the faster UHS II slot) automatically gets copied to Card 2. You also have the ability to separate RAW/JPEG or photos/videos or just copy photos (or movies) to your backup slot. Long story short, the options are endless!
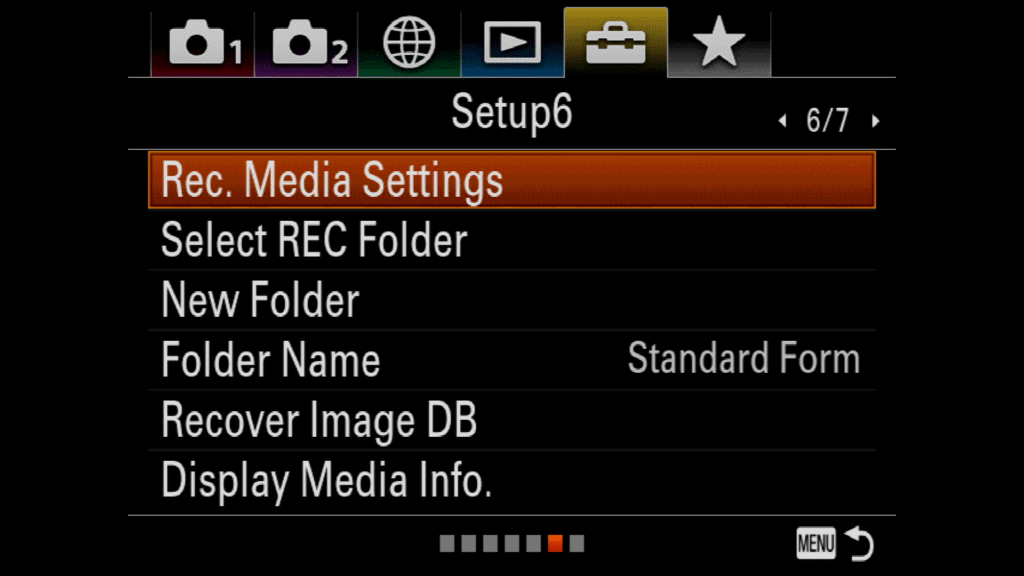
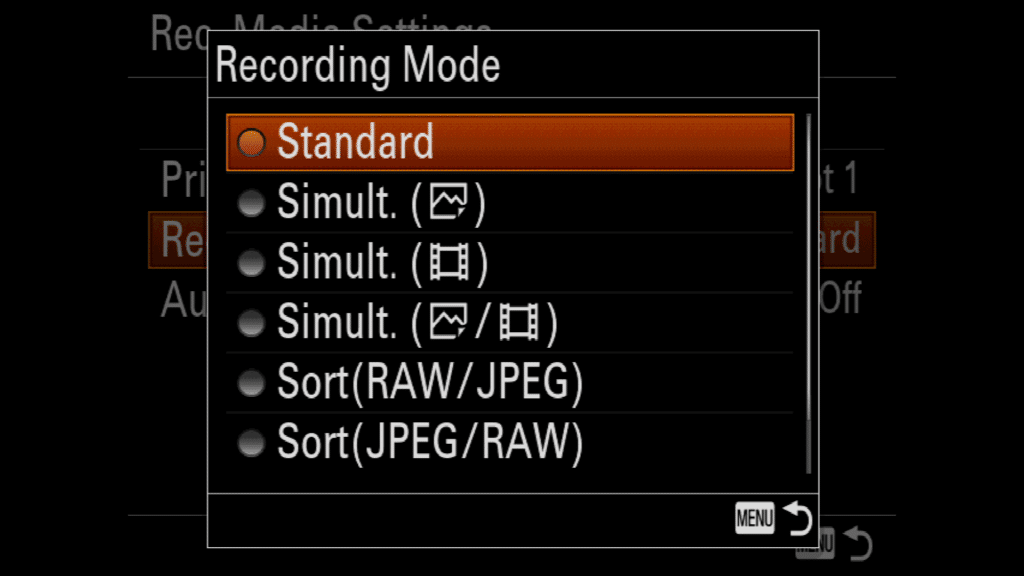
However, if you are like me and you have never had an SD card go bad, there is no point in making two copies of your SD cards when you are out shooting. But that doesn’t mean you don’t have options. If you set “Prioritize Rec. Media” to Slot 1, set “Recording Mode” to Standard and turn on “Auto Switch Media”, you won’t have to worry about switching to a new card when you run out of space in the middle of a shoot. This happens to me often when out in the field and nothing is more frustrating than having the perfect moment pass you by because your primary card was full.
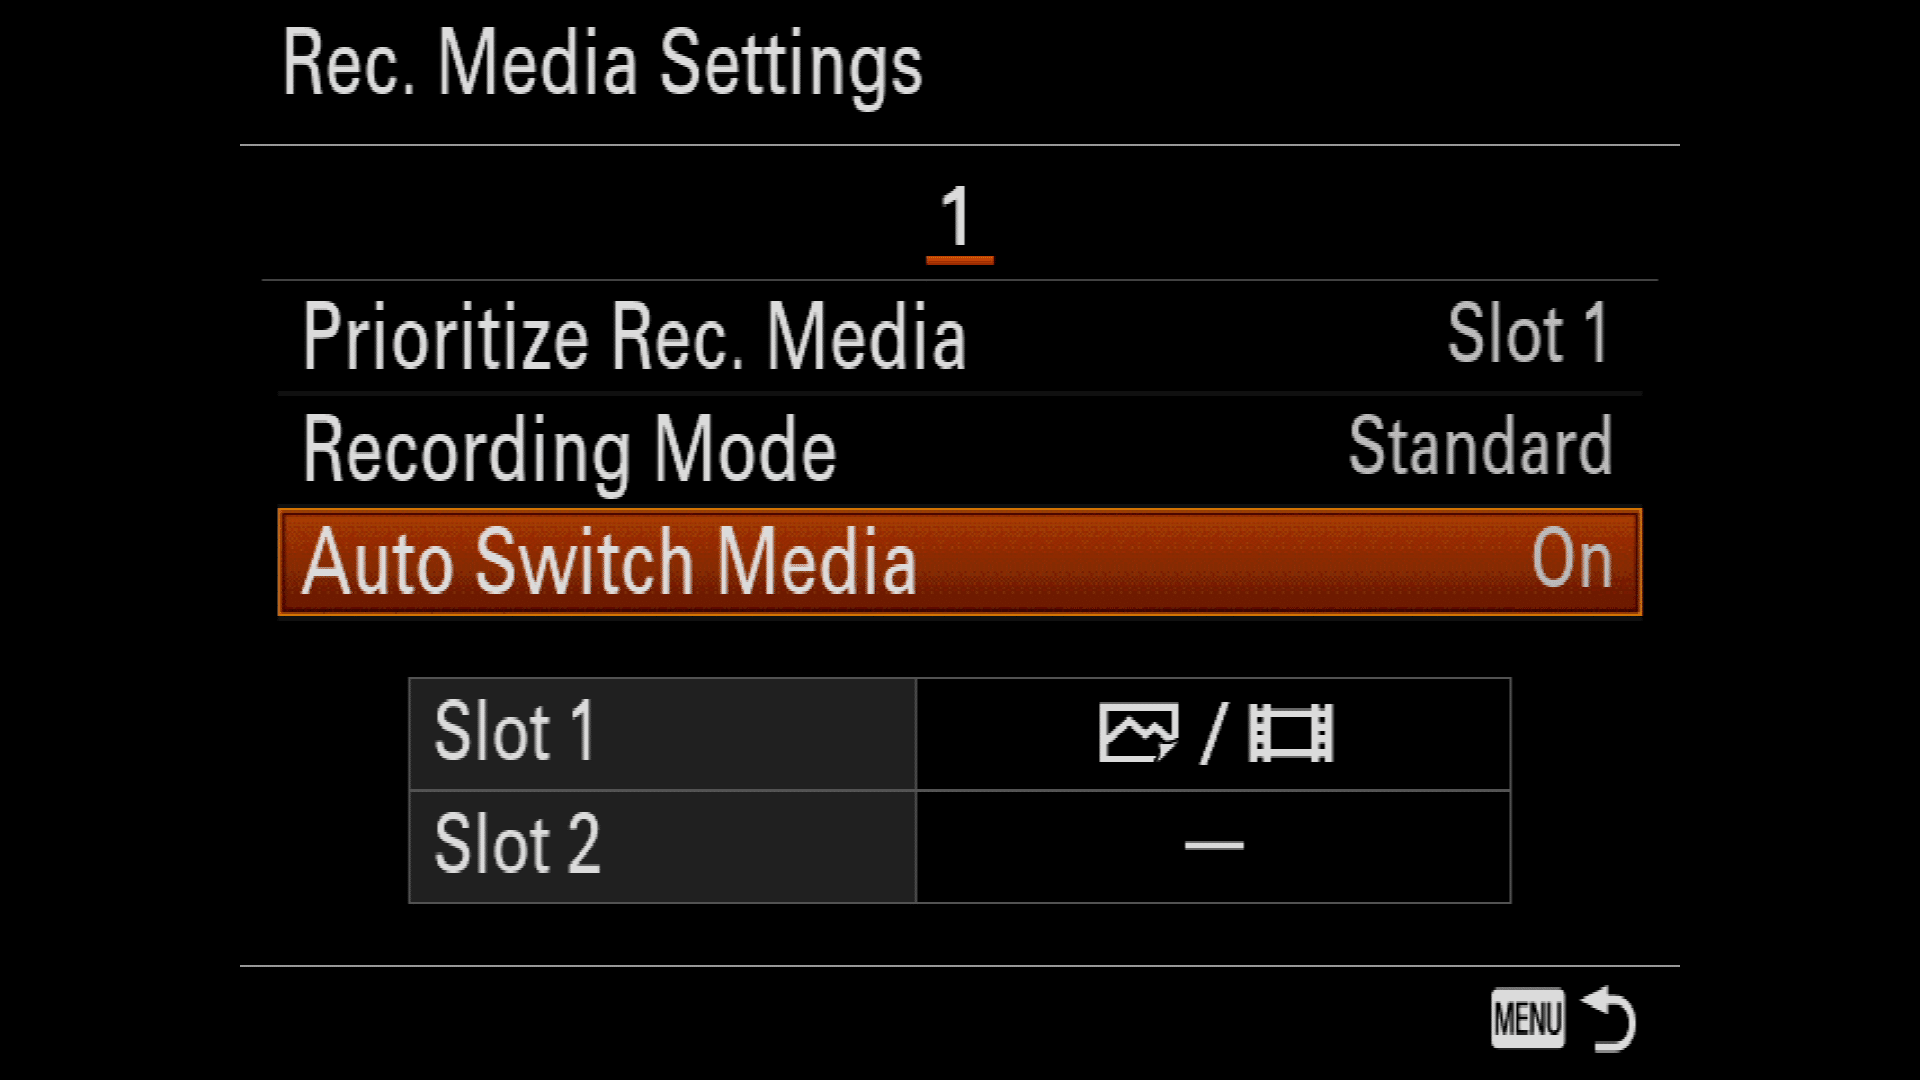
These settings can be found in the Toolbox Menu Tab on Page 6 under “Rec. Media Setting”.
Enjoy True Back Button Focus
When it comes to ergonomics and button layout, one of best things the a7R III inherited from the a9 is the dedicated focus button on the rear of the camera. The idea of back button focus is fairly straightforward. The Shutter Release button on the top of the camera is configured to solely be responsible for taking an image while a button on the rear of the camera is dedicated to achieving focus. By separating these two functionalities, the idea is that you are able to react in a much quicker manner to capture the moment at the exact right time, rather than accidentally refocus your shot by pressing your shutter button halfway down by accident. While I have always customized a button on my Sony mirrorless cameras to have this feature with previous models, the addition of a large dedicated button for back button focus is a welcomed change.
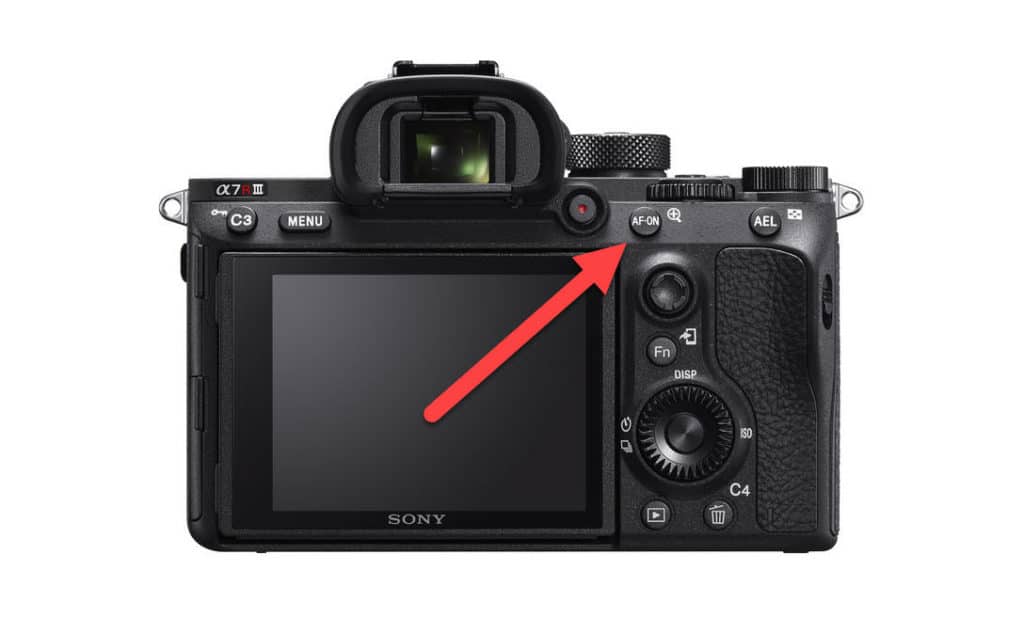
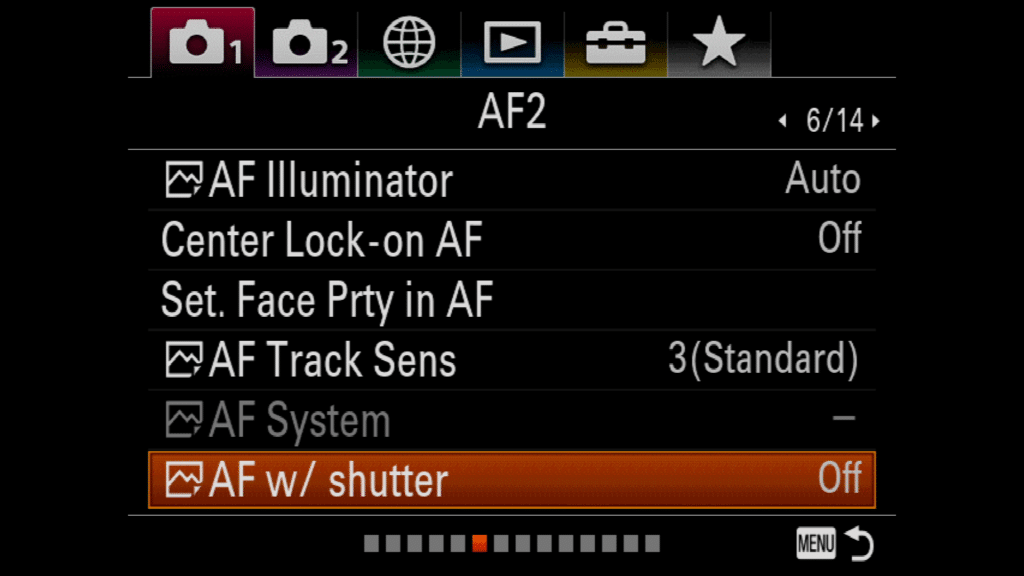
The ‘AF-ON” button is correctly configured by default, but we do need to adjust the “Shutter Release” button so that it too no longer controls your autofocus system. To do this, jump into the Camera Menu Tab (1) and find Page 6. Adjust “AF w/ shutter” to “Off”.
Take Advantage of the New Eye AF Technology
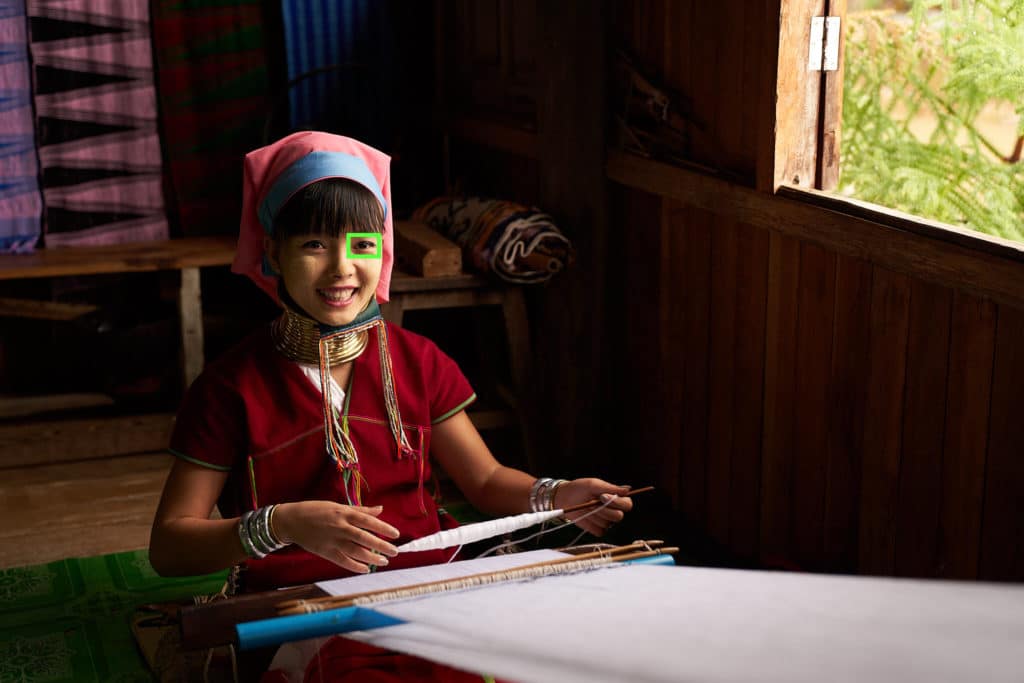
One of the most powerful and often under-rated features found in nearly all Sony mirrorless cameras is known as Eye AF. Essentially it works by quickly changing the cameras AF system to search for and track human eyes, although it doesn’t work very well with animals. The system will continuously track the eye, even as your subject moves around your frame, allowing you to have a much higher chance at nailing tac-sharp eyes with your subjects. While Eye AF has been in Sony’s cameras for a few years, the a7R III has received some pretty incredible upgrades, including the ability to track eyes even when they are closed. Having used this feature in Myanmar earlier this month, I can say that the results blew my mind!
So how do you take advantage of this feature? The key is to customize one of your camera’s buttons to allow you to easily engage it. By default, the center button found in the middle of your rear control wheel is set for Eye AF, but I don’t feel that is a very natural place for you to access it. Two better choices would be either the Auto Exposure Lock Button (AEL) or a press down on the rear joystick as they are both in close proximity to the rear “AF-ON” button that you might already be using for back button focus. However, if those don’t work, you might want to look into using the “Focus Hold” button found on the side of many Sony lenses. This is most likely the button that most of you never knew what it did…let alone that you could customize it’s functionality.
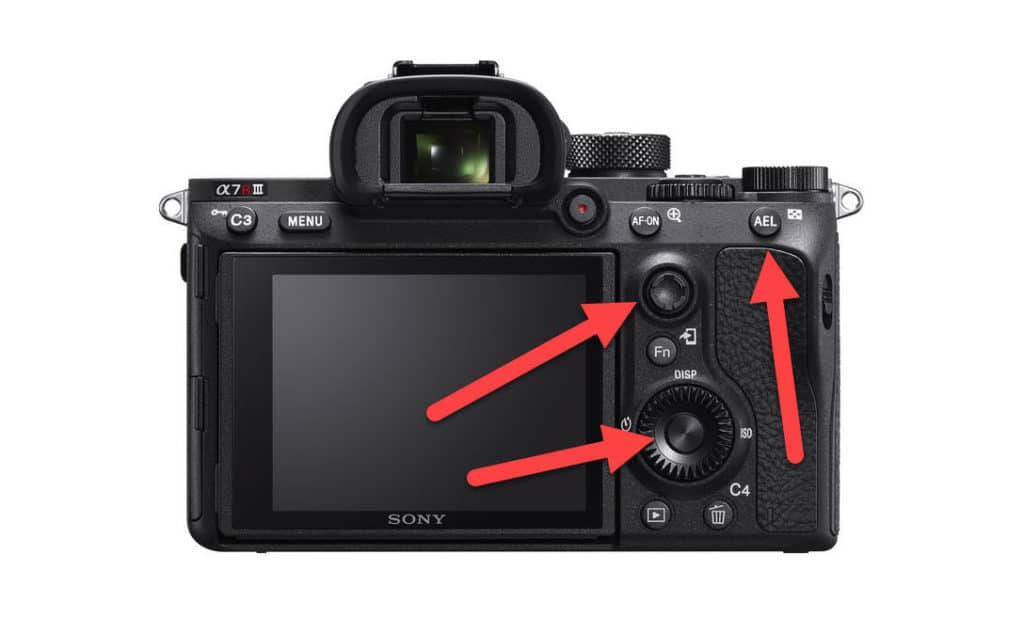
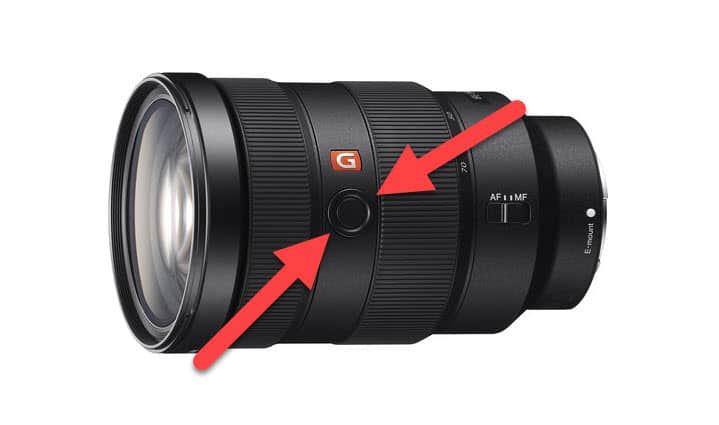
I have an entire section of this blog post dedicated to fully customizing your a7R III buttons and menu systems, so be sure to check it out to learn how to customize this functionality with your own a7R III.
Enable Touch Screen Support
The a7R III marks the first Sony in the a7 series of cameras to have received Touch Screen support, thanks to all of the requests from photographers out there. It joins the likes of the a9 and a6500 within the Sony camera lineup and while the feature is limited to helping you achieve a specific focus point in both Still and Video modes (sorry no menu support at this time), the functionality is actually off by default with the RIII.
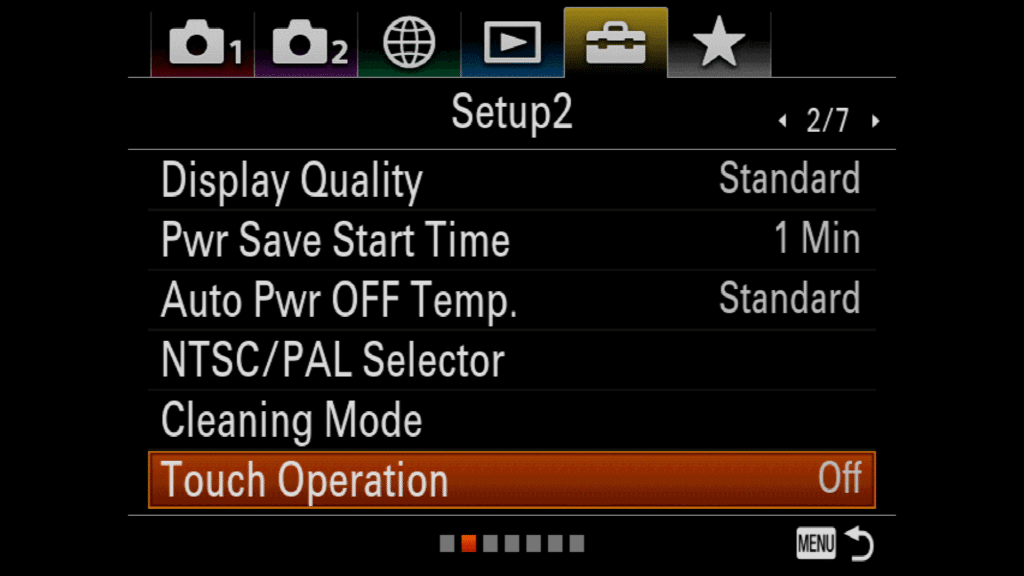
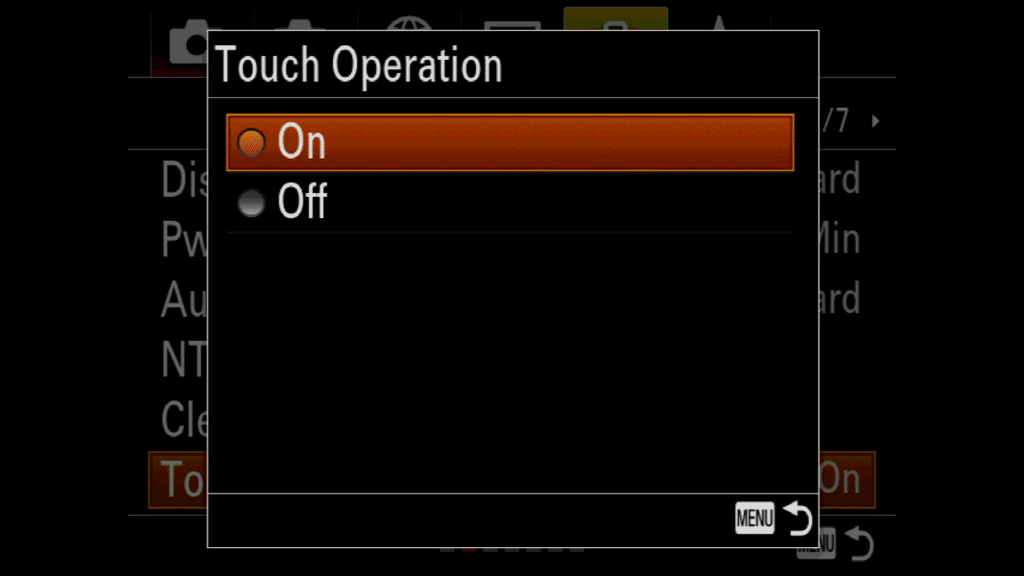
To enable Touch Screen Support, head to the Tool Box Camera Menu and make your way to Page 2. At the bottom of the screen, you will find “Touch Operation”. Change it from “Off” to “On”.
Adjustable Spot Metering Point
Another new feature to the a7R series is the ability to force the cameras light meter to read from an adjustable focus point rather than just the center of your image when you use the “Spot Metering Mode”. Mix this setting with the “Touch Screen” support I mentioned above and you have a handy way of capturing very specific spectrums of light in a scene, such as rays of light piercing through a cloud or the glow of a candle on a wall or face.
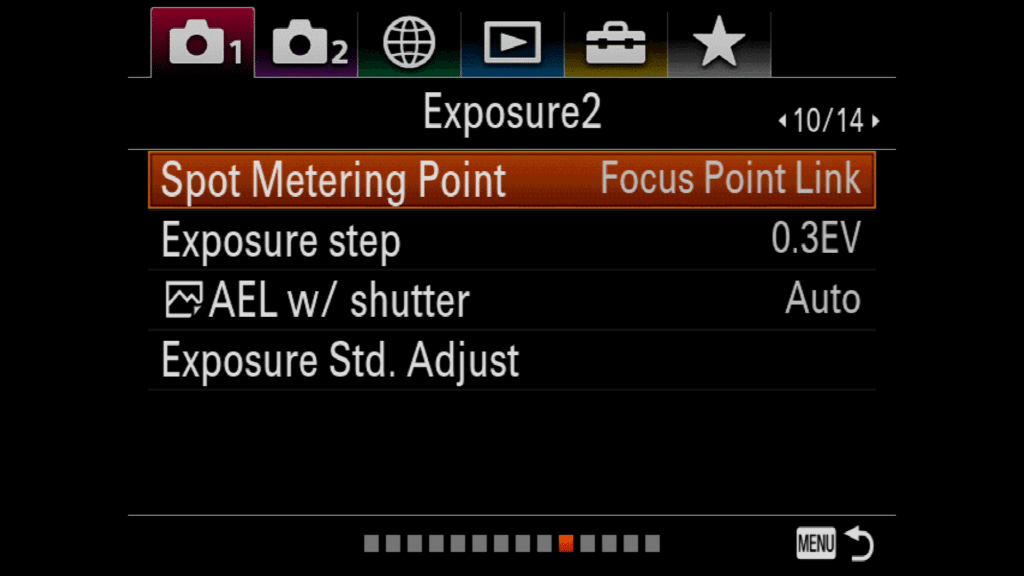
To enable this setting, jump to the Camera Menu Tab (1) and move to page 10. There you will find “Spot Metering Point” at the top of the menu and select “Focus Point Link”.
Articulating Rear LCD Trick
One of my favorite features found on many Sony mirrorless cameras is the rear articulating LCD screen. It gives you a lot of flexibility when you are using your camera at odd angles or perspectives (both high and low), which can be extremely helpful in a pinch. However, one often annoying aspect of this setup is the Proximity Sensor found just above the Viewfinder. As you move your face close to the rear camera, the sensor picks up on this and automatically switches the display to the Viewfinder. This in and of itself is generally a good thing, unless you are trying to use the rear LCD screen and you find the Proximity Sensor simply too sensitive, causing your rear LCD to switch on and off repeatedly as you try to find the right distance.
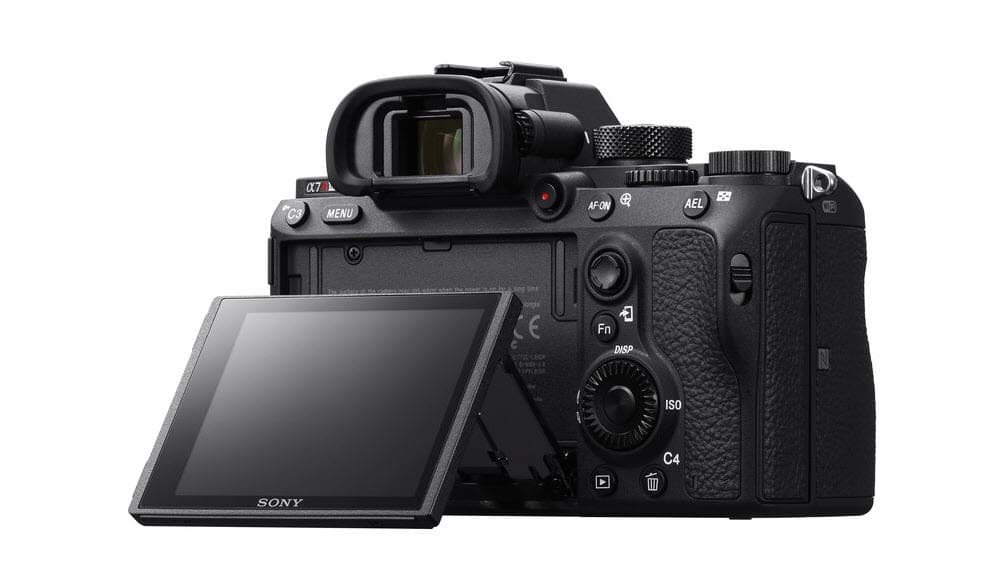
Luckily the Sony a7R III picked up a very subtle fix for this situation. Anytime you pull out the rear LCD (even just a tiny amount) it will automatically disengage the Proximity Sensor, fixing this problem that plagued every a7 camera before it. You are welcome former a7R II owners 😉
HDR Movie Mode
One of the more exciting Movie modes found in the a7R III is its ability to shoot HDR movies which have a much higher dynamic range to work with than standard movies. You will be able to pull out more details in the shadows and highlights then you normally would be able to do.
To shoot in HDR mode, you need to first head to the Camera Menu Tab (1) and find Page 12. At the bottom of the menu you will find “Picture Profile”. Once that has been selected, you can scroll down your list of options until you get to “PP10”. From there you can either shoot in this standard mode for HDR or press the right button on the rear control wheel and further adjust your settings, namely “Gamma” where you can change between HLG & HLG1 – HLG3 for different results.
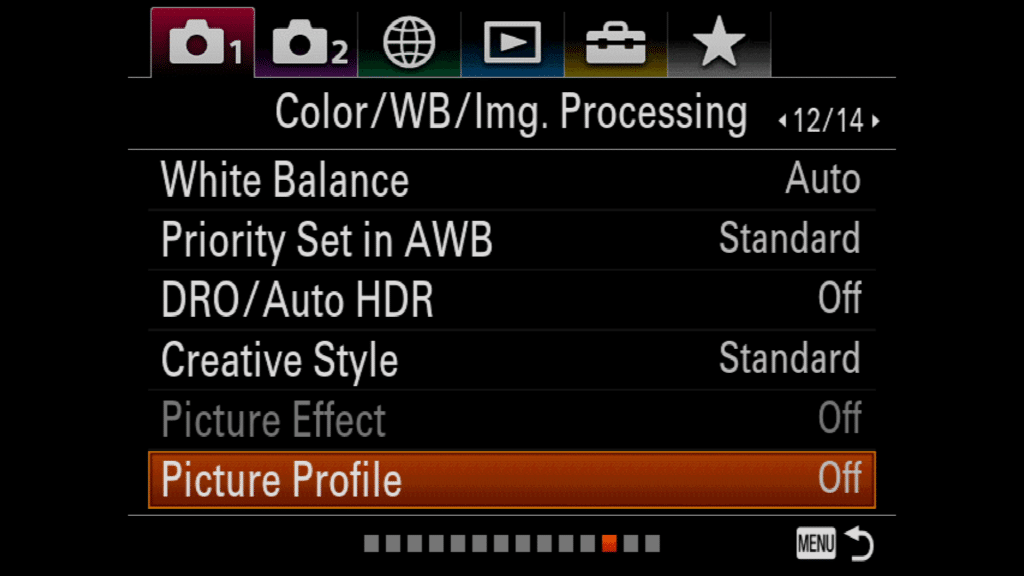
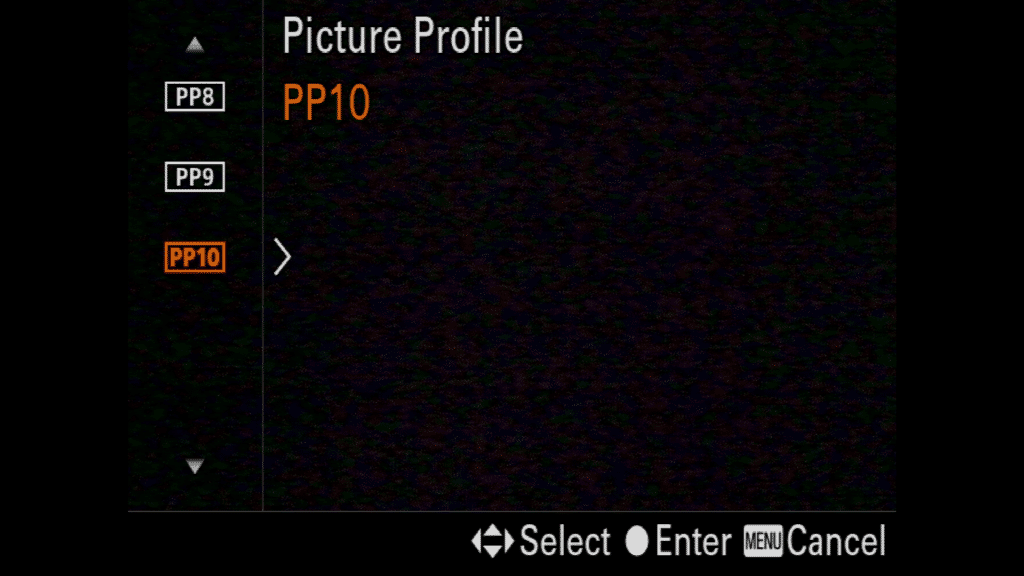
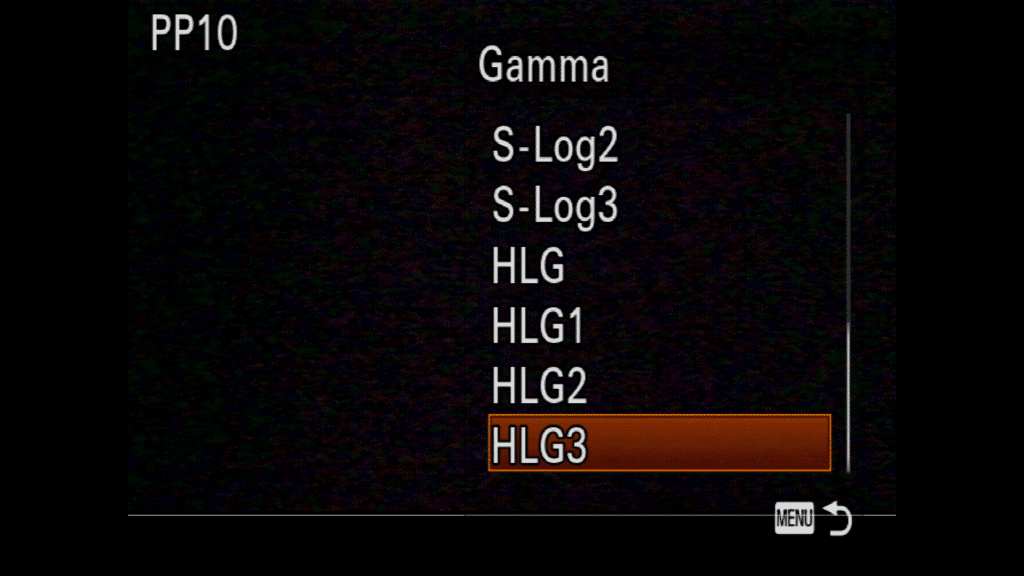
Here is some info straight from the Sony Help Guide for the a7R III…
- HLG: Gamma curve for HDR recording. Equivalent to the HDR standard Hybrid Log-Gamma, ITU-R BT.2100.
- HLG1: Gamma curve for HDR recording. Emphasizes noise reduction. However, shooting is restricted to a narrower
dynamic range than with [HLG2] or [HLG3]. - HLG2: Gamma curve for HDR recording. Provides a balance of dynamic range and noise reduction.
- HLG3: Gamma curve for HDR recording. Wider dynamic range than [HLG2]. However, noise may increase.
- [HLG1], [HLG2], and [HLG3] all apply a gamma curve with the same characteristics, but each offers a different
balance between dynamic range and noise reduction. Each has a different maximum video output level, as follows:
[HLG1]: approx. 87%, [HLG2]: approx. 95%, [HLG3]: approx. 100%.
Adjust the Finder/Monitor Displays
In addition to inheriting the “no blackout” shooting experience from the a9, the a7R III has drastically improved the rear LCD and Viewfinder displays from the Mark II model. In fact, I think only the a9 can compete when it comes to the quality of both displays. For both the Viewfinder and the Rear LCD, you will want to make sure that Display Quality is set to “High”. This increases the resolution of the displays so that you see alot more texture fine detail than before, especially for those that like to pixel peep with their images. In addition, you will want to make sure the “Finder Frame Rate” is also set to “High”. This will come in handy when you are photographing fast moving objects, giving you a much smoother viewing experience when tracking subjects.
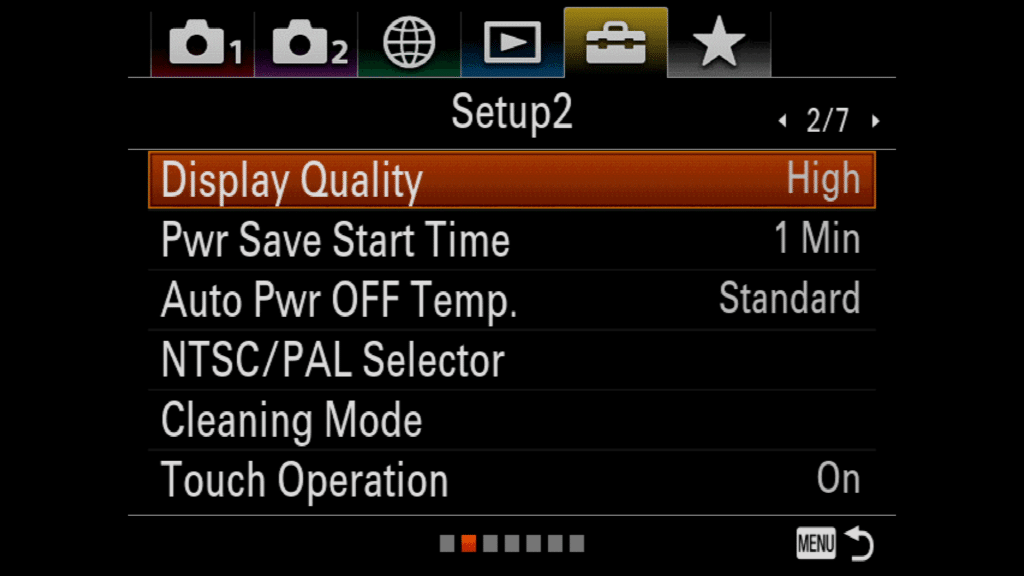
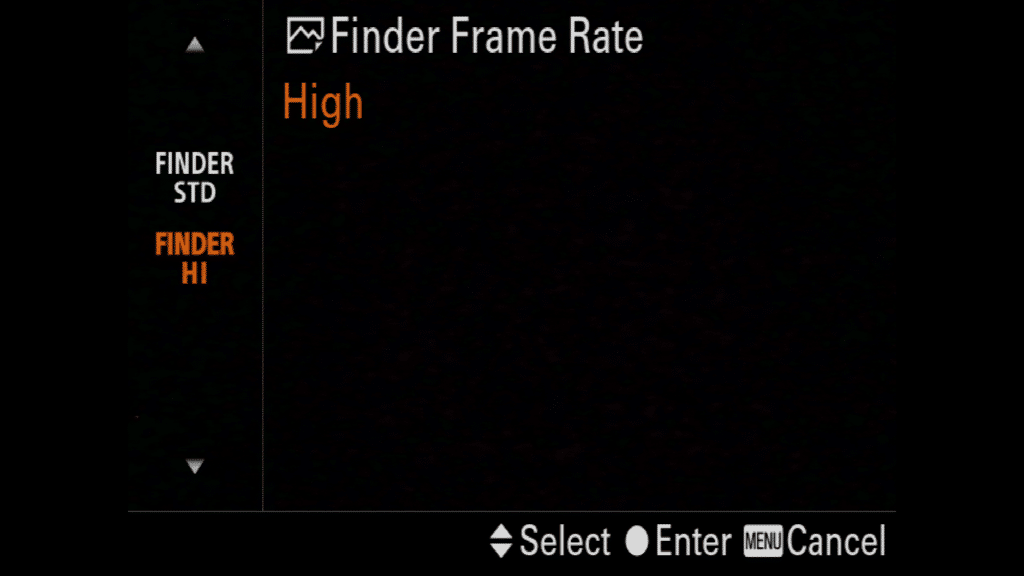
These features can be found in the Tool Box Menu on Page 2 under “Display Quality as well as the Camera Menu Tab (2) on page 6 under “Finder Frame Rate”.
Enable GPS Image Tagging
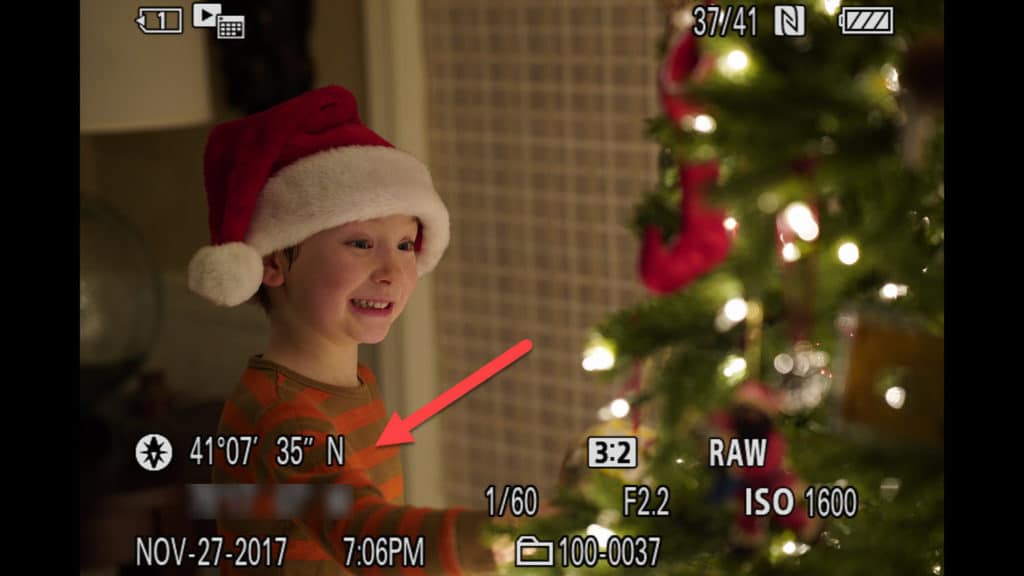
While many travel and landscape photographers have been asking for a dedicated GPS device to GeoTag their images taken with Sony mirrorless cameras, Sony has provided the next best option on the RIII. Instead of a device that you have to purchase separately, Sony has added built-in Bluetooth based GPS tagging into the Sony Play Memories mobile app (Android & IOS). Once you link your camera to your phone through the app, the GPS location from your phone is embedded into the RAW & JPEG files you capture with the a7R III. While it takes a minute or two to get things setup, things run pretty smoothly from there when you want to turn on the feature.
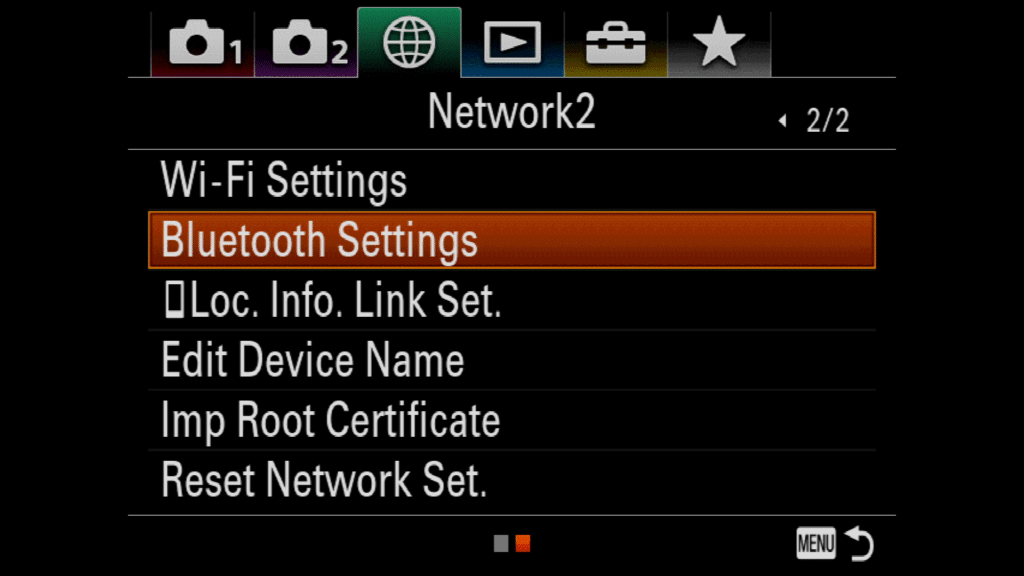
The first thing you need to do is turn on the Bluetooth setting on your a7R III by going to the Network Setting Menu Tab and moving to Page 2 “Bluetooth Settings”. Once you have turned it on, you need to select “Pairing” on the same menu screen to allow the a7R III to be discovered by your mobile phone.
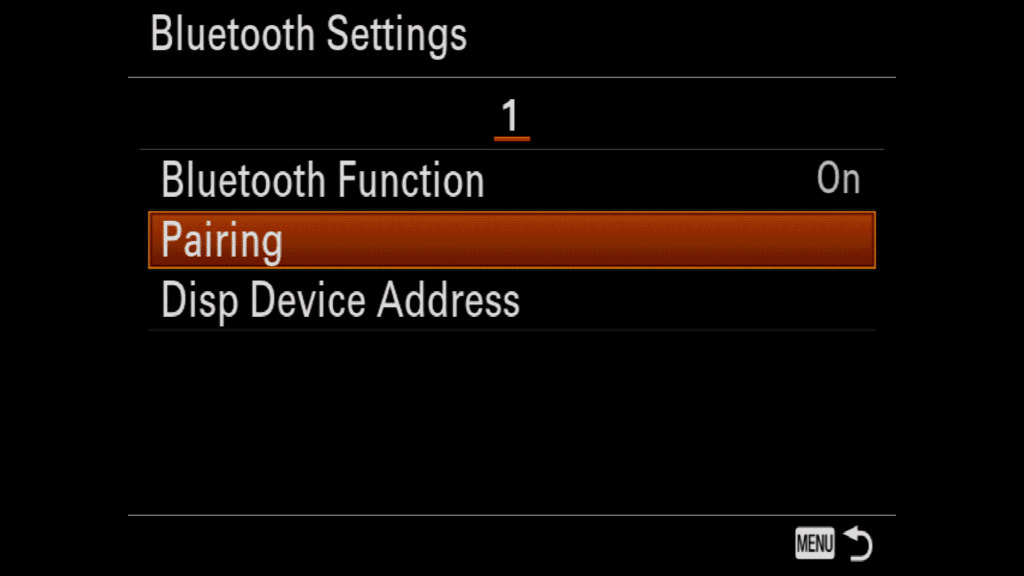
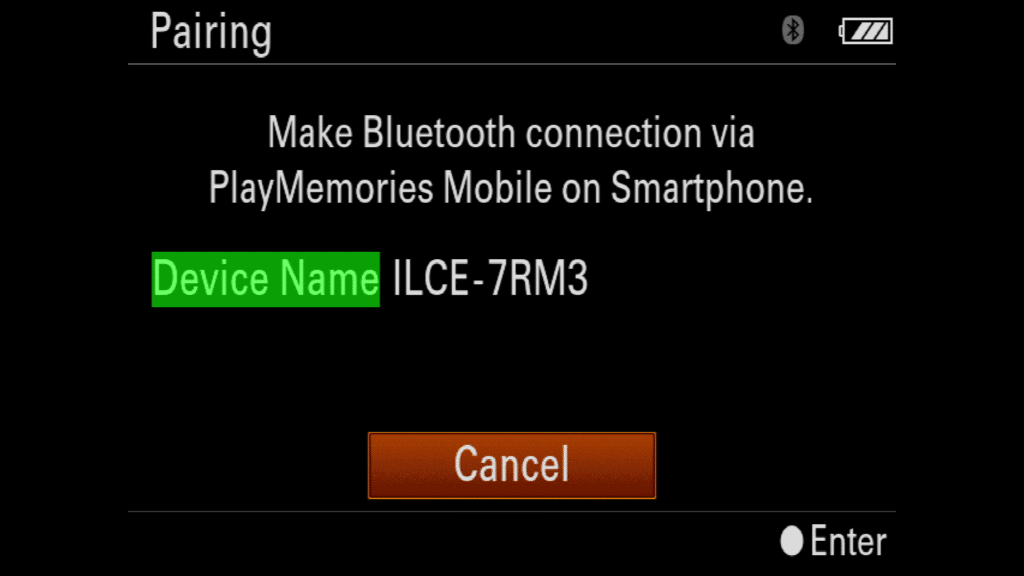
On your phone, you will want to open up the “Sony Play Memories” app and select “Location Information Linkage”. Once there turn on “Location Information Linkage” by tapping the toggle on the right. Next, you need to tap the “Set the Camera” button where you should see “ILCE-7RM3”. Once you have selected the RIII on your phone, you will need to verify things back on your Rear LCD of the Mark III by hitting the “OK” button. Now that the pairing is complete, you can hit the “Menu” button to go back to the Network Settings Menu and select “Loc. Info Link Set” and make sure it is set to “On”.
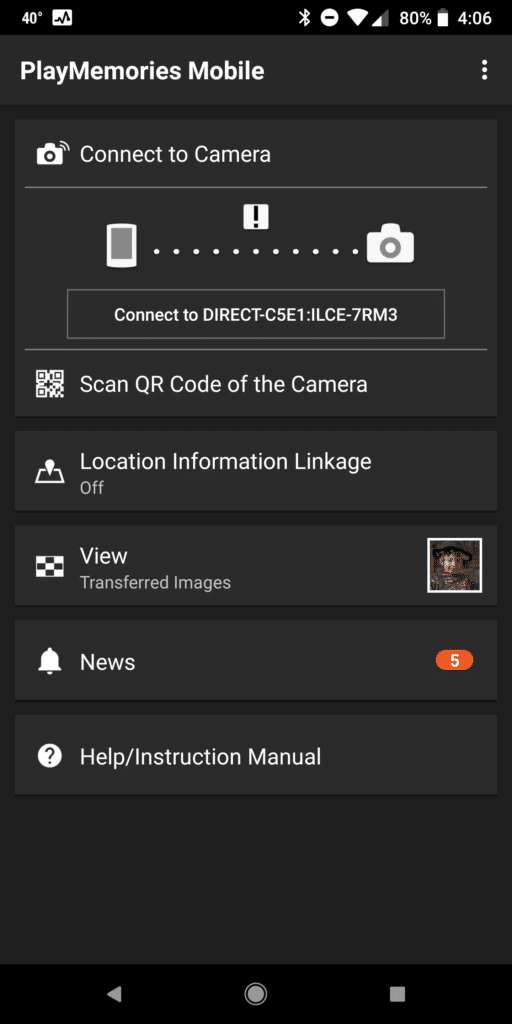
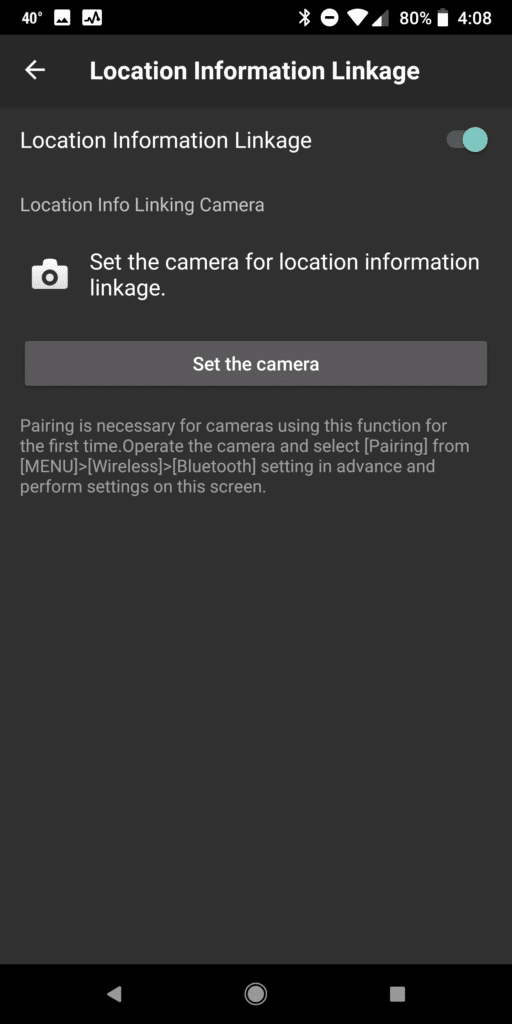
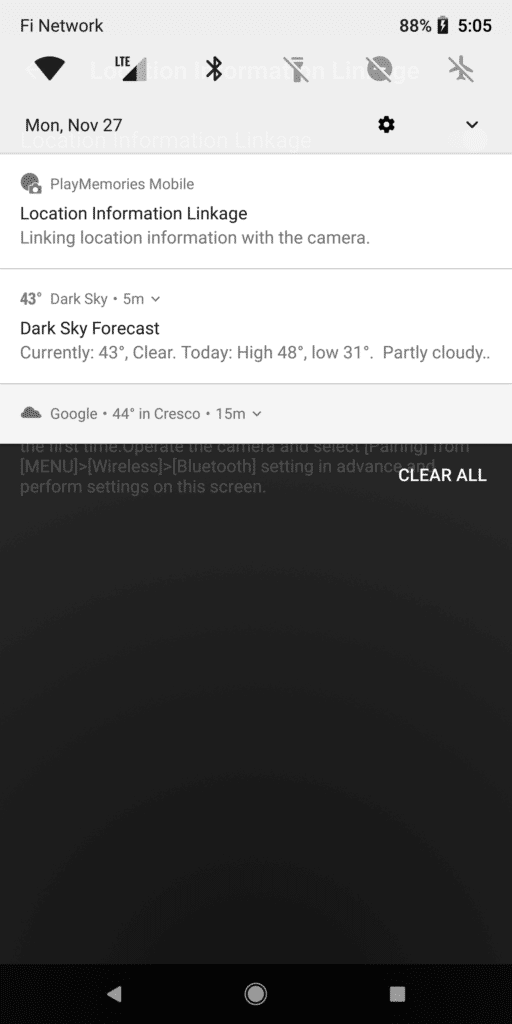
Now all you need to do is open up your Play Memories App on your mobile device to make sure you have a connection and then start shooting away. Do note that if your camera goes to sleep, it will temporarily break the connection with your phone, but it should re-establish that connection fairly quickly when it wakes up.
Taking Advantage of Pixel Shift Technology
Another big addition to the Sony a7R III is known as “Pixel Shift Technology”. While I won’t get into too much detail, the general premise is that most camera sensors have gaps in the pixel image data they capture, forcing the camera’s sensor and computer to help fill in those gaps with highly educated guesses when it comes to color and texture detail. With Pixel Shift, the goal is to fill in those “gaps” with RAW image data by taking four images in a row with a 1-pixel difference between each of them. You then take those four images and merge them together on your computer to get some fairly impressive results when it comes to the depth, texture, and color found in your images. The tradeoff is that you not only need to shoot this from a tripod, but there can’t be any movement in your scene either, otherwise, the results can be blurry.
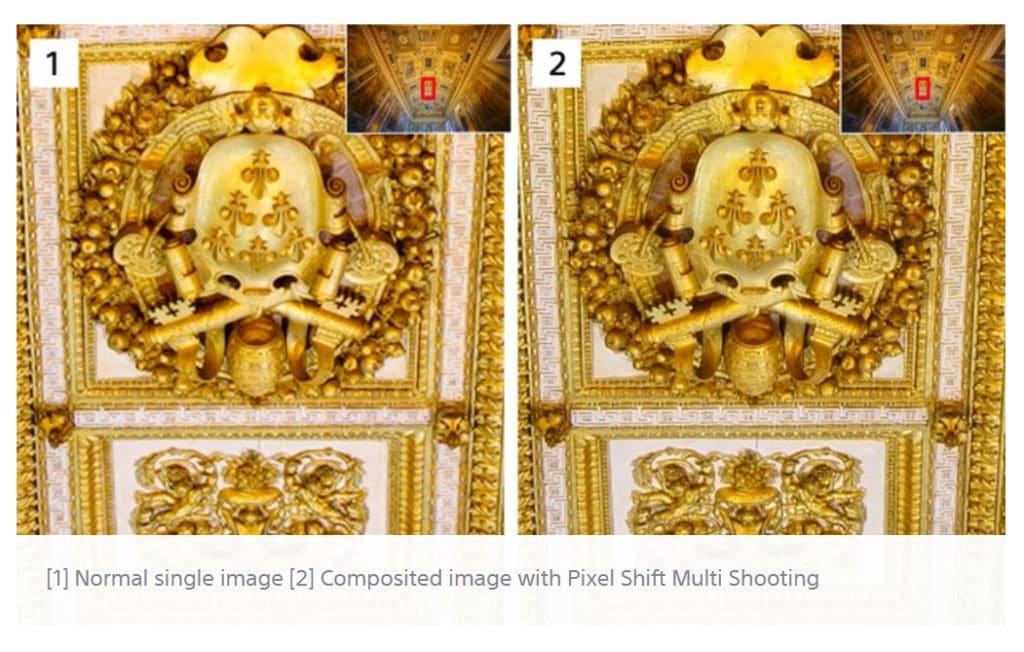
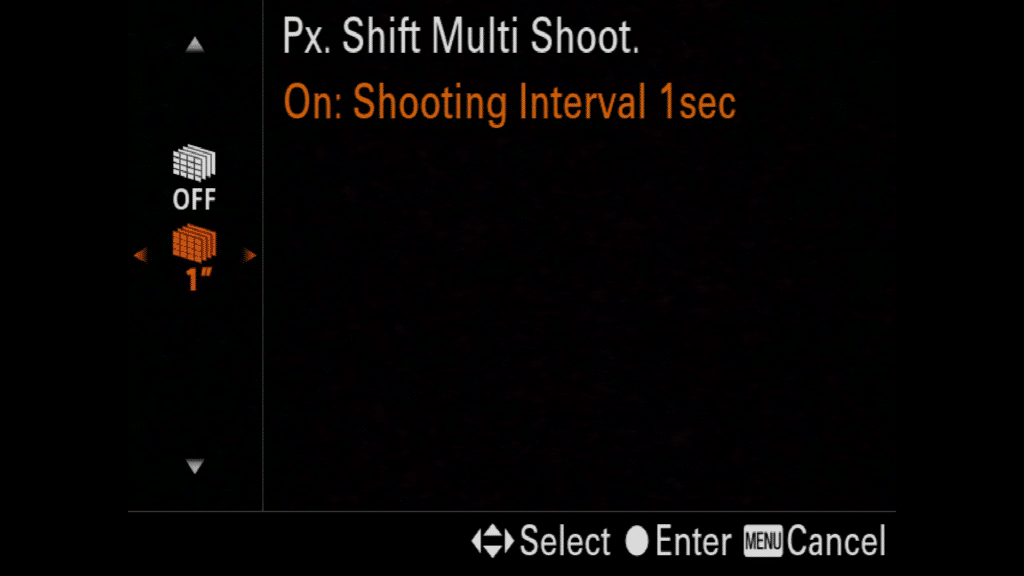
Another challenge is that this feature is buried inside the Camera’s Menu System, which might cause some unnecessary delays when you want to use it out in the field. To have quick access to this setting, you might want to customize its functionality to one of the buttons on your camera, such as the C4 button. If you have other plans for that button, you could also set “PX. Shift Multi Shoot” mode to the Fn (Function) button/menu found on the back of your camera. Either way, this feature is one that you might want easy access to. In the next section of this blog post, you will see how to customize the camera’s buttons as well as the Fn. menu system.
Rate & Protect Images
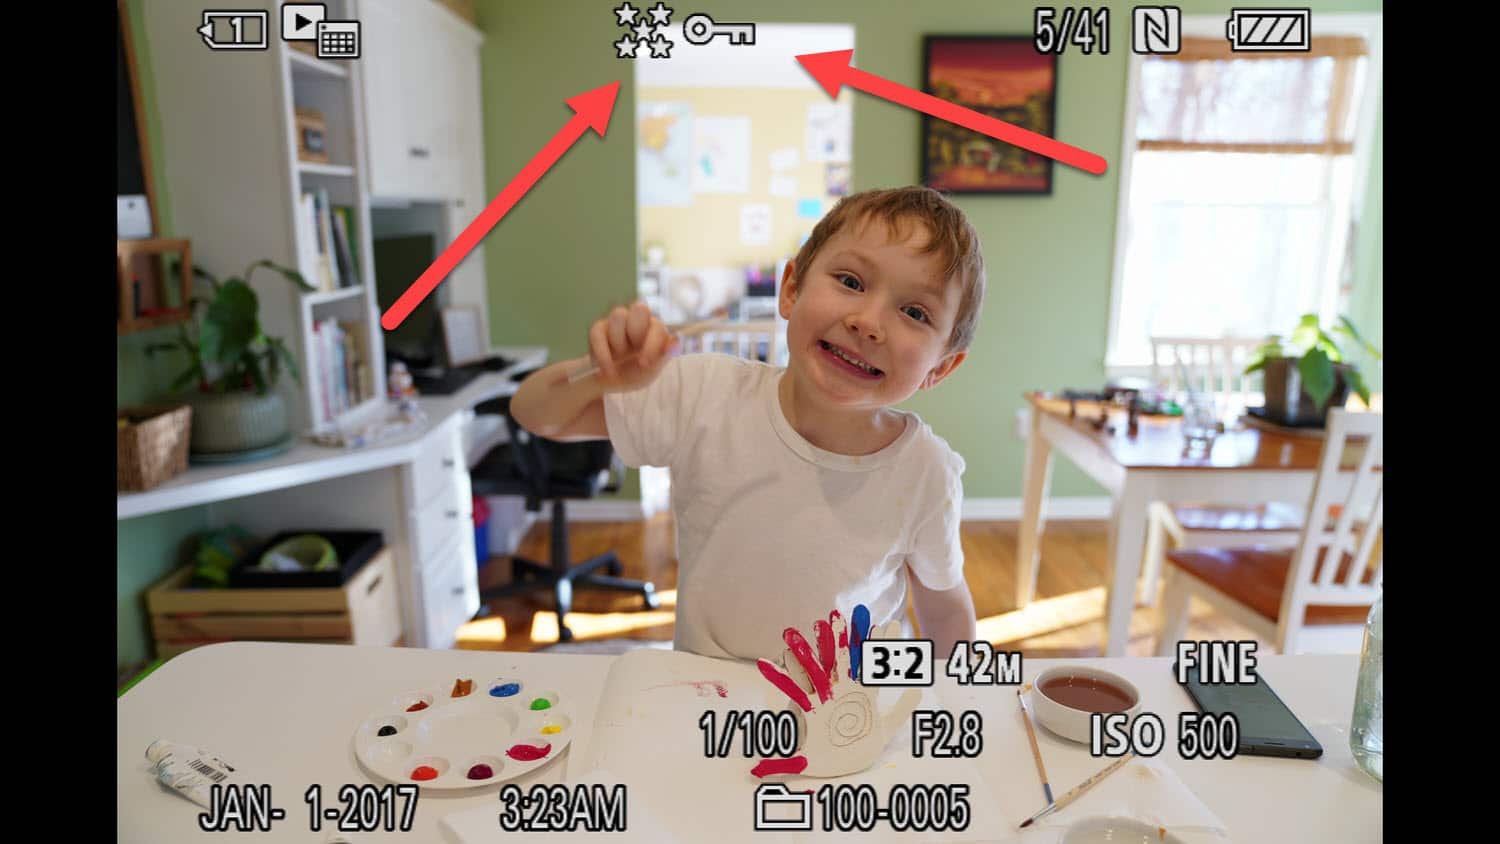
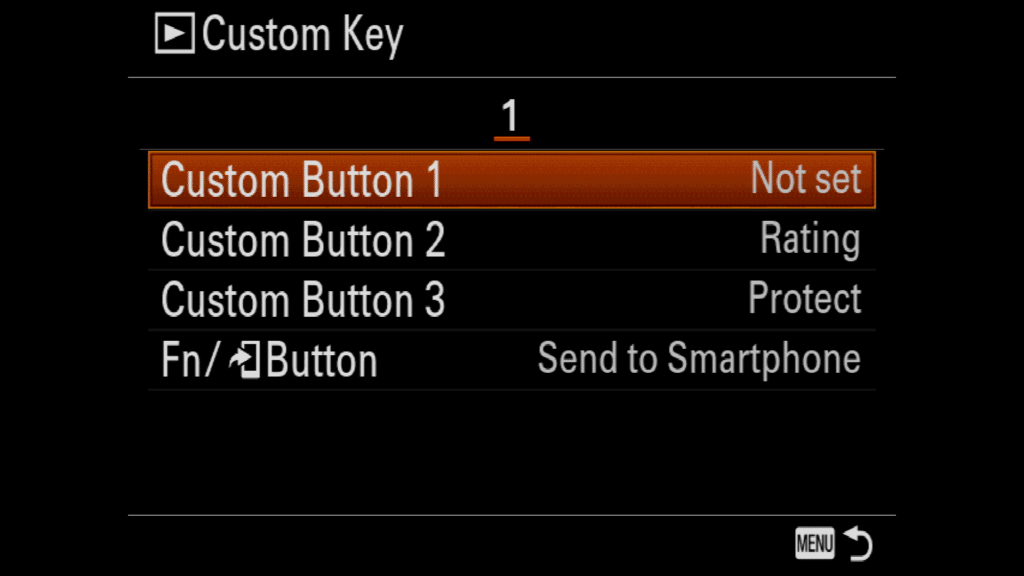
A small but important feature missing from Sony cameras until now has been the ability to Rate and Protect images from being deleted while in camera. While you are reviewing your images, you can now lock your images, making them impossible to delete (outside a Format of your SD card). This is done by hitting the “C3” button near the “Menu” button in the upper left-hand corner of the back of your camera. The C3 button even has a “Key” logo to showcase this feature.
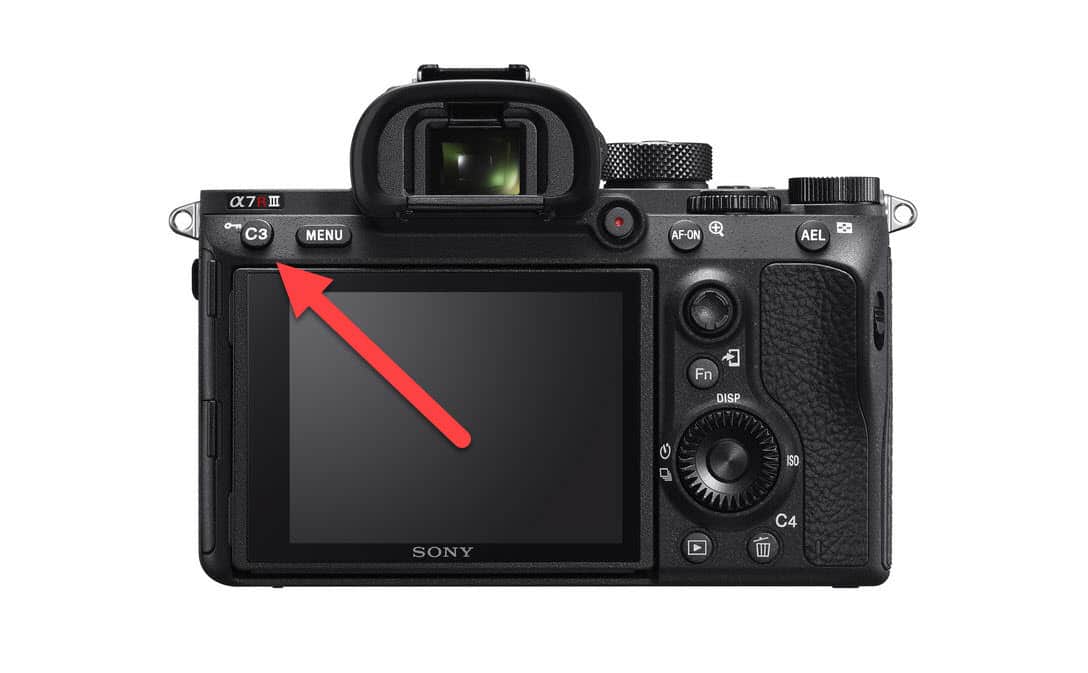
Additionally, you can also customize the C1 or C2 button to allow you to rate your images from a 1-5 star rating. These ratings will carry over into your preferred Photo Editing/Organizing app of choice, allowing you to easily get a head start on sorting through what you feel are some of your best images from a given shoot. In the next section of the blog article, I will show you how to customize these buttons.
CUSTOMIZING YOUR SONY A7R III
Easily one of the best things about Sony mirrorless cameras is that you have the ability to customize nearly every button or menu system on your camera, and the a7R III is no different. From the physical buttons on the camera to the Fn. & My Menu options there are a ton of ways to customize your a7R III. If you customize your camera in the right way, you should rarely if ever need to go into the standard Sony Menu System, an occasional sore point for some photographers moving to Sony from Nikon or Canon.
CUSTOMIZABLE BUTTON LAYOUT
One of my favorite things to do with a new Sony mirrorless camera is to customize the experience of shooting with the camera to match my needs as a landscape, travel and humanitarian photographer. While the Canon and Nikon’s functionality and button layout has mostly stayed the same over the years and companies like Fuji have taken advantage of offering tons of physical dials, Sony has worked hard to give you the ability to make your camera your own, instead of like everyone else’s. If you don’t like how things work right out of the box, you can customize nearly every button and dial found on the camera body.
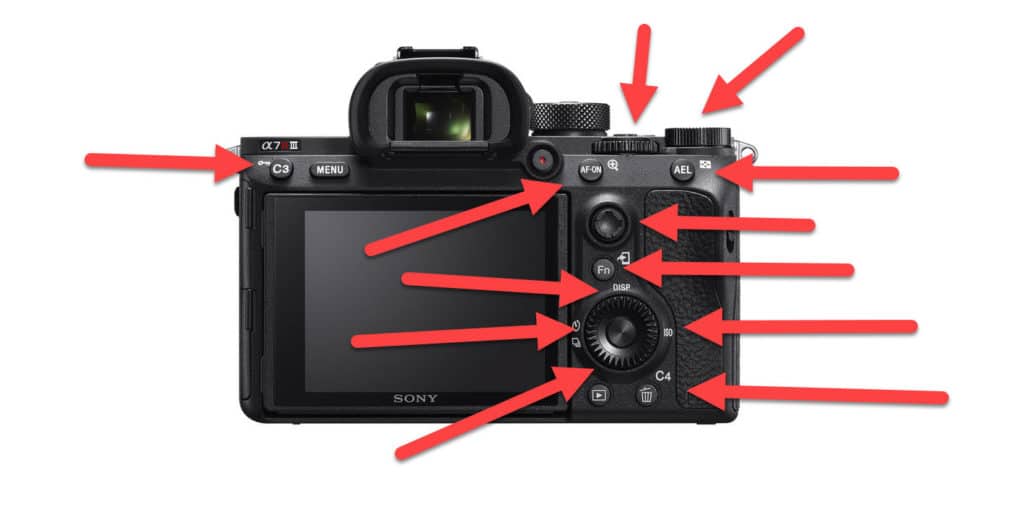
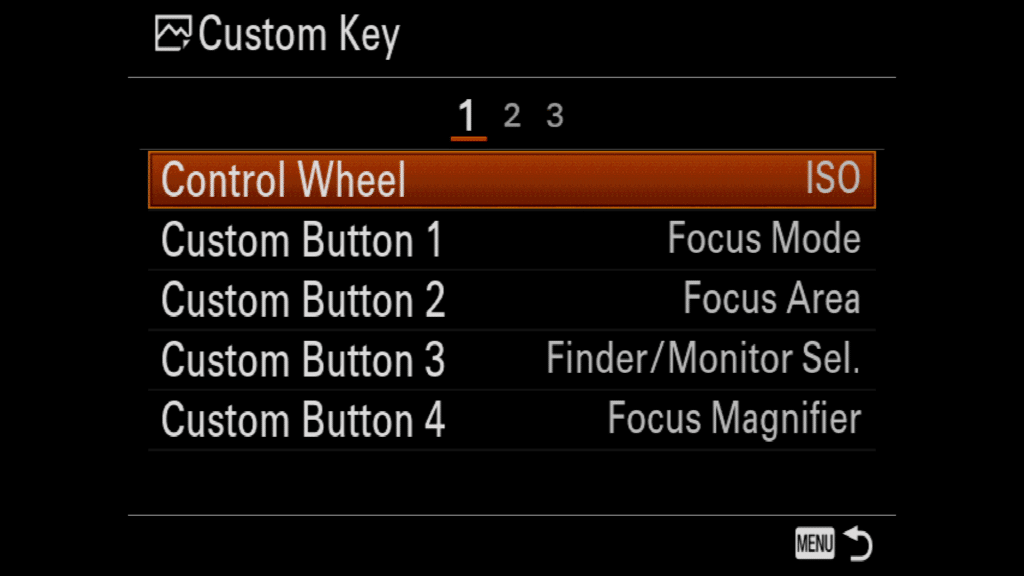
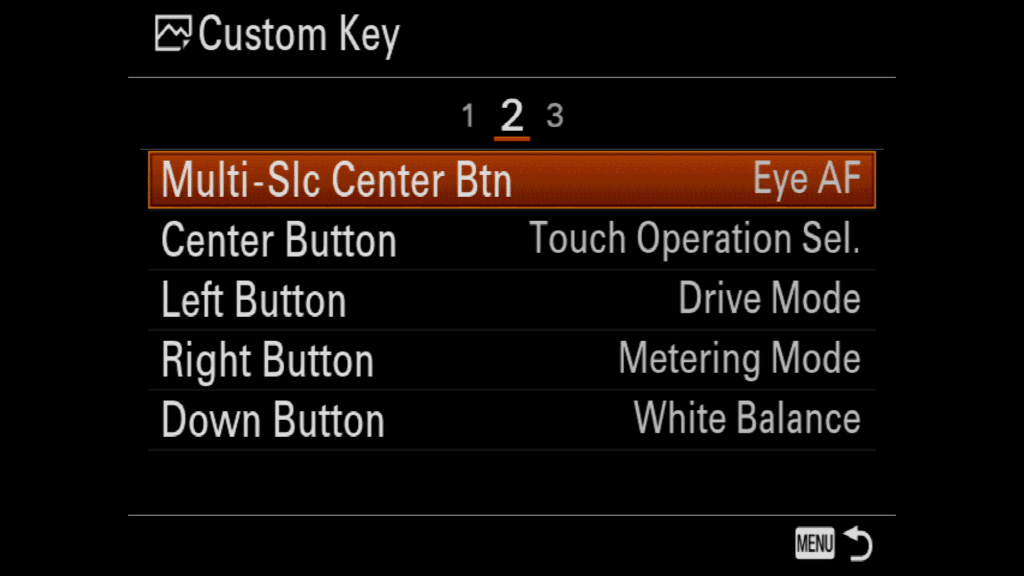
New to the a7R III is the ability to customize button functionality separately when you are in the Stills and Video modes. While I don’t personally leverage this feature, it is a nice touch for those that need drastically different workflows for still and video work. Additionally, you can now also customize a few different buttons differently when you are in Playback mode, although this is mostly reserved for the new protect and star rating system. For my a7R III, this is how I have customized my button layout…
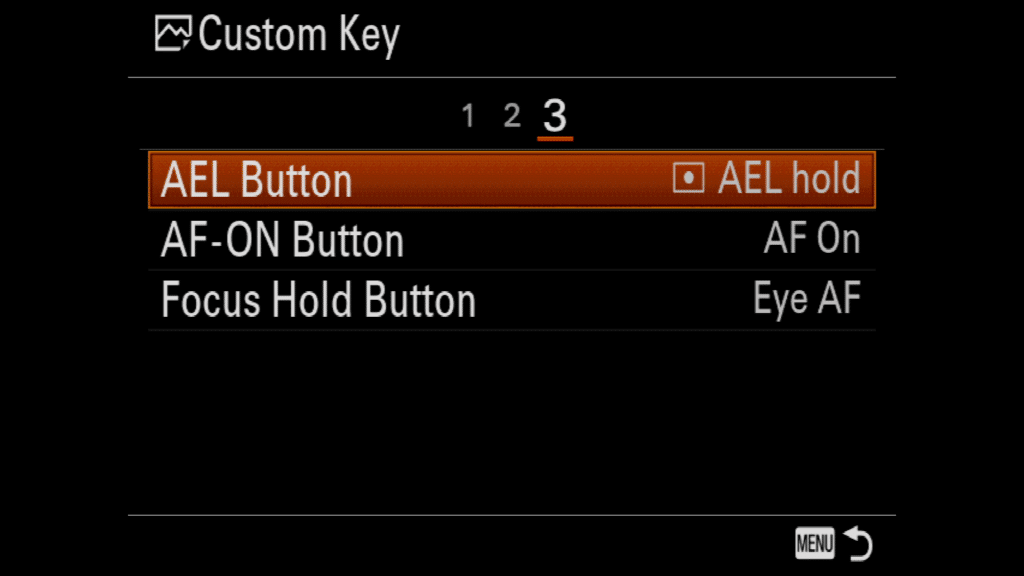
When it comes to image and video playback, this is how I have my 7R III setup.
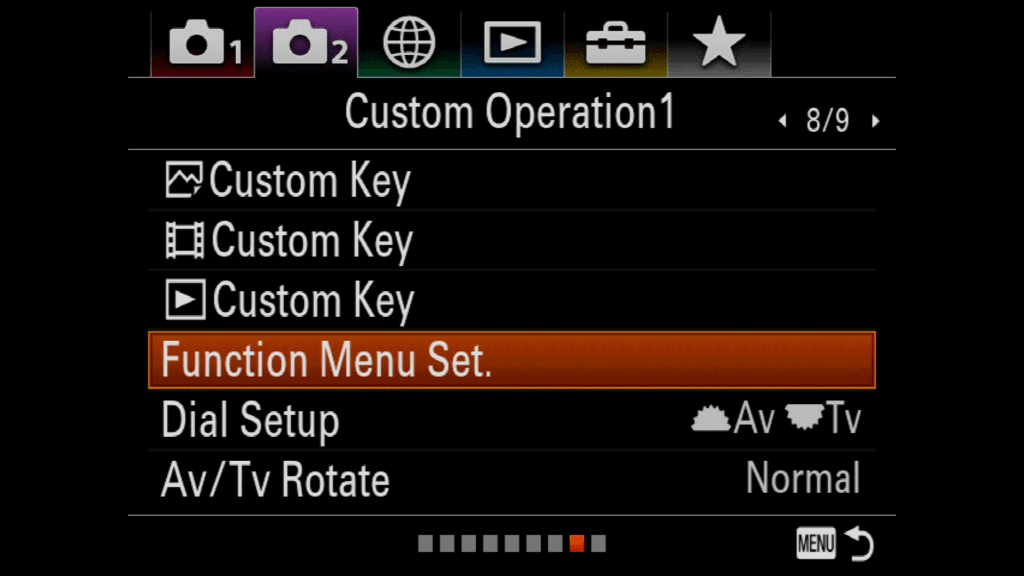
To customize your own a7R III, jump into the Camera Menu Tab (2) and find your way to Page 8.
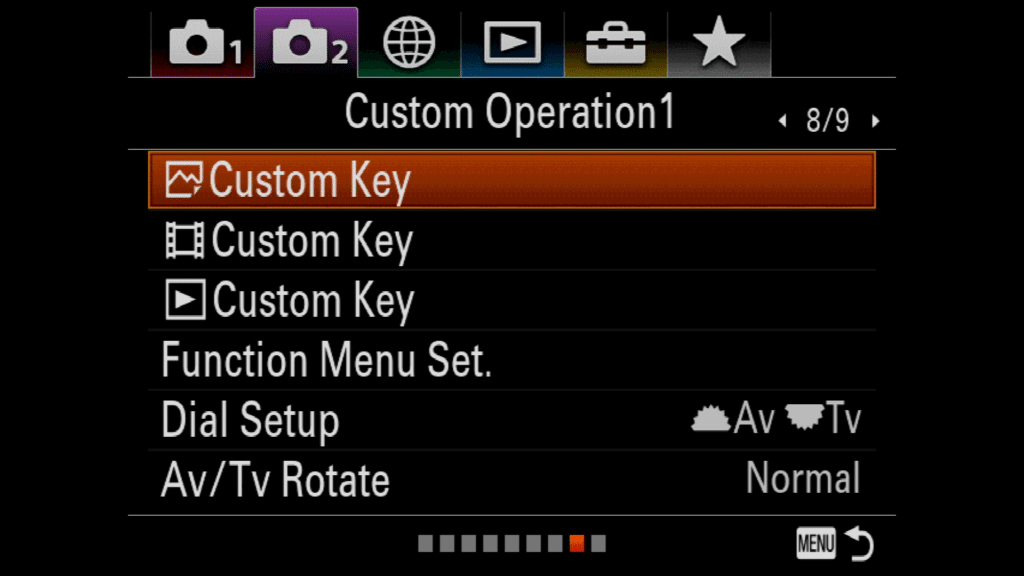
Here you will find the “Custom Key” config menus for Stills, Video, and Playback listed at the top of the screen.
CUSTOMIZE YOUR FN MENU
The second most important customizable element of the a7R III is the Fn or Function Menu. This is where I make sure I have quick and easy access to all of the camera settings I might need to shoot both Stills & Video that I didn’t already assign to a custom button. With the Fn menu, you have the ability to assign 12 functions/settings, 6 on the top row and 6 on the bottom. Since I shoot a mixture of stills and video projects throughout my travels, I decided to make video settings the focus of the upper Fn menu and assign still photography based settings to the bottom or lower row to keep them organized and separate.
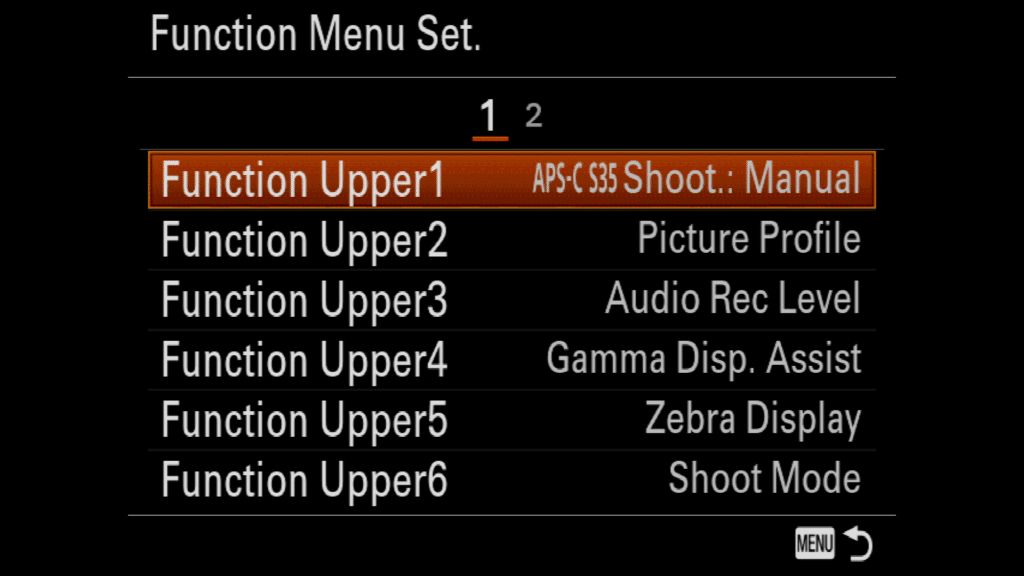
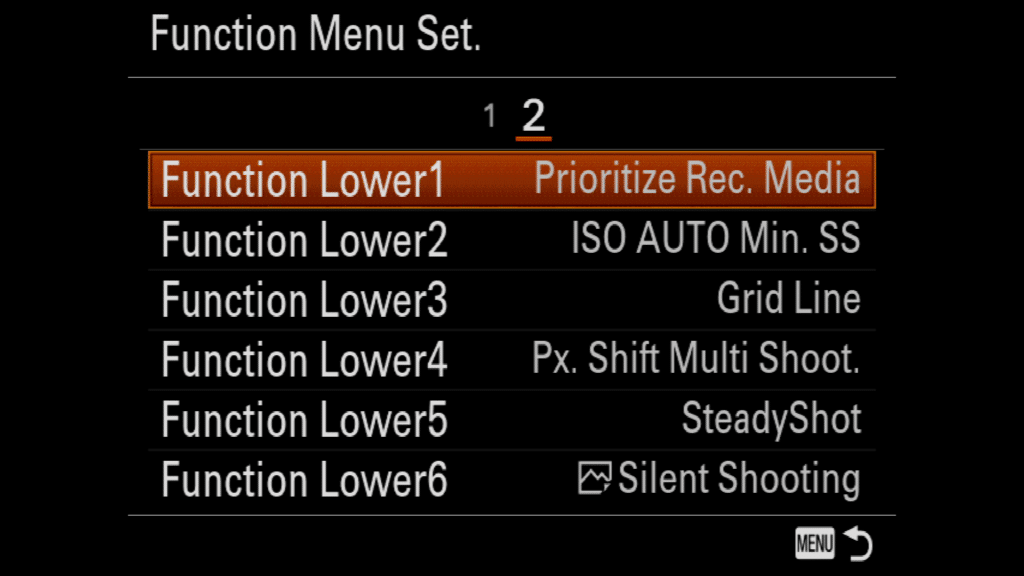
Upper Row
- APS-C S35 Shoot. : Manual – Allows me to easily switch between Full Frame and APS-C Super 35 Mode
- Picture Profile – Gives me quick access to change the Picture Profile of my videos including sLog2, sLog3 and the new HDR profiles
- Audio Rec Level – Allows me to turn up or turn off Audio Recording on the camera
- Gamma Disp. Assist – Simulates the processed look of videos shot using S-Log or HLG video modes to help view the extremely low contrast video footage on camera
- Zebra Display – Allows me to turn on Zebra setting common tool used by videographers to showcase overblown highlights in video
- Shoot Mode – Displays the shooting mode I am currently in such as Manual, Program, Shutter Speed Priority or Aperture Priority
Lower Row
- Prioritize Rec. Media – Allows me to choose which SD card slot to write image to
- ISO AUTO Min. SS – Quickly adjust the minimum shutter speed to use in conjunction with Aperture Priority at ISO Auto
- Grid Line – Turn on or turn off Grid Lines such as the Rule of Thirds
- Px. Shift Multi Shoot. – Engage the Pixel Shift functionality *requires a tripod and static non-moving subjects
- Steadyshot – Turn on or turn off Steady Shoot (IBIS). I can be helpful to turn this off when shooting from a tripod
- Silent Shooting – Quickly engage Silent Shooting where the camera doesn’t make a sound when capturing an image
To customize your own Fn. Menu head to the Camera Menu Tab (2) and navigate to Page 8. There you will find “Function Menu Set.”
SETUP YOUR MY SETTINGS MENU
A new addition to the a7 series is the ability to customize one of the menu tabs inside the a7R III main settings menu. This is something that I have missed from my Canon & Nikon days and I am glad that it has come to Sony. While I tend to fully customize 95% of my needs into my a7R III button layout and the Fn. Menu, there are a few features or settings that you simply can register in those areas. For anything like that, the new “My Settings” Menu is where you will want to look.
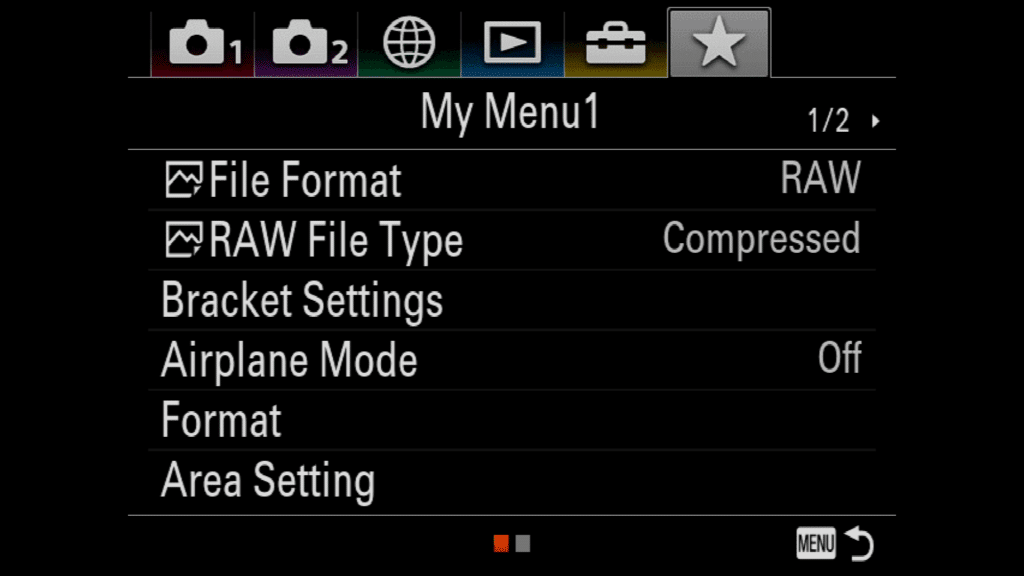
For my personal a7R III, I have the following settings registered in this customizable menu…
- File Format – Allows me to easily move back and forth between RAW, JPEG or RAW & JPEG.
- RAW File Type – Here I can quickly switch between Compressed and Uncompressed RAW File Types
- Bracket Settings – Here I can adjust the self-timer when I am shooting brackets from a tripod
- Airplane Mode – If I really want to save battery life, I can make sure all wifi and Bluetooth functionality is turned off
- Format – When I need to format a new or used SD card
- Area Setting – When traveling, I can easily change the time zone my camera is in so that my time stamps are always accurate
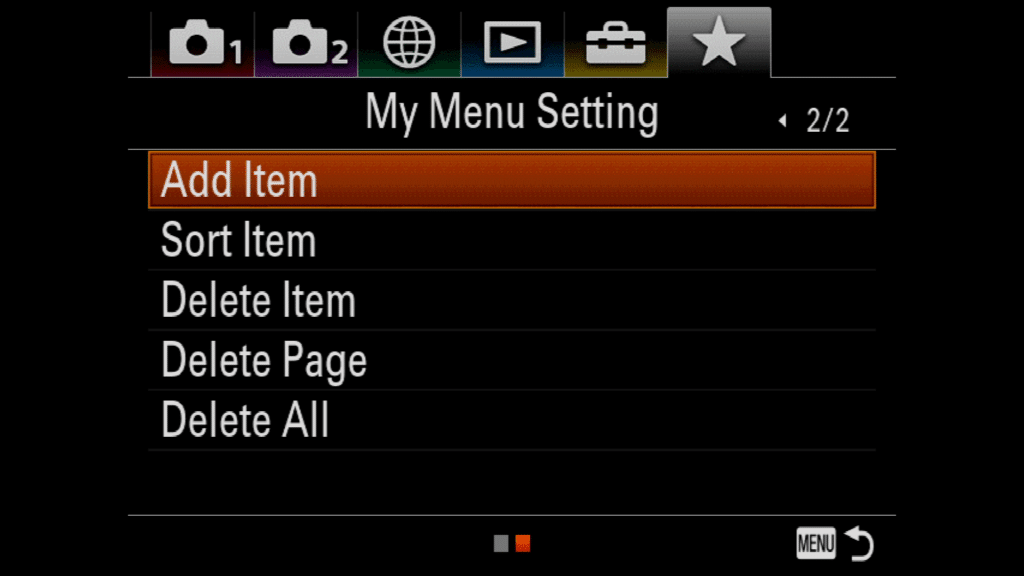
To customize your own “My Menu” simply navigate to the “My Menu Setting” menu tab (Star) and select “Add Item” to begin the process.
REGISTER CUSTOM SHOOTING MODES (1, 2 & 3)
One of the often ignored settings found on many digital cameras these days is the ability to save a specific set of camera modes, settings, and features on your camera, allowing you to quickly switch your favorite settings to capture a movie as well as shooting landscape still images in a matter of a second or two. On the a7R III, you are given 3 such modes, represented by the 1, 2 and 3 modes found on the top Camera Mode Dial.
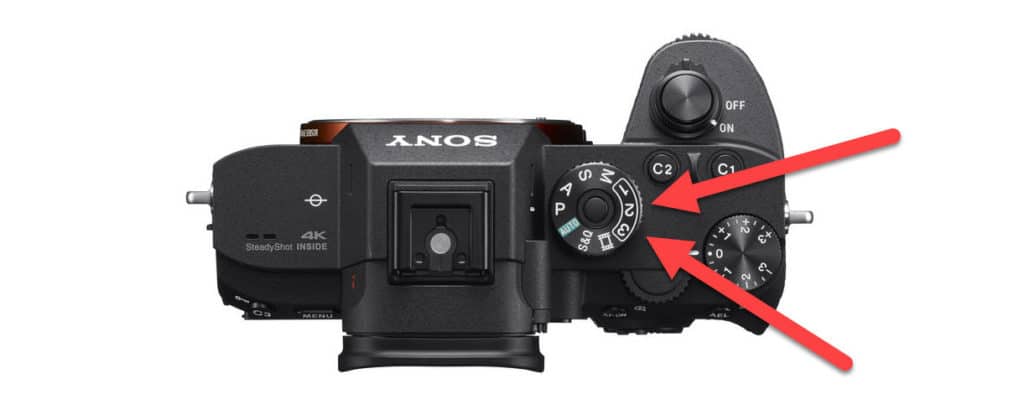
For my a7R III, Memory 1 is set for shooting landscapes, Memory 2 for shooting portraits and Memory 3 for shooting HDR 4k video at 24p. Put some thought into how you might use your camera differently for different subjects.
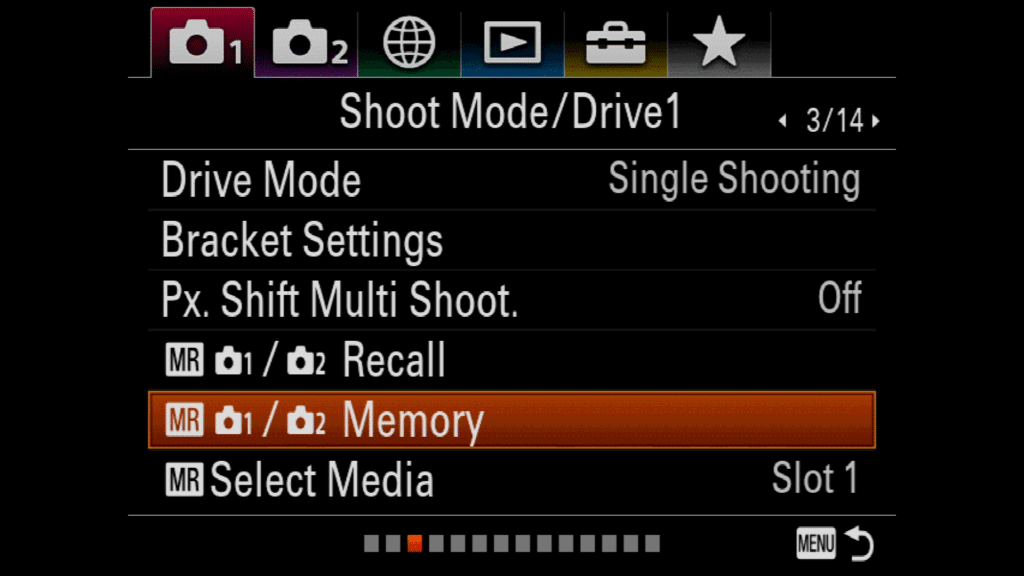
To register a Custom Shoot Mode, move the top Camera Mode Dial to one of the three Custom Modes and then adjust all of your settings and features on your camera until you are fully dialed in. Then jump to the Camera Menu Tab (1) and move to Page 3. There you will find the “MR 1/2 Memory” menu item. Select it and then choose 1,2 or 3 at the top of the next screen. You can also register four more groups of settings with M1-M4, but those specific settings are registered to your SD Card. Format the SD Card and those settings with be gone as well.
RENAMING IMAGE FILE NAMES
While many photographers (myself included) often customize the name of our image files when we import them into Adobe Lightroom, Capture One or On1 Photo RAW, there can be some merit to customize the names of image files coming out of the a7R III. This can be especially helpful if you shoot with multiple cameras or if you have a team of photographers shooting an event. Sony lets you control the first three letters of any file it creates with this camera from the default of “DSC”. I choose to go with “7R3” so that I know which camera took this images. I do the same thing with my a9, so that it says “a9_”, making it very easy to know which files right off the SD card came from which camera.
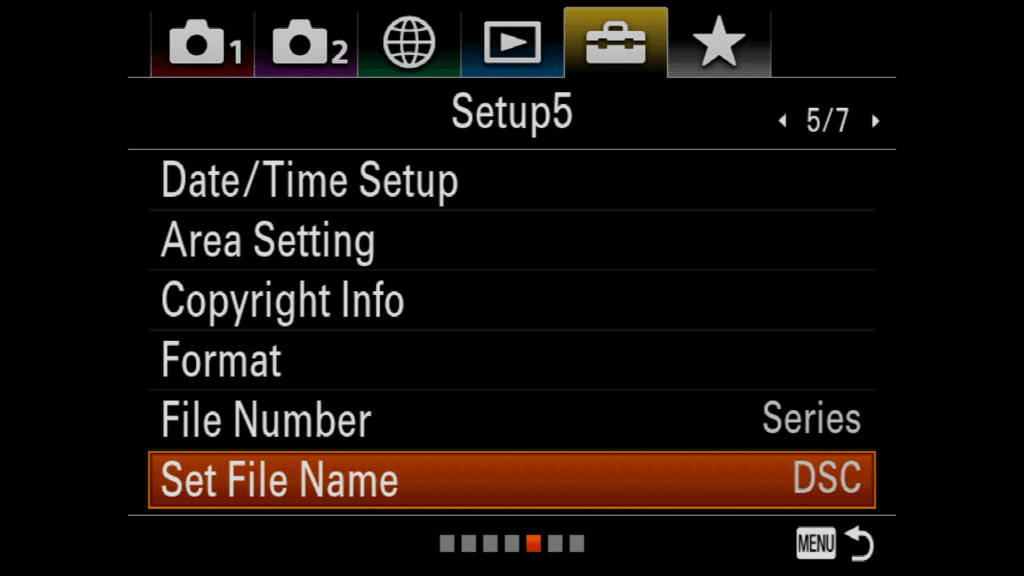
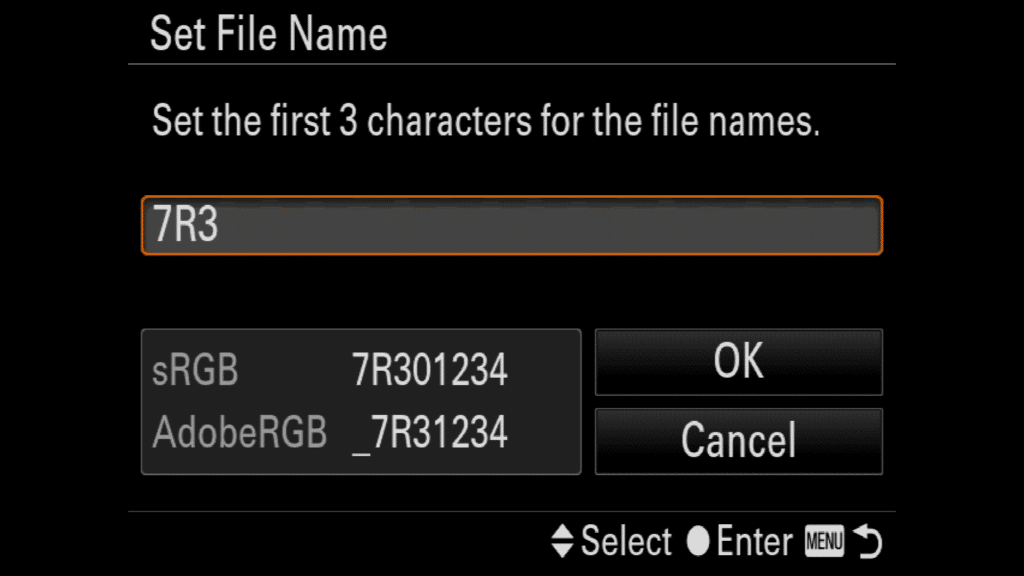
To customize the names of your files, head to the Toolbox Menu and move to Page 5 where you will find “Set File Name” as the last option on the page.
SETTING COPYRIGHT INFO
One of the last things I like to do with my Sony cameras is embedding my Copyright Information right into any images taken with my cameras. The a7R III has a setting that makes customizing this image metadata very easy.
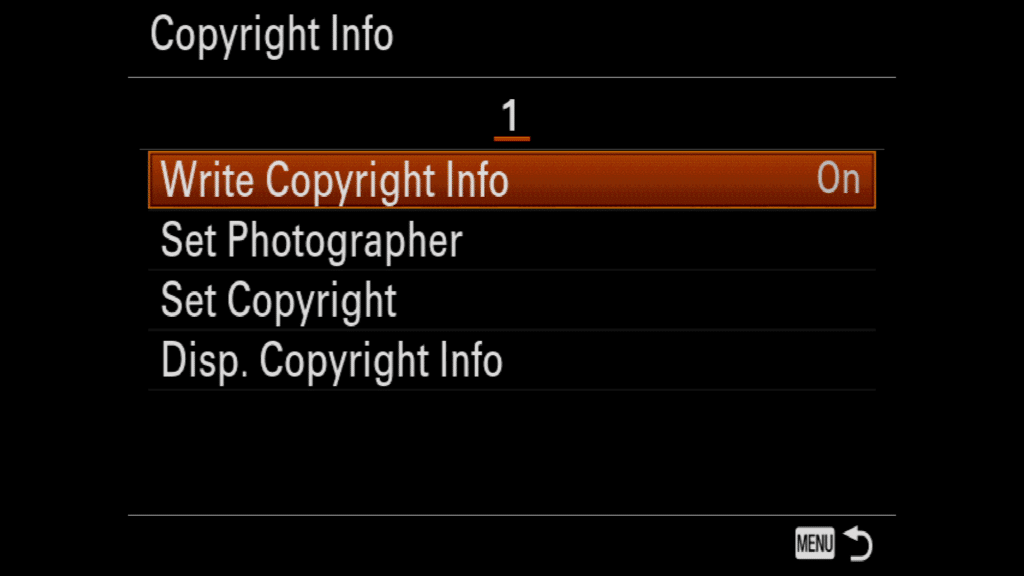
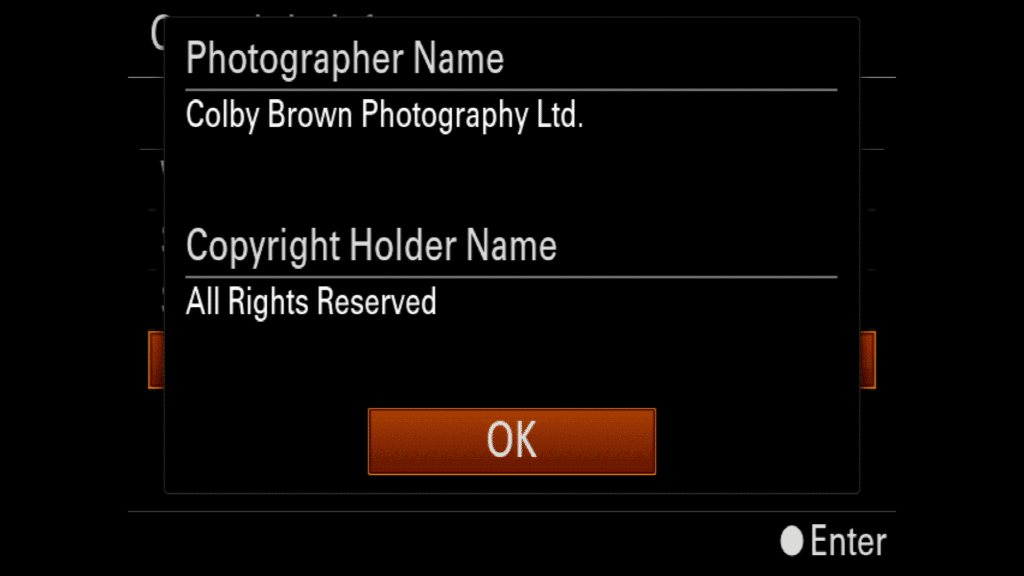
In the Toolbox Menu under Page 5 you will find the “Copyright Info” option. Under that setting, you can easily set the photographers name as well as the kind of copyright you wish to show. Once you are ready, make sure “Write Copyright Info” is set to “On” and you are good to go.
3RD PARTY ACCESSORIES
No camera is complete without a few optional 3rd party accessories to help make your life easier and arguably more creative. The following five items can be found in my gear bag that also houses my a7R III.
USE FAST SD CARDS
One of the first things you are going to want to purchase for your a7R III will be the fastest UHS-II SD card you can find. While the Mark III doesn’t shoot 20 fps like the Sony a9, it is still capable of shooting at 10 fps. Additionally, with a 42mp sensor, you are going to be dealing with pretty large files, especially if you shoot in RAW. An uncompressed RAW file will come in around 80mbs while a compressed will be about half that. Long story short, if you want the improved image buffer to work as intended, you need a fast SD card.
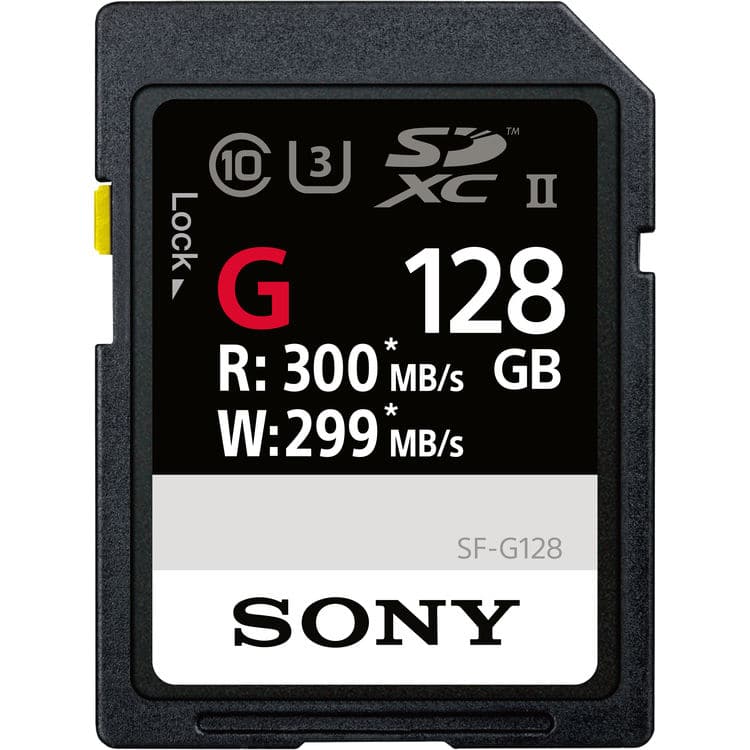
Personally, I recommend the 64GB (LINK) & 128GB (LINK) Sony SDXC UHS-II cards that have read speeds of 300 MB/s and write speeds of 299 MB/s.
DUAL BATTERY CHARGER
After spending a month in Myanmar shooting with the a7R III, I only completely drained a Z100 battery once after a full day of shooting. Most of the time I could go 3-4 days on a single charge. While the new Sony Z100 batteries are much better than the older NP-FW50 batteries found in nearly all previous Sony mirrorless cameras, it doesn’t hurt to pick up a few extras just in case.
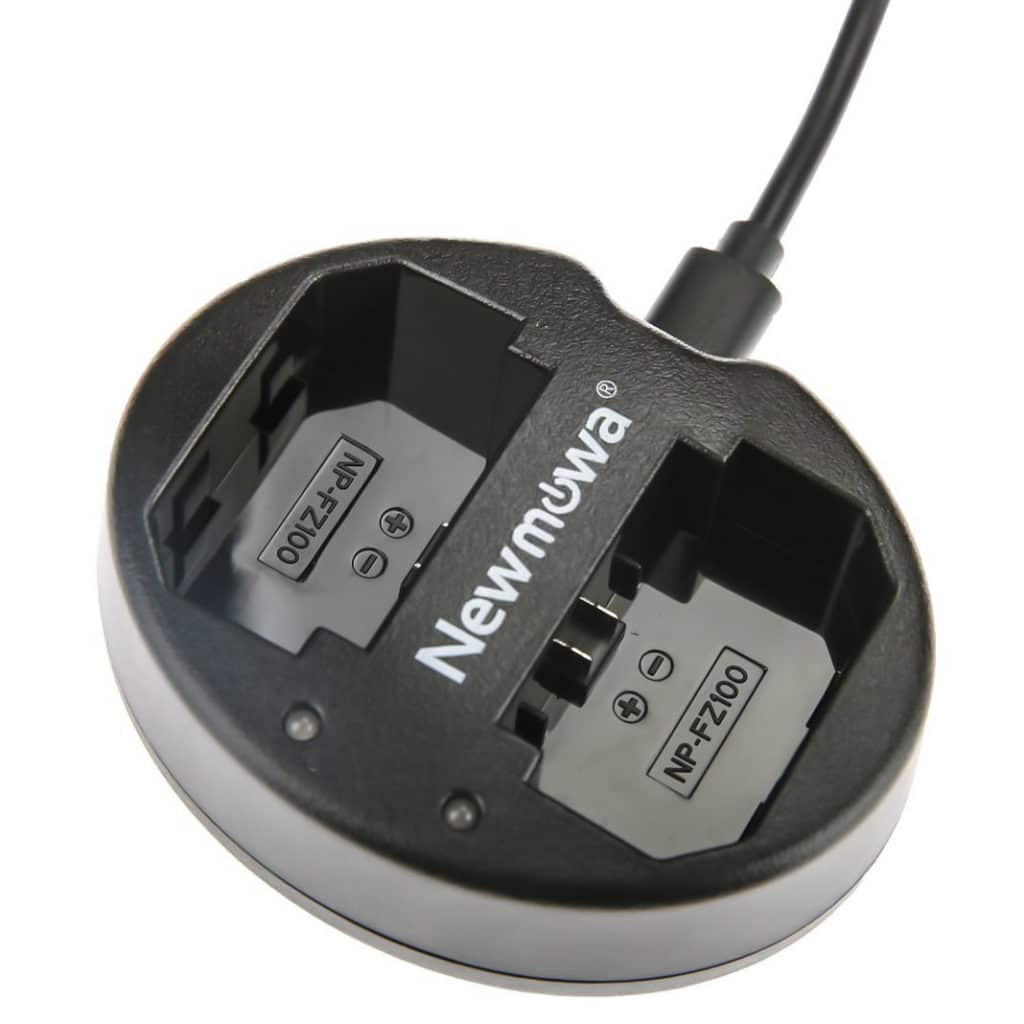
To charge these batteries on the road, I opted to pick up two Newmowa dual chargers from Amazon. Not only are these chargers pretty cheap, but they are super portable as well. As icing on the cake, they charge via a micro USB cable so that I can recharge them in my hotel room, in my car or even in my backpack with an external power brick. I have been thrilled with them so far!
*It seems too many of you bought this charger quickly and it is now sold out, but I am sure it will be back for sale soon-ish. It is worth the wait!
L BRACKET
One of the most under-rated accessories for any camera is an L bracket. While its use is mostly limited to those that find themselves shooting from a tripod, I find them to be pretty invaluable. The general premise is that you secure an L-shaped bracket to your camera that fits your tripod ball head mount. The bracket runs the length of the bottom as well as the left side of your camera, allowing you to quickly and easily switch from shooting horizontal to vertical without forcing your camera to hang off one side of your tripod. If you haven’t used one before, pick one up! It will change your life 😉
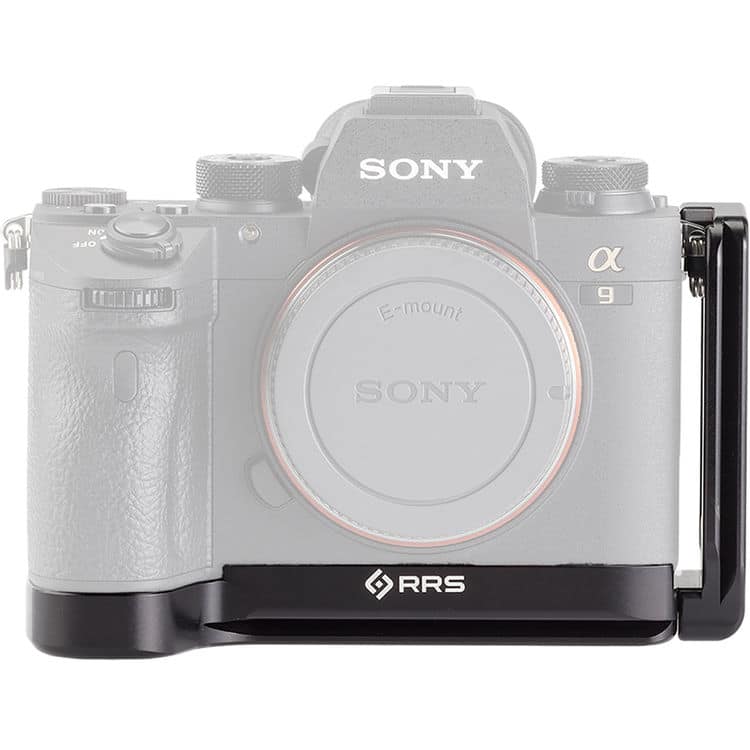
While the brackets for the a7R II won’t fit the a7R III because of the side camera ports, nearly anything made for the a9 should work just fine with the a7R III. Really Right Stuff (RRS) makes one of the best brackets out there, but it is expensive. A slightly cheaper alternative would be from Kirk. Otherwise, you can find many Chinese knockoffs on Amazon as well, generally in the $30-$50 USD range.
REMOTE CONTROLS
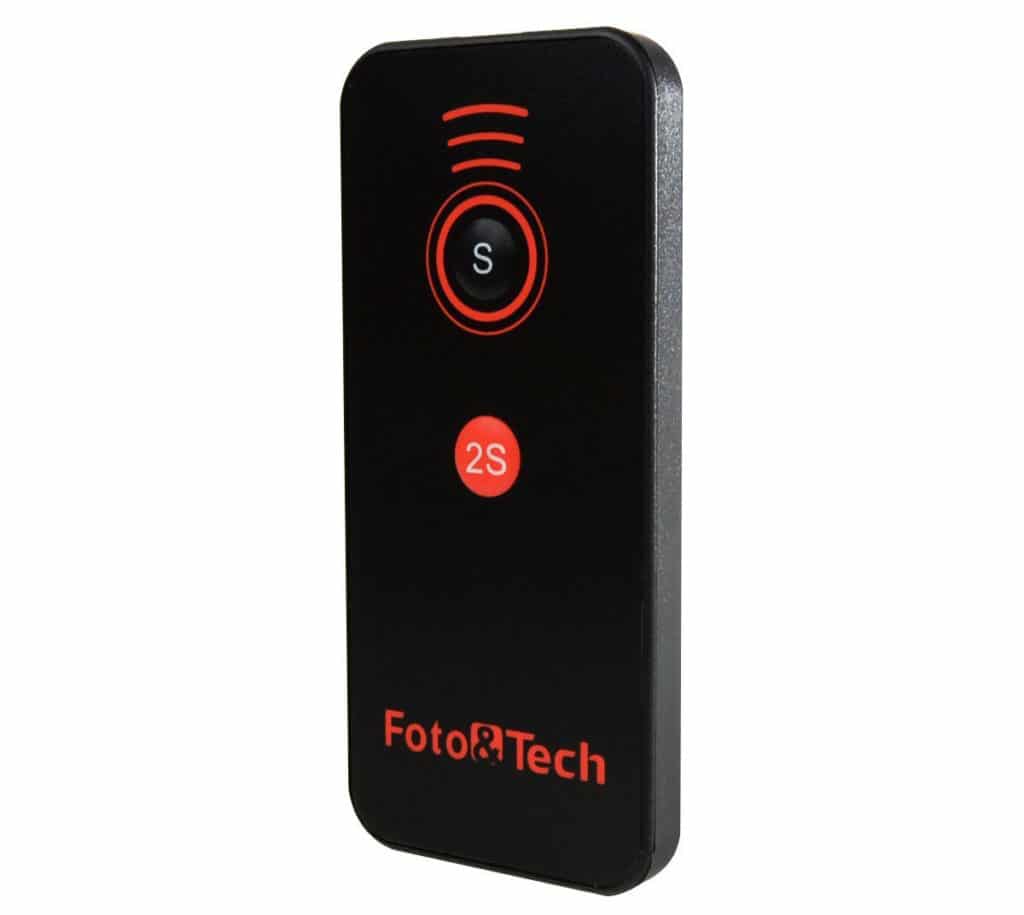
If you find yourself shooting from a tripod often, you might want to look into picking up a remote for your a7R III. Personally, I prefer wireless remotes, because I often find the cable from a wired remote can cause issues with my L bracket when shooting in the vertical orientation. I use Foto & Tech Wireless Remotes from Amazon. They cost a fraction of what Sony sells their remotes for, and they work pretty well. Plus they are cheap, so you can pick up a few pairs and simply keep them in your gear bag.
Additionally, you might want to look into picking up an intervalometer if you find yourself wanting to shoot a timelapse since Sony has unfortunately removed the Play Memories App support for this camera. Historically the Timelapse App was one of the more popular apps they offered. So now if you want to shoot a time-lapse with the Mark III, I would look into picking up a JJC TM-F2 Timer Remote.
EXTERNAL BATTERY CHARGER
One of my favorite features found in all of my Sony mirrorless cameras is the ability to charge the camera easily while on the road. With an external battery, I can quickly connect my Sony a7R III to a power brick by using a micro USB cable. If I am hiking or have long drives between locations when shooting, this can make topping off my Z100 batteries a breeze.
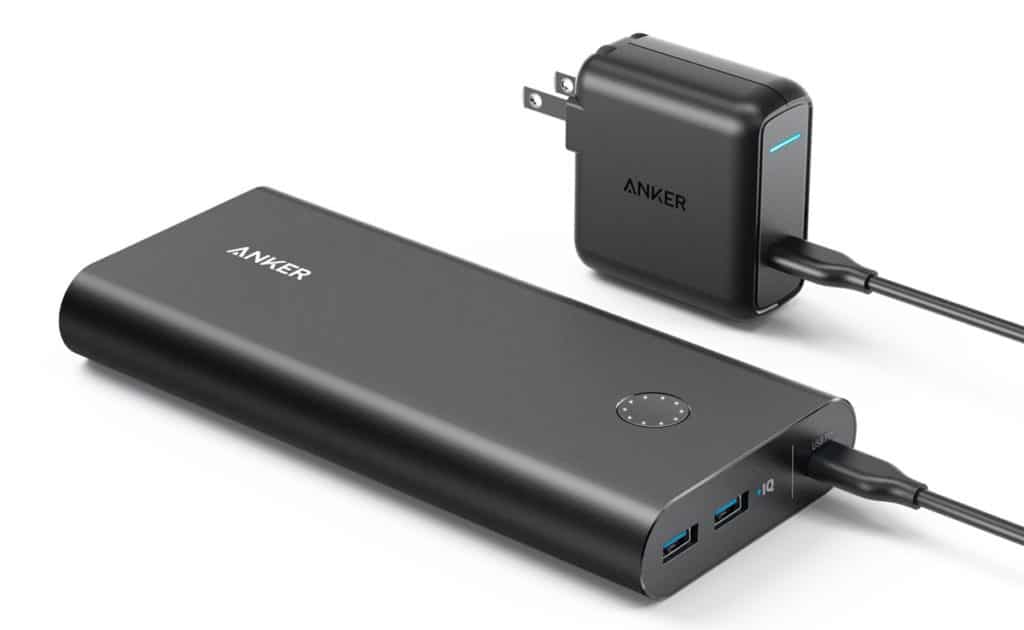
I carry an Anker PowerCore+ 20100 USB-C Power brick. It has two standard USB ports & a single USB Type C port to charge from.
While charging your camera via micro USB is possible on all Sony mirrorless bodies, the a7R III also has a USB Type C port that can be used as well. This should be welcome news to Timelapse shooters who might have been worried when they heard there would be no Timelapse Sony PlayMemories App support on this camera. Historically photographers would use the app while also trickle charging their battery via the USB port on the side of the camera so that they can capture a long timelapse without running out of battery life. Since the use of an intervalometer will now require that micro USB port to function, the USB Type C port can be used to charge the camera instead.
a7R III Giveaway
I am giving away a Sony a7R III on my Instagram account (@ColbyBrownPhotography) to one lucky winner. Details can be found in my IG post below!
ASK ME ANYTHING
If you have any questions about the Sony a7R III, please let me know in the comments below! My full in-depth review will be coming soon!

