One of the best things about owning a Sony mirrorless camera is that virtually every button, feature, and menu system can be customized and tailored to your shooting style, including the newly released Sony a1 flagship mirrorless camera. While I have written a complete setup guide to the a1 for those who are brand new to this camera, I decided to separate out all of the unique customized buttons and menus I did to my A1 here on this blog post so that I had more room to explain and walk you through my choices. As a Sony Artisan who extensively photographs landscape, travel, and wildlife photography, there are certain features and functionality that I want near-instant access to on my own Sony a1 that I didn’t feel I had when I first took the camera out of the box. Feel free to use this as a guide when setting up your own camera, but feel free to change things to suit your style of shooting best.
This article will be divided into three core sections: Customized Buttons, the Fn Menu, and the My Menu section inside the camera’s menu system. I will do my best to explain my choices as I describe each customization, but if I miss something or you have any questions, please feel free to leave them in the comments section below. At the bottom of this article, you will find a link to my Sony a1 Settings file that you can load on your a1 to mirror everything you see here (as well as what is mentioned in my Complete Setup Guide to the Sony a1).
This blog post is based on the 3.0 Firmware released on January 15th, 2025. If you use an earlier FW version, the screenshots and some features might differ.
Customized Buttons
With the Sony a1 you have the ability to fully customize 16 different buttons found throughout this camera. What is really interesting is that you can apply different functionality to each of these buttons depending on if you are in Photo, Video or even the Review modes within the camera. So what functionality should you apply to these buttons? For me, the custom buttons on a camera are for features that I want instant access to no matter if I am using the rear LCD or shooting through the viewfinder. Of all my customizations to my a1, these features tend to take the highest priority. Everything here is customized for “Photos” unless I mention otherwise.
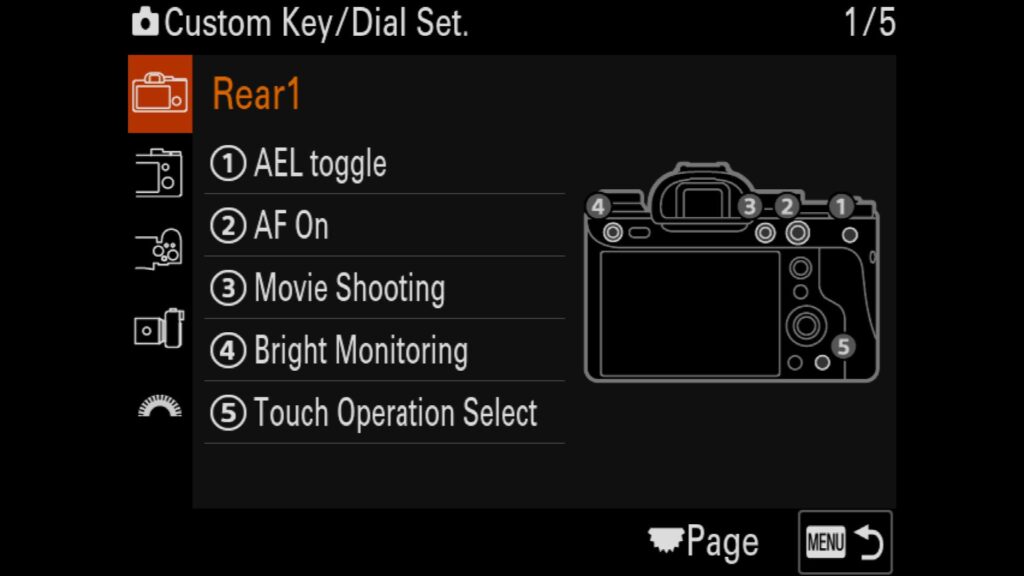

Rear 1
1. AEL hold – This button doesn’t change from the default setting, but essentially it stands for “Auto Exposure Lock.” It will help you look at a certain exposure within an image when shooting in creative modes like Aperture or Shutter Speed Priority modes.
2. AF On – Allows you to use Back Button Focus with the Sony a1 easily. For some, separating the focus functionality from the shutter button allows them to be more efficient when achieving AF with one finger and taking shots with another.
3. Movie Shooting – This will start recording a movie no matter what mode you are in. However, a setting in the menu system allows you to turn this button off when shooting still images.
4. Bright Monitoring – One of the hidden gems of the Sony mirrorless camera system, this must-use feature is perfect for shooting in low-light situations. When you turn on this feature, the a1 artificially increases the ISO of the rear LCD screen, essentially allowing you to see and compose your shot in the dark. I use this feature a lot when shooting Astro/Northern Lights images.
5. Touch Operation Select – One feature I love using with most of my Sony cameras is the rear LCD Touch Screen for achieving focus. That said, there are times when you want to turn it off so that you accidentally don’t change your focus point. This button will turn on and off the touch functionality of the rear LCD screen.
* In Video Mode, I change button 5 to “Focus Magnifier” so that I can quickly check MF when shooting video.
Rear 2
1. Focus Standard – Allows you to move your AF around your frame with adjustable AF zones. If you press the joystick down, like a button, it will reset any adjustable AF area to the center of your frame.
2. Face/Eye Subject Select – Sony’s Eye AF system is pretty incredible, but currently, you need to select Human, Animal, or Bird so that it knows which algorithms to use. This button allows you to switch between the three modes on the fly.
3. Switch Right/Left Eye – When photographing a subject using Eye AF, the system doesn’t always know which eye you want to focus on. This button will attempt to switch to the other eye.
4. Switch Right/Left Eye – I duplicated this functionality from the button above to give me a left/right feel when using each button, although this is not required. You could change either one of these buttons to another feature and still move between both eyes of a subject.
5. White Balance – Even though you can easily adjust your White Balance in post when shooting in RAW, it is nice to be able to quickly adjust the white balance of a scene quickly.
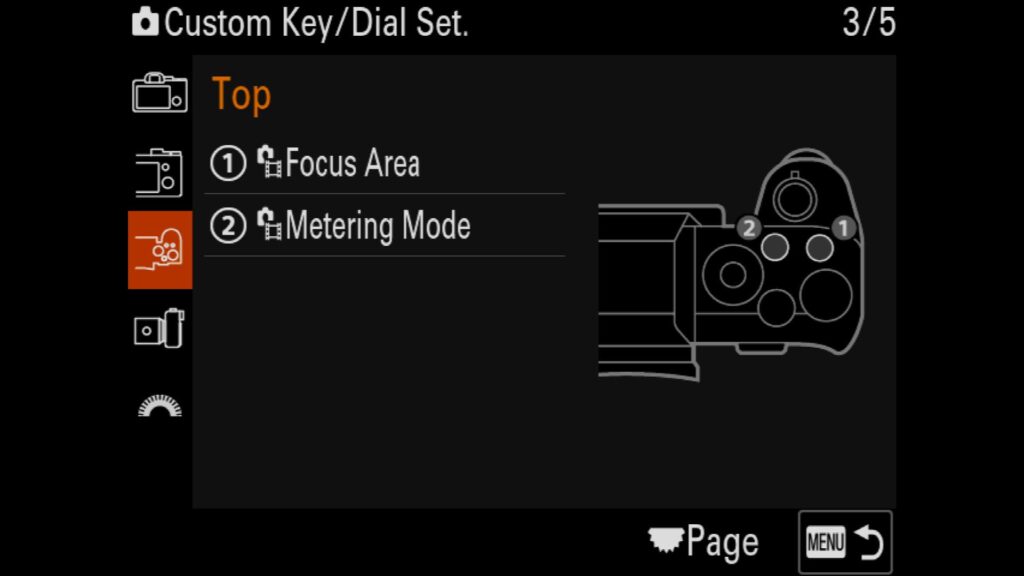
Top
1. Focus Area – Use this button to quickly change between the different adjustable AF Area modes available to the Sony a1, such as Wide, Zone, or adjustable spot (among other options).
2. Metering Mode – I have customized that feature to this button to adjust the camera’s metering mode. This way, I can quickly move from Multi to Center or Spot metering to adjust how my camera is reading the light within a given scene.
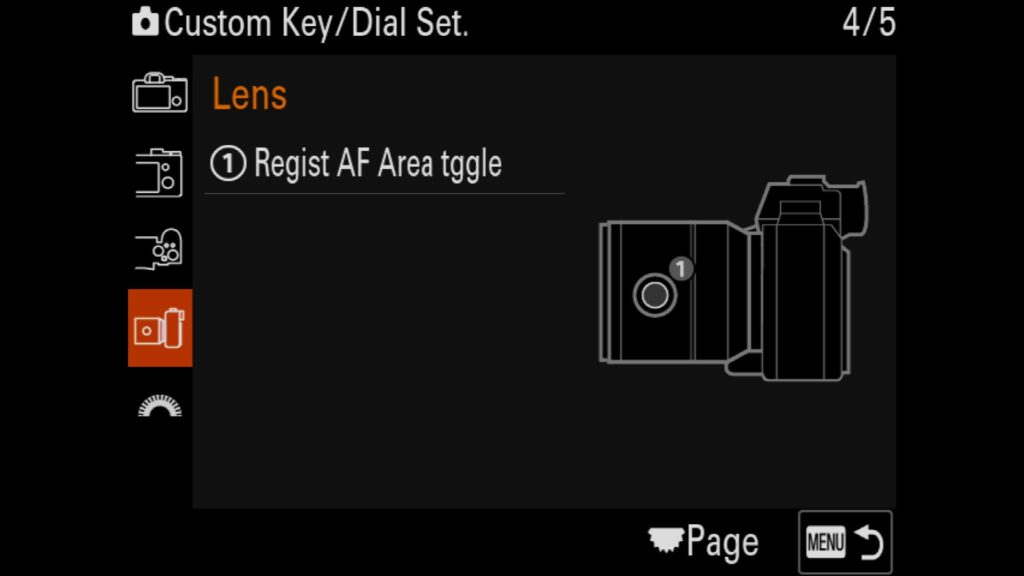
Lens
1. Register AF Area Toggle – This allows you to recall specific AF Areas you have registered, no matter what current AF Area you selected. For example, you can use this feature to quickly change from Wide to Zone Tracking or Mediuam Adjustable AF Point. This is an excellent feature for wildlife & sports photographers who need to quickly change from a larger AF area to a much smaller and more precise one.
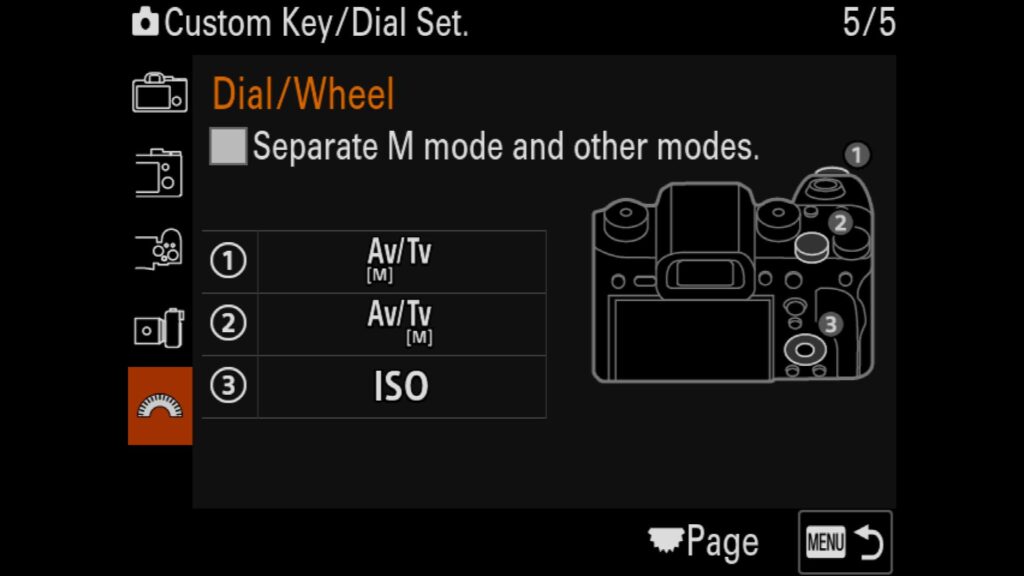
Dial/Wheel
1. Aperture – This dial is set to default to control Aperture but can be changed.
2. Shutter Speed – This dial is set to default to control Shutter Speed but it can be adjusted.
3. ISO – By default, the rear wheel does nothing, but I prefer that it allows me to adjust my ISO. This is a fast and super convenient way of changing your ISO on the fly, but it will be too convenient for some. If you aren’t paying attention, you can accidentally adjust your ISO, so keep an eye on it.
Playback Buttons
You can customize the buttons on your Sony a1 to be different when you are in the “Playback” system reviewing images/video.
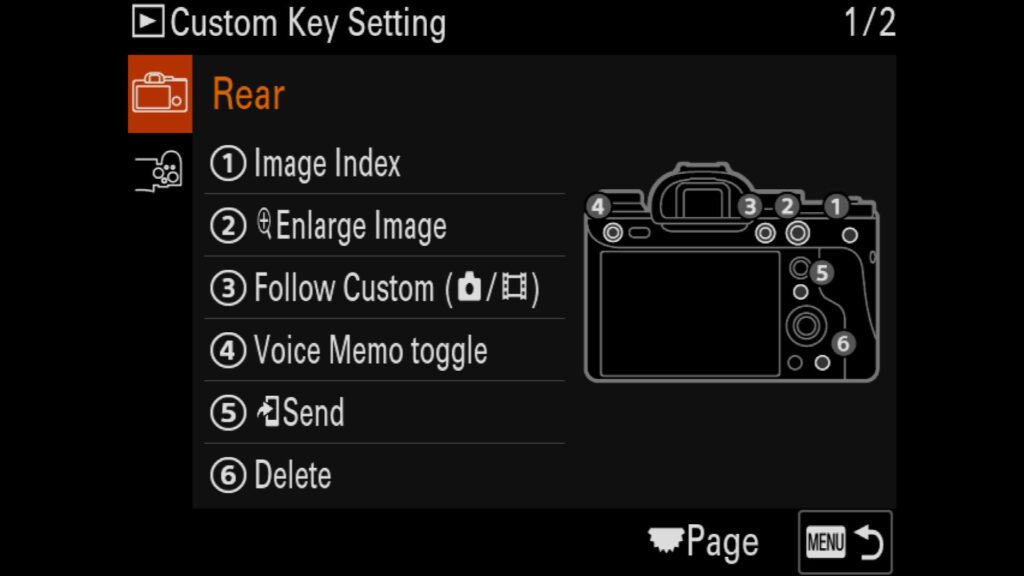
Rear
1. Image Index – This is an easy way to see small thumbnails of all images on your SD or CF Express Type A Card.
2. Enlarge Image – When you want to zoom into any image you have taken to verify it is sharp.
3. Follow Custom (Photo/Video) –
4. Voice Memo toggle – To record a voice memo that will attach itself to the image you are looking it. This feature is invaluable when you want to remember the name of a specific species or subject you photograph.
5. Send – Send the image you are looking at to your phone via the Sony Creator’s App.
6. Delete – Delete the selected image off your SD or CF Express Type A card.
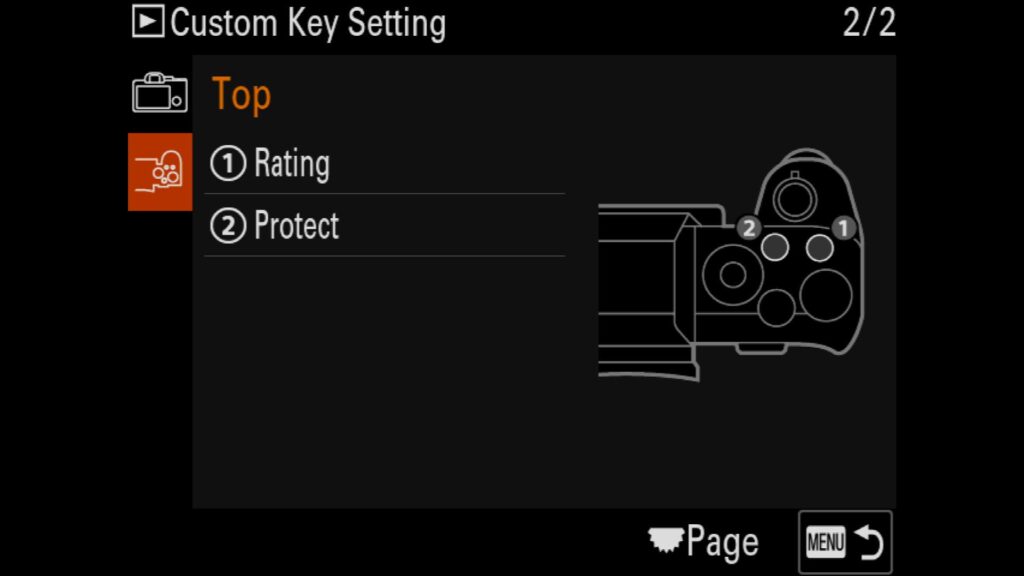
Top
1. Rating – You can apply a star (1-5) to any image you are looking at. These stars will carry over into Adobe Lightroom, making it easier to find specific photos you know you want to take a closer look at.
2. Protect – You can mark an image or video as “Protected,” which protects it from being accidentally deleted from your memory card. This, however, will not save the selected file if the memory card is reformated. When paired with the “Display as Group” feature, this tool is handy for helping you cull through your images with the Sony a1. If you take a burst of images, those images are grouped together in the playback system. Any images you “Protect” within that group will be kept/saved when the group is deleted. So, if you take 30 images of a bird in flight, you might only find five you genuinely like. Hit the protect button on those five images, then delete the group. All protected images are saved, and you have deleted the rest of the photos in that burst.
Fn. Menu
After you have customized your camera’s buttons, the next place you need to focus on is the Fn. Menu. On the back of the a1 is an Fn Button that pulls up the following menu on your screen. Here, you want all of the features you couldn’t assign to a button but still want relatively quick access to. You have 12 different spots (two rows of six items) that you can customize differently depending on if you are shooting still photos of video. Unlike with the custom buttons on my Sony a1, I have two completely different menus for Photo & Video, as you can see below.
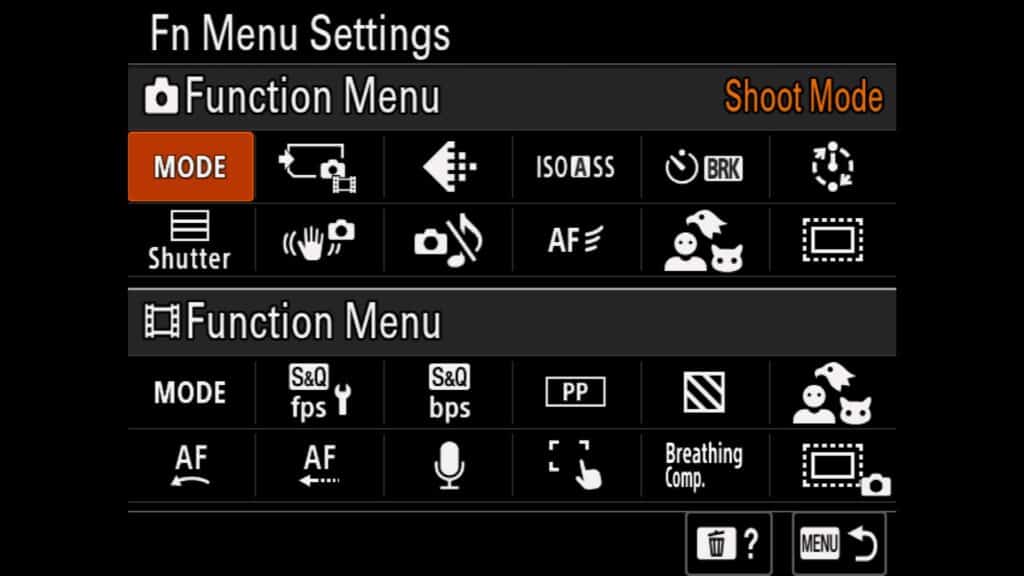
Still Photo Upper Row:
Shoot Mode – While you cannot adjust the camera mode from this menu item, it offers a great reminder of which camera mode you have the camera set to.
Rec. Media Settings – This is where you can adjust how you want your still images and videos recorded to your memory cards. Do you want to duplicate content to each card, write photos to one card and videos to another? You have lots of options.
Image Quality Settings – Want to shoot in RAW or JPEG or RAW+JPEG. Here you can change that setting on the fly.
ISO AUTO Min. Shutter Speed – Setting the minimum shutter speed allowed to use with the camera before increasing the cameras ISO. This only works if you are in AUTO ISO or shooting in the Auto, Program, Shutter Speed Priority or Aperture Priority.
Selftimer during Bracket – If you bracket your images, this is where you can choose to add a small 2, 5 or 10 second delay before the bracket begins. With this set, it will capture every image in the bracketed set for you.
Interval Shooting – If time-lapses are your thing, this is where you would set all of the controls to capture it.
Still Photo Lower Row:
Shutter Type – While the camera defaults to AUTO, you can manually choose to use the Electronic and Mechanical Shutter via this option.
Steadyshot – Most lenses will control Steadyshot/IBIS, but if you are using a lens without that feature, you can make sure Steadyshot is turned on or off here.
Silent Mode – If you want to shoot in complete silence, turn silent mode on with this option.
AF Tracking Sensitivity – To adjust how quickly the a1 refocuses on a subject or finds a new subject, you can experiment with the AF Tracking Sensitivity.
Face/Eye Subject – Allows you to see if you are shooting an Animal, Human, or Bird when it comes to Eye AF Subject Acquisition.
APS-C S35 Shooting – If you are using a lens without the custom lens button that we configured above, you can manually set your camera to shoot in APS-C mode with this setting.
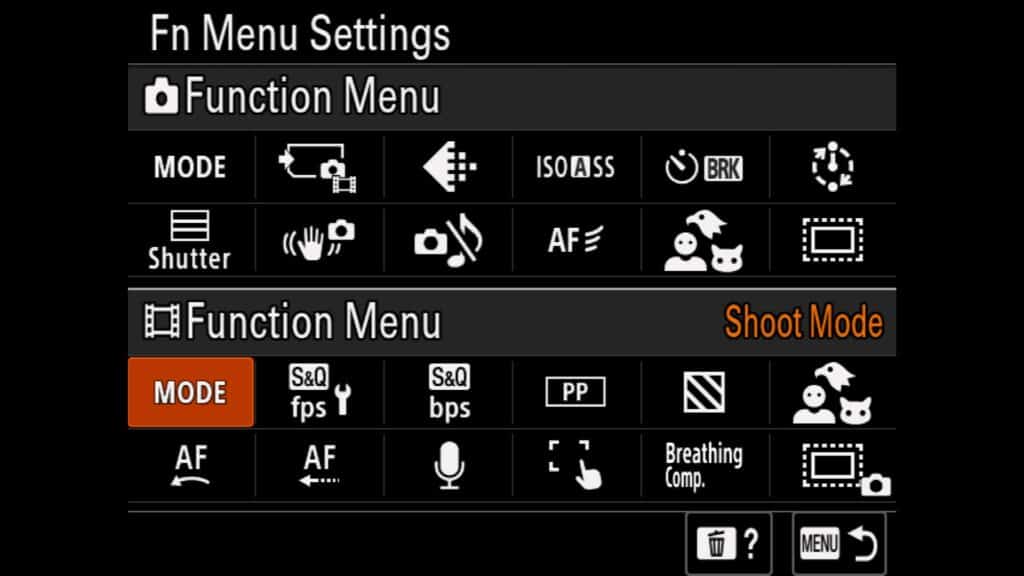
Video Mode Upper Row
Shoot Mode – When in video mode, this is the best way to change between the Camera Modes for shooting video, such as Manual, Program, Shutter, or Aperture Priority.
S&Q Frame Rate Settings – S&Q is a fun feature that allows you to shoot a slow-motion video with the a1, where the video comes out in slow motion. To control the actual S&Q frame rate, use this menu item. I set my Rec Frame Rate to 24p and my shooting Frame Rate to 120fps. This creates a slow-motion video that is 5x slower than normal speed.
S&Q Record Setting – Adjust the Bitrate and Record settings for the videos shot in S&Q mode. I generally shoot in 100M 4:2:2 10 Bit when possible for the best results.
Picture Profile – With video, you may want to adjust the kind of color and tone you can work with to color grade later. With the A1 you have PP1 – PP11 which represent a variety of different modes such as S-Log2(PP7), S-Log3(PP8 or PP9), HLG2 (PP10) or Sony’s Cinetone (PP11). I usually stick to Cinetone (PP11) for most of my video work when I don’t want to do much color grading.
Zebra Display – A great way to check to see if you have blown out the highlights in your video is to turn on the Zebra Display function. Any over-exposed area will flash bright lights at you to indicate you are clipping your highlights.
Face/Eye Subject – Allows you to change between Animal, Bird, and Human Eye/Face Detection. Just so you know, currently, only Human Eye AF works in Video.
Video Mode Lower Row
AF Subj. Shift Sensitivity – Adjust the camera’s AF sensitivity to focus on another subject once your subject leaves the focus area of your scene. I set mine to “1,” so the AF sticks to the subject more aggressively.
AF Transition Speed – Adjust the speed at which the focus moves from one point to another while using AF in movie mode. I set this to “6” so that the AF system can quickly relock its focus on the subject I am filming.
Audio Recording Level – Adjust the Audio Recording Level when shooting video
Touch Functionality in Shooting – Adjust the touch functionality when it comes to video. (Touch Focus, Touch Tracking, Touch Shutter or Off)
Breathing Compensation – Turn on/off Breathing Compensation when it comes to focusing while shooting video.
APS-C S35 Shooting – Jump into APS-C S35 mode when filming video if needed. Note that not all video modes allow this, such as shooting at 120fps with the a1.
Sony's My Menu
The last place that you can customize your Sony a1 will be in the My Menu section of the internal updated Sony Menu System. This is where I tend to put the features that I don’t need instant access to all the time, but also don’t care to search through the menu system when I need them. But to be honest, I find myself using this section less and less now that Sony has redesigned it’s menu system. This started with the Sony a7S III and now comes to the a1 and I presume all future Sony camera bodies as well. In total, Sony gives you a total of 6 different “My Menu” tabs within the a1, which gives you plenty of options to experiment with!
I ended up creating 3 “My Menu” tabs: One for general settings, one for still images and another for video-centric features.
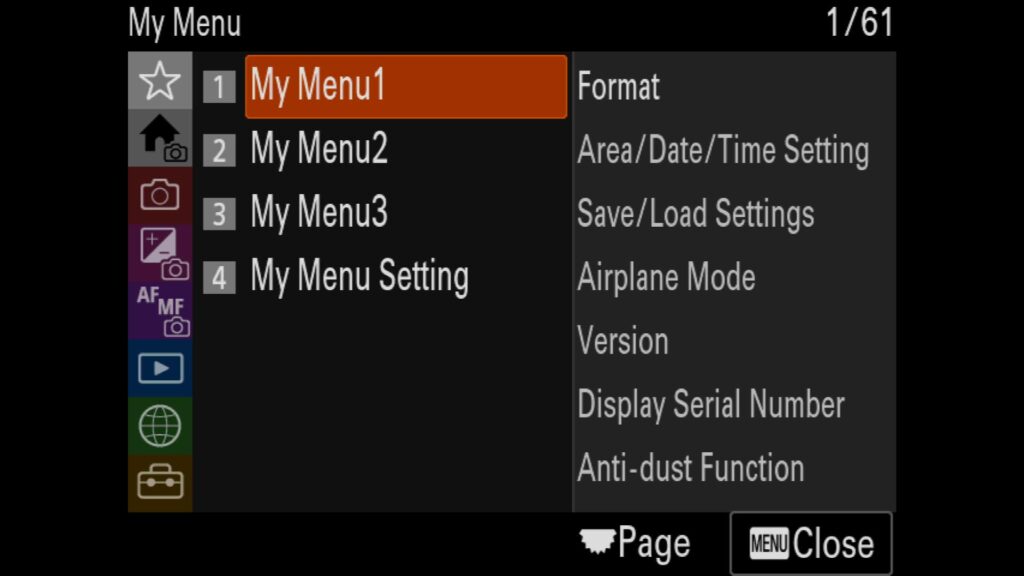


General Settings
Format – When I need to quickly clear and format a card, you will find this setting at the first spot in my general settings menu.
Area/Date/Time Settings – I always try to keep the timestamps of my images accurate, especially when shooting with multiple cameras on a trip. Here you can adjust the actual time, date and time-zone that will be applied to your images/videos.
Save/Load Settings – One of my favorite features of the newer Sony cameras, the ability to save and load entire all of your settings to duplicate with a 2nd camera or share with other users on the internet (like you can find in my Setup Guide for the A1).
Airplane Mode – If you don’t plan on connecting to the camera via wifi or bluetooth, you can turn on airplane more to save more battery.
Version number – To verify the firmware version you currently have installed on your camera body and any attached lens
Display Serial Number – When you want to see the serial number of the camera, possibly if Sony Support asks.
Anti-dust Function – When you want to try to clean your camera sensor of dusk automatically
Photo Settings
Interval Shoot Func. – To adjust all of the settings required to capture a time-lapse with the Sony a1
Bracketing Settings – You can adjust the following settings: Bracketing Type, Selftime during Bracket, Bracket order, and Focus Bracket Settings. This is where you need to head if you want to use the new “Focus Bracketing” mode from on the 3.0 FW for the Sony a1.
Pixel Shift Multi Shoot. – If you are shooting from a tripod with a static subject, experimenting with Pixel Shift can help you create more detailed and larger images using this technology.
Recall Camera Settings – Allows you to save nearly any set of settings together into a custom camera mode on the camera. You can have your camera dialed in complete for Landscape still images on one Camera Recall Mode while having it dialed in for Wildlife slow motion video shooting on another for example.
Focus Area Limit – You can limit the number of AF Area options that pop up in your cameras options while shooting. Good for when you only find yourself regularly using a small handful of AF area options with most of your shooting.
AF Area Registration – If you want to customize one of the buttons on your camera to lens to recall a specific AF area option (such as Zone Tracking or Spot Tracking) you have to register that AF area with the camera first. When setup correctly you can use that custom button to quickly move between the currently selected AF area (such as Wide) to Zone Tracking with the press of a button. This is very handy for wildlife photographers
Del. Registered AF Area – You can delete any registered AF areas that you might want to recall using the custom button mentioned above.
Video Settings
File Format – Easy access to change the video file format between all of the 8k, 4k and 1080 settings.
Movie Settings – With a video format selected above, here I can adjust the frame rate as well as the bit rate of the videos I am recording.
S&Q Settings – Quick access to all of the Slow & Quick video settings when I want to shoot slow-motion video with this mode.
Anti-flicker Set. – One of the most important camera settings for when you are shooting still images or videos in a scene with LED lights that tend to have a higher frequency than standard lightbulbs. I use this all the time when recording in my home studio because of the RGB LED lights I use with my setup.
Audio Recording – Turning on or off internal audio recording with a video.
HDMI Resolution – Selecting the resolution you want to output via the HDMI port if you are streaming to a computer or recording on an external recorder like an ATOMOS Ninja 5.
HDMI Output Settings – All of the rest of the HDMI video output settings.
Want To Download My Settings File?
You are free to copy and use any of the settings I have laid out here, but if you want a faster option, I am happy to share my settings file with all who sign up for my newsletter. Put your information below, and you will receive an email that includes a link for the settings file for you to download as well as instructions on how to load them onto your camera.
What Questions Do You Have?
As I mentioned above, if you have any questions, comments, or even suggestions for other Sony a1 users, please let me know in the comments section below…