When it comes to choosing the right smartphone, there is no shortage of options. Between IOS, Android and Windows Phone you literally have hundreds of phones to pick from at any given point in time. However when it comes to quality mobile phone photography and the cameras inside these devices, there really are only a few companies to look at if you want to capture quality images. While the iPhone has been the benchmark for mobile photography for years and Nokia came out with the 41 MP beast of a camera in the Nokia 1020 for Windows Phone a few years ago, it has been Android that I have been most excited about and for good reason. While much of the hype lately has been around the Samsung Galaxy S6 and its impressive camera, LG has been stepping up their game lately and are poised to make a big splash today with the launch of the LG G4, the successor to the popular LG G3 that came out with last year.
But why do I think that LG is ready to make waves with its new camera? Because just over a month ago they approached me with a pretty interesting idea. To put their latest flagship phone to the test in as many challenging and difficult situations as possible and see how it did. Along the way, we would film a number of videos about the experience and share them with the world. While I was skeptical at first, that quickly diminished once I heard that it had a f/1.8 lens, DNG support and near full manual controls…features I have been asking for for years with other Android manufacturers.
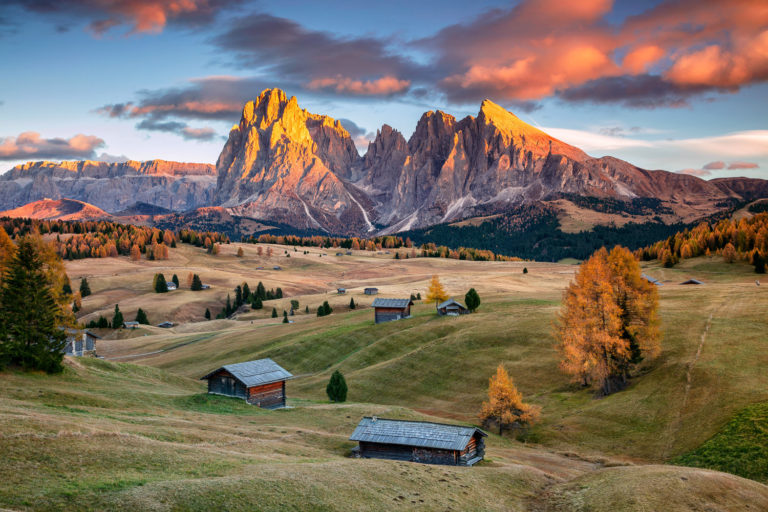
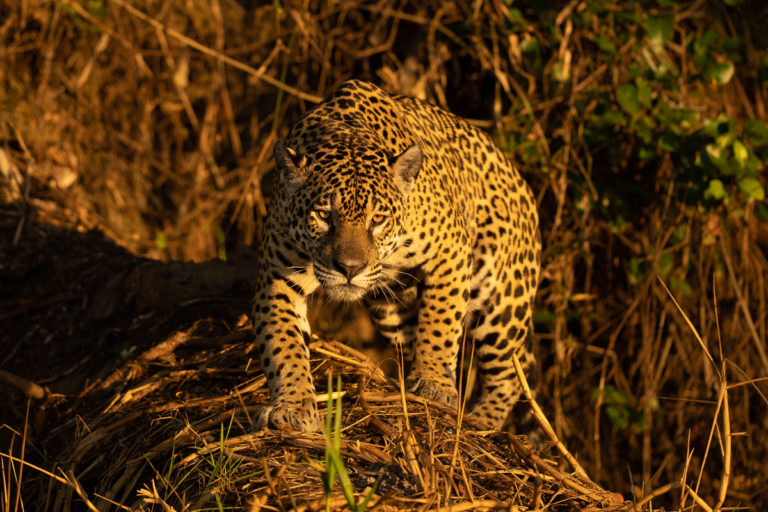
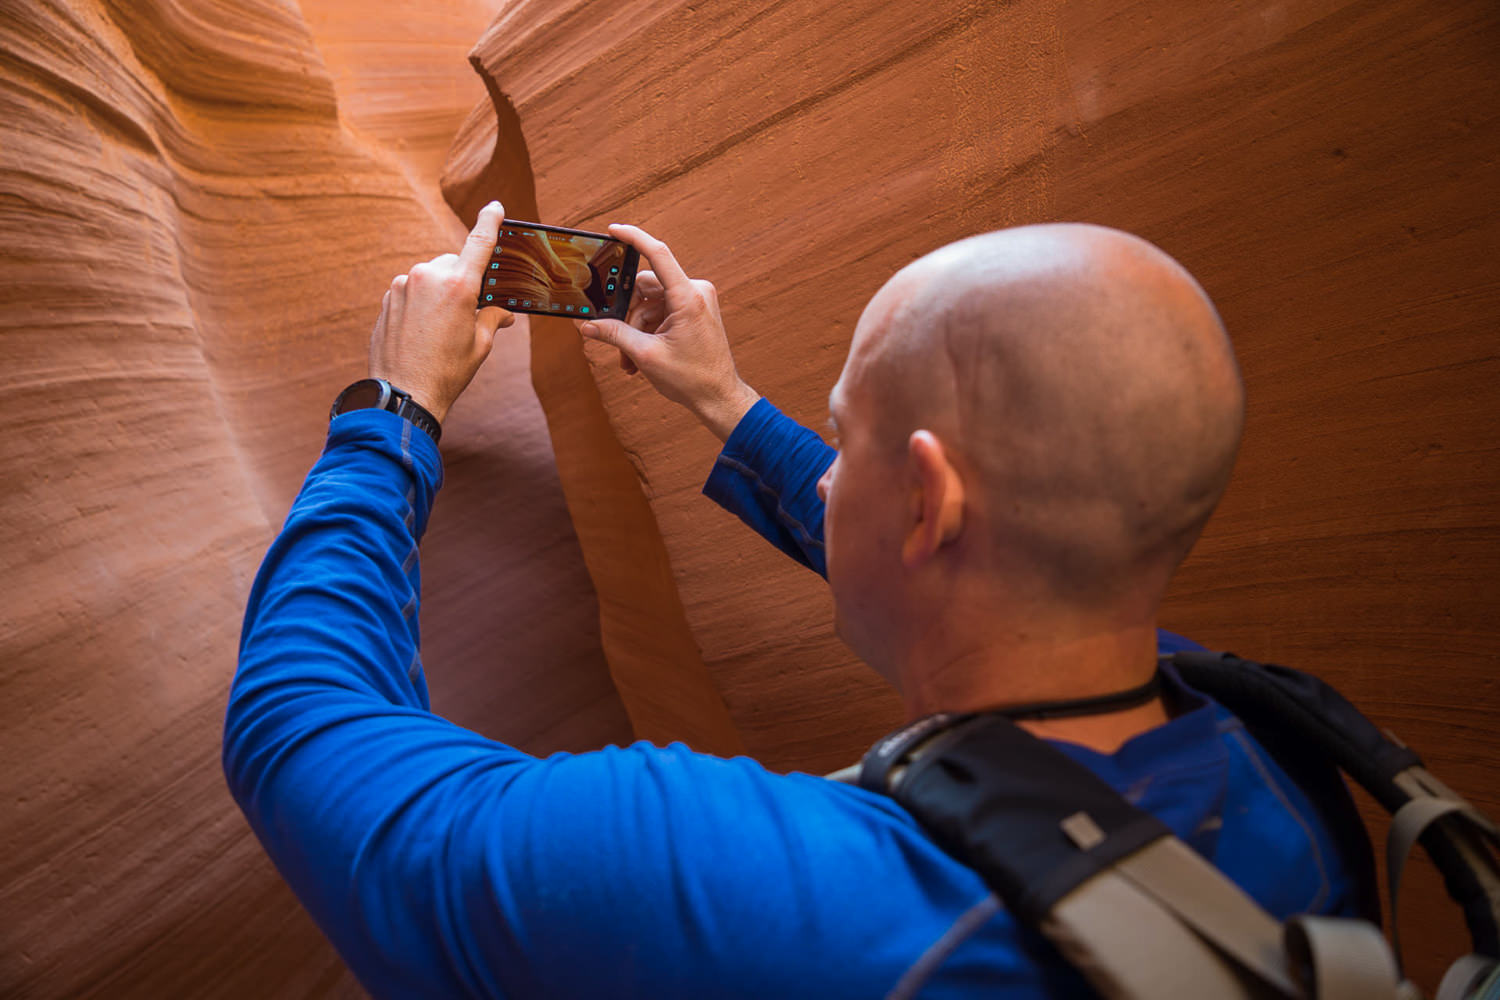
So for the last month, I have been exclusively using a pre-production model of the LG G4 (one of four in the world) in both the Pacific Northwest (Oregon) as well as American Southwest (Utah/Arizona). During that time, I was able to put the G4 into a number of scenarios that would have had other mobiles phones running for the hills. Here are a short teaser video LG and I put together about some of my initial thoughts on the G4 to build up excitement for today’s product launch.
[x_video_embed type=”16:9″][/x_video_embed]So how did the LG G4 perform? Let’s find out.
Specs
While there will be plenty of tech reviews that focus on all of the different aspects of the G4, I wanted this review to mostly focus on the camera side of things. That being said, there were a few notable points that I wanted to touch on when it came to the phone itself. Do note however that I was using a pre-production model that I used didn’t have the finalized software that will be shipping to consumers. Just something to take into account…and that I legally have to say 😉
- Chipset: Qualcomm Snapdragon™ 808 Processor
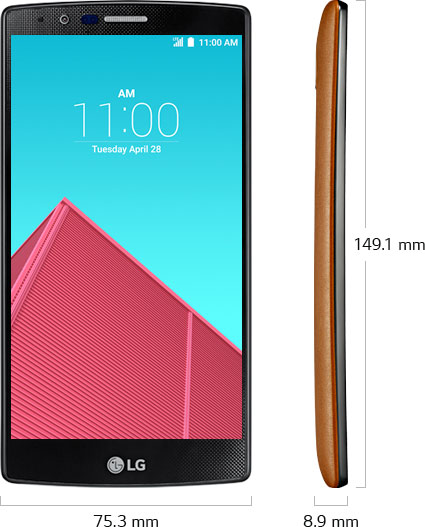
- Display: 5.5-inch Quad HD IPS Quantum Display (2560 x 1440, 538ppi)
- Memory: 32GB eMMC ROM, 3GB LPDDR3 RAM / microSD slot
- Camera: Rear 16MP with F1.8 Aperture / OIS 2.0 / Front 8MP with F2.0 Aperture
- Battery: 3,000mAh (removable)
- Operating System: Android 5.1 Lollipop
- Size: 148.9 x 76.1 x 6.3 – 8.9 mm
- Weight: 155g
- Network: 4G / LTE / HSPA+ 21 Mbps (3G)
- Connectivity: Wi-Fi 802.11 a, b, g, n, ac / Bluetooth 4.1LE / NFC / USB 2.0
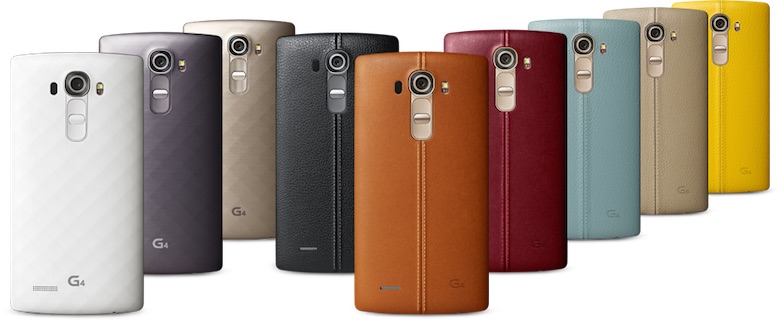
- Colors: (Ceramic) Metallic Gray / Ceramic White (Genuine Leather) Black / Brown /
- Notable Camera Features: Manual Mode / Gesture Shot / Quick Shot
CPU/Speed – Overall I found that the G4 ran pretty smooth. I didn’t notice any delays in opening apps or moving throughout the Android OS. The choice of the Qualcomm Snapdragon 808 over the more powerful 810 is an interesting one that I feel mostly came down to both power and battery life. The 808 is a less power hungry CPU, helping the G4’s battery last longer than its competition. When you mix that with the fact that it is still incredibly smooth and fast, it begins to make sense why LG went that route.
5.5-inch QHD Display – The screen is both gorgeous and bright. When I loaded some of my professional images onto the device, I was impressed with both the color and contrast that was displayed. Blacks seemed like true blacks and the rest of the color spectrum appeared to be represented well. This screen also gets pretty bright, a nice feature when using it in direct sunlight, although it does drain the battery significantly faster. Lastly, there is a very slight curve to the display, not nearly as much as the LG Flex 2, but it is there.
Build/Portability – Overall the G4 feels pretty great in my hand. There are no hard edges/corners that make it uncomfortable to either carry or put up to your face to make a call. It is also quite thin and light, although I am sure it isn’t the thinnest or lightest phone in the world. Overall, using it was a very enjoyable experience.
Removable Battery/Micro SD – While this isn’t a big deal for your average user, it is for many of the tech junkies in the audience. Many people were upset when Samsung announced that the new S6 wouldn’t have a removable battery or a micro SD slot. The G4 has both, which is a welcome addition to an already impressive phone.
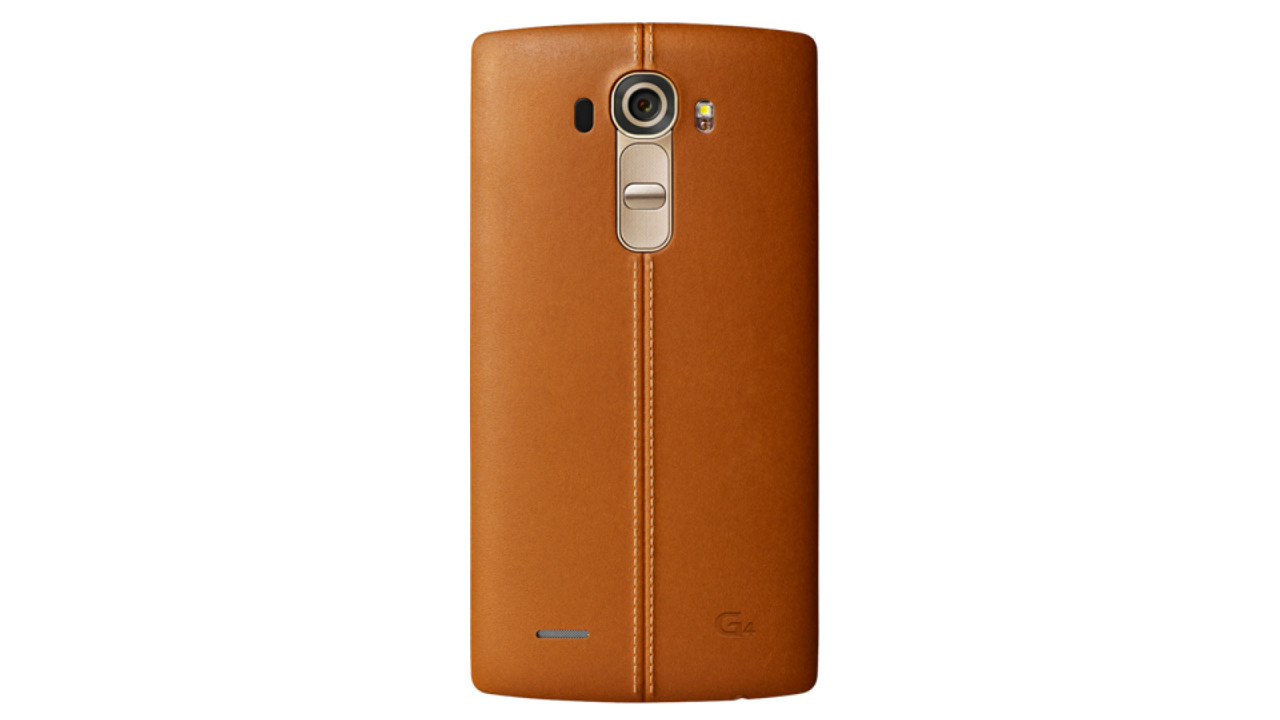
Multiple Back Cover Options – Choice is always good, after all, that is why most of us choose to go with Android to begin with. While the G4 has many different back cover options, I was given the phone with the real brown leather back cover. At first I wasn’t sure if I was going to like it, but truth be told I think it is one my favorite options now. The leather itself feels incredibly soft to the touch and because it is leather, it won’t slip and slide out of your hands. That being said, because it isn’t hard plastic or metal, it is susceptible to damage when dropped on rough surfaces, which I experienced first hand after a challenging night shot with moving cars in the middle of Zion National Park. Sorry LG if you are reading this 😉
Android 5.1 – While it sounds like a no-brainer, flagship phones don’t always ship with the latest Android software. Luckily the G4 is running Android 5.1 which is the most recent Android version available today. 5.1.1 is coming at some point soon, but Google hasn’t announced it yet so I can’t expect LG to run with software that isn’t publicly available. I will leave a more in-depth review of LG’s software that runs on top of Android for other tech websites.
Quick Charging 2.0 – While it doesn’t get as many headlines as many of the other features listed above, the LG G4 supports Qualcomm’s Quick Charge 2.0, which in my opinion is a must have in this day and age. It essentially works just as it sounds. When you plug the G4 into the wall using the LG charger, it will charge the phone much faster than other smart phones. Oh…and it has wireless charging support! Can an iPhone do that? 😉
Camera & App Features
As I mentioned above, my main focus with this review will be on the camera and its features.
Camera Modes
With the LG G4 you have three different camera modes to choose from. Each is represented by its own icon located in the top left hand corner of the app.
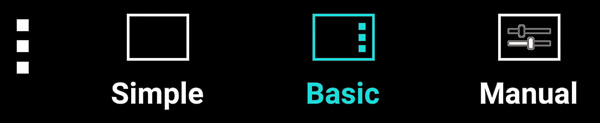
Simple – Just as it sounds, this mode is as simple as they come. You have no additional options to choose from in this mode. All you have to do is point your camera at your subject and tap on the screen. It will take the photo for you and you’re done.
Basic – If you want a little more control, you will want to play with the “Basic” camera mode. Here you can adjust settings such as your image size, turn on the flash for portrait photography, engage HDR mode or even select one of LG’s four sub camera modes: Auto, Light Trail, Panorama or Dual (where you can super impose an image on another).
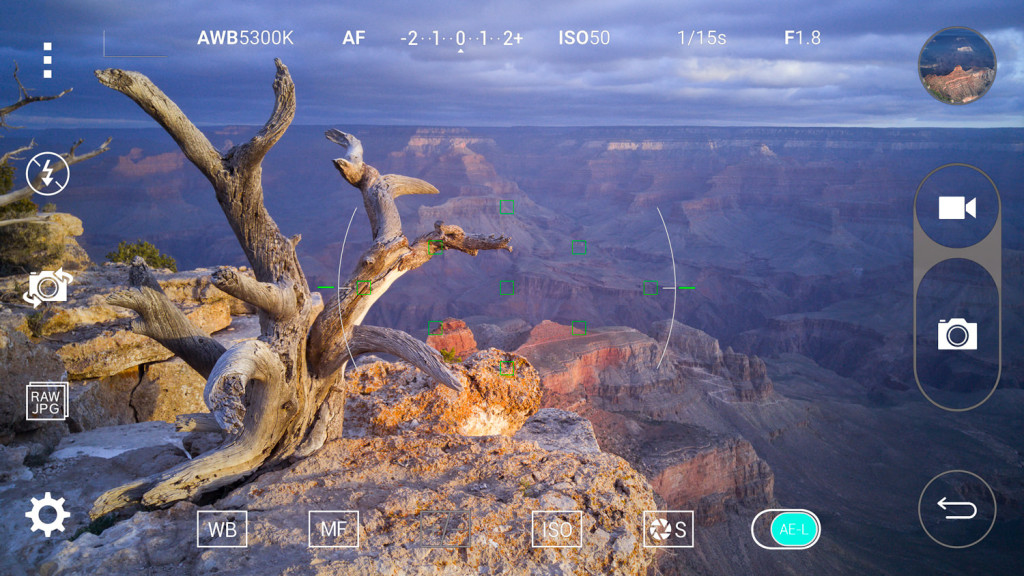
Manual – If you want near full control over the exposure of your image, you will want to use the manual mode. Here you can choose your White Balance, ISO, Shutter Speed, engage Manual Focus and control exposure compensation. You can also set each of these variables on auto and only adjust the features you wish to control. This is also the only mode that allows you to shoot in RAW (which puts out a DNG file). Within this setting you can shoot JPEG or RAW + JPEG if you want the best of both worlds. (I will cover the differences between these two options in a few minutes).

Unlike other 3rd party camera apps that can shoot in manual mode, the LG G4 does a MUCH better job in terms of exposure simulation. By this I mean that as you adjust your settings, such as ISO or Shutter Speed, the scene you are seeing through the app will get lighter or darker respectively to let you know if you are going to capture a well exposed image. In addition, LG has included a histogram and light meter, looked in the top left corner of the camera app to further help you use manual mode.
F/1.8 Lens
If there is one area that most mobile phone manufacturers are seriously competing in, it is with how fast their lenses are. While Samsung’s new S6 has an f/1.9 lens and the new iPhone has an f/2.2 lens, the LG G4 currently has the fastest lens available today at a fixed f/1.8 lens. So what do these numbers really mean?
Essentially the aperture of a camera controls how large of an opening is used to allow light to reach your cameras sensor. The bigger the opening, the more light that can enter. This comes in handy when shooting in very dark environments because your camera’s sensor needs to grab as much light as it possibly can to expose an image. So when we say that the G4 has a “fast” lens, it simply means that it can allow more light into the camera’s sensor than its competitors, which allows you to use a faster Shutter Speed to capture subjects in situations with little light.
So does it perform, as advertised. I was able to use this camera in situations with low light much easier than other mobile cameras.
AF System
Like the LG G3 before it, the G4 uses laser focus to help make sure your images are coming out sharp and in focus. In the “Basic” camera mode, you simply tap on the screen and the camera app will choose your focus for you, but in the “Normal” and “Manual” modes, you have 9 different AF points near the middle of the screen that can be used when letting the camera focus for you.
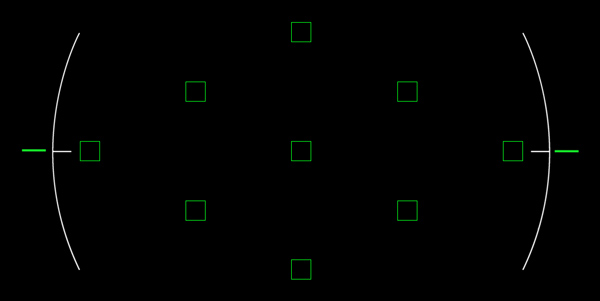
If you want to take things a little further, you are of course free to tap your finger anywhere on the screen in these two modes and the camera will than attempt to achieve AF at that spot. You will know when you have achieved AF by the small square/rectangle box turns from white to green.
Lastly, if you are so inclined, you can actually manual focus your images when using the Camera’s new “Manual” mode. While this is a nice feature that works well in bright lit scenes, I found that it struggles a bit to work in very dark situations, understandably. While it is nice to have this ability, in all honesty the laser guided AF system worked so well that I never felt I could do a better focusing job by jumping into the manual focus mode.
OIS – What Does It Mean and What Does it Do?
Often times it can be confusing when you see certain terms referenced in reviews like these. Terms such as HDR or OIS may dance across your screen, but give little context to what they are about. One of LG’s selling points for its mobile cameras has been OIS (Optical Image Stabilization). This features sole role is to help you take sharper images in darker situations. When working in dark environments, your cameras natureal response is often to increase its shutter speed, allowing you to capture more light in a scene. The problem with this is that the longer the shutter speed, the more likely your images will come out blurry because of camera movement.
If you think about it, we as humans are never truly still. We are breathing and sway constantly. Mix that with a long shutter speed and often times the results will be unusable. With OIS, there is a mechanism built into the camera that helps to counter balance the natural movements of the phone to help you take sharp images in what might normally be a challenging environment.
So how well does it work? With a bit of practice, I was able to take incredible sharp images with a shutter speed of 1/4 of a second. To put that into context, most professional photographers can’t hand hold an image with a shutter speed slower than 1/60th of a second without some help (tripod, leaning against something), depending on the lens they are using. Needless to say, I was VERY impressed!
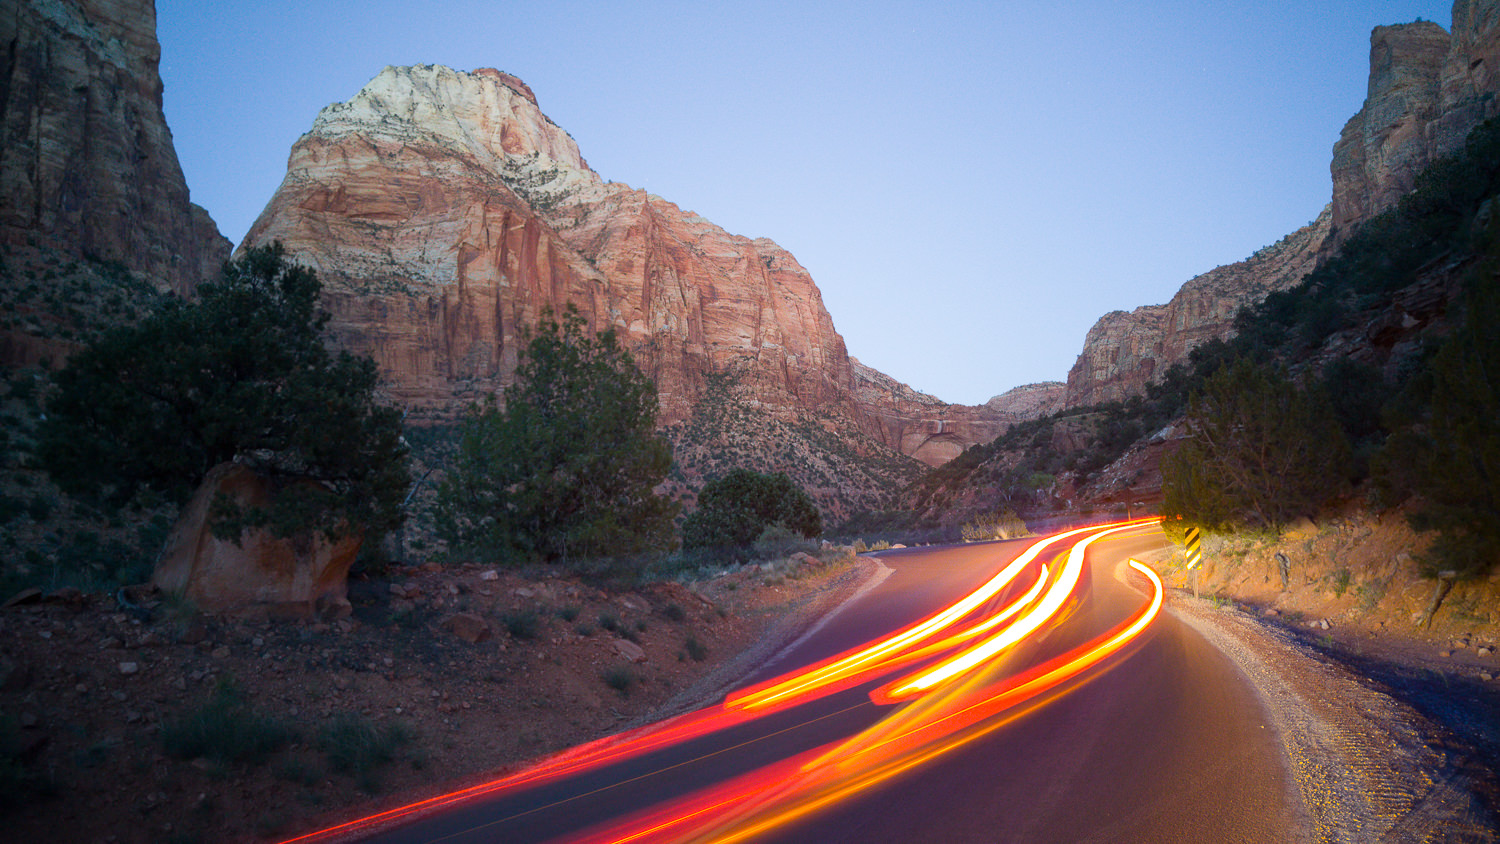
Long Exposures
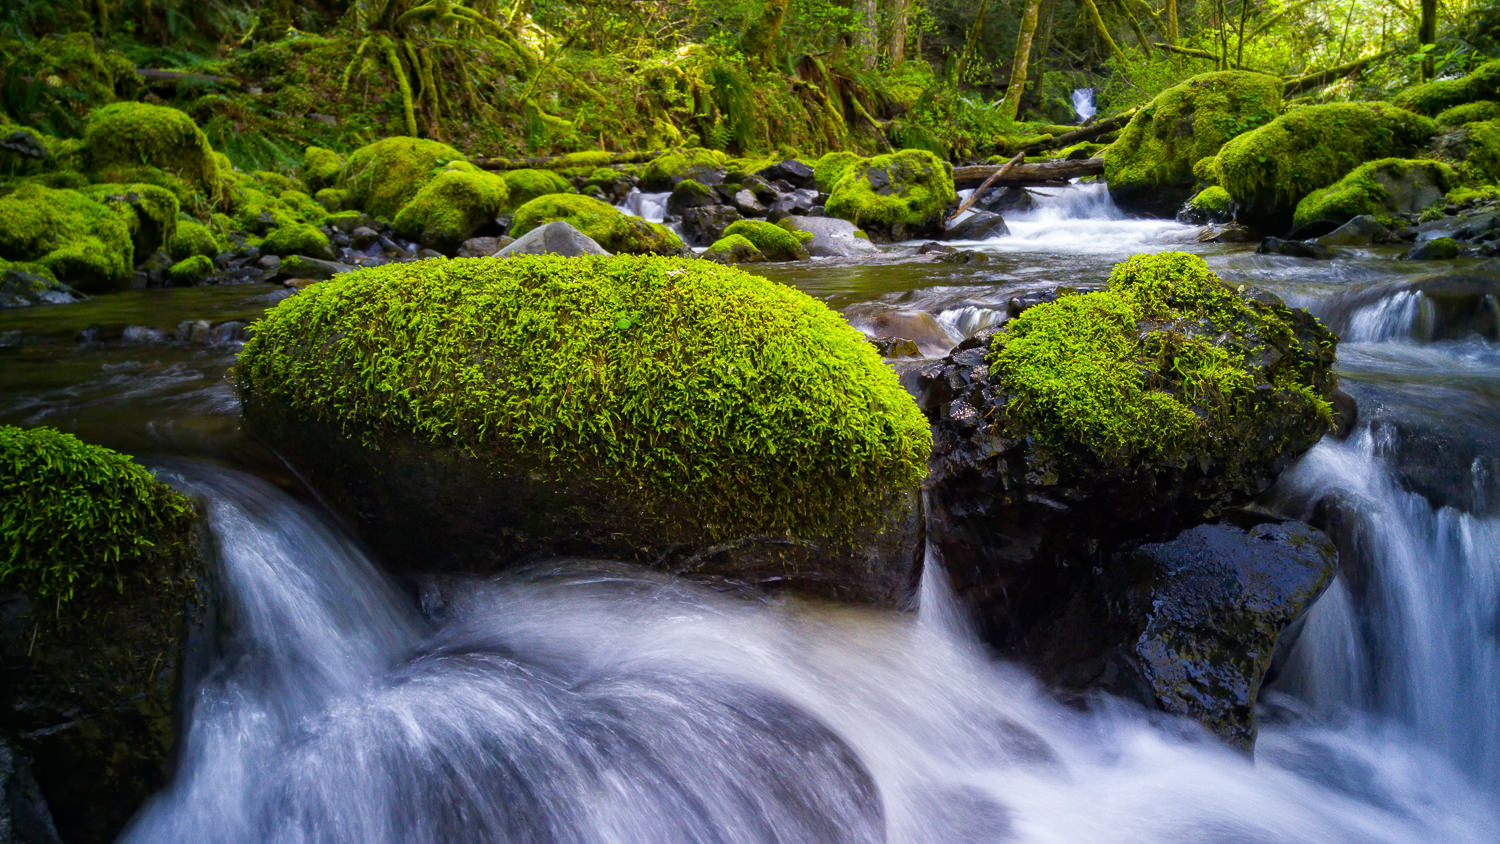
One of the biggest challenges for mobile phone photography over the years has been the ability to take quality long exposures. Generally the issue comes down to having total control over the shutter speed of a given mobile phone. While all DSLR’s and most Mirrorless cameras allow you to take up to 30 second exposures, most mobile phones are limited to a few seconds at best…and even than you can’t choose how long your shutter will stay open.
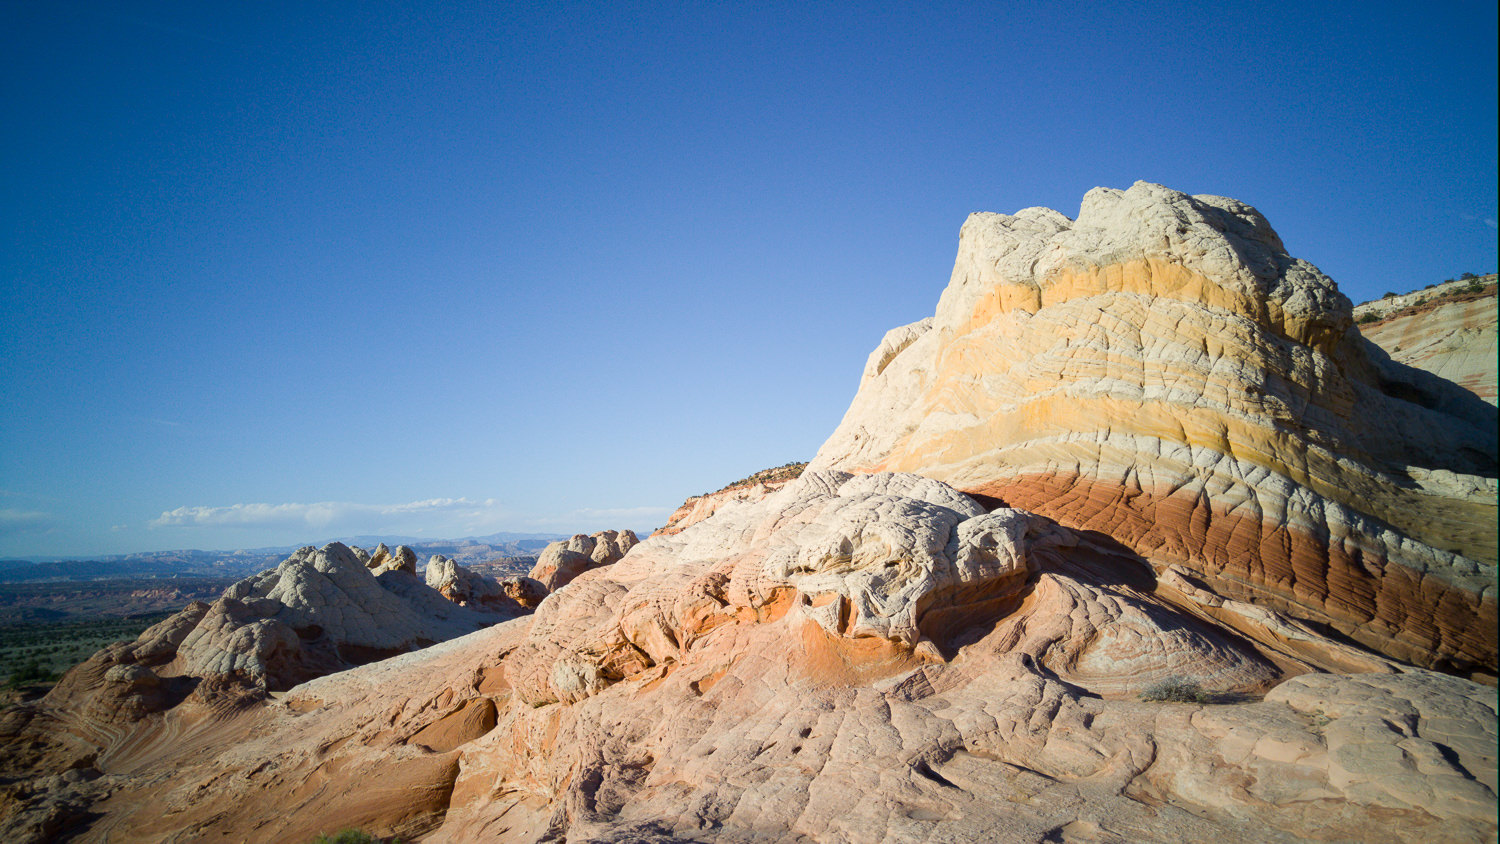
With the G4’s new manual mode, you can take long exposures up to 30 seconds in length, which is well…pretty awesome. I have found that with anything over 1/4 of a second you really need to have a tripod, but up to that point it is fair game if you have steady hands. To easily attach your camera to a tripod, I have been using a Joby GripTight which works simply enough.
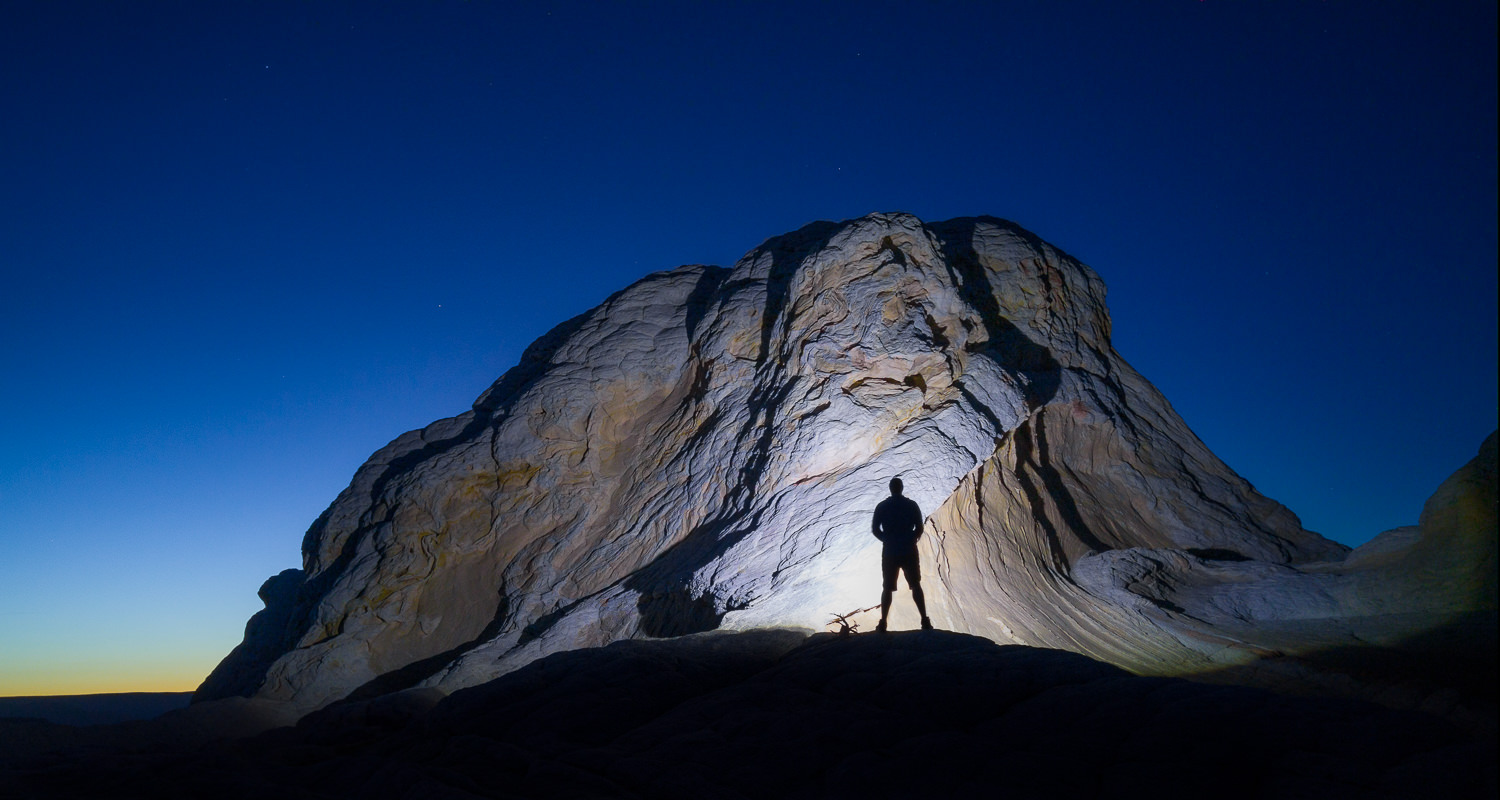
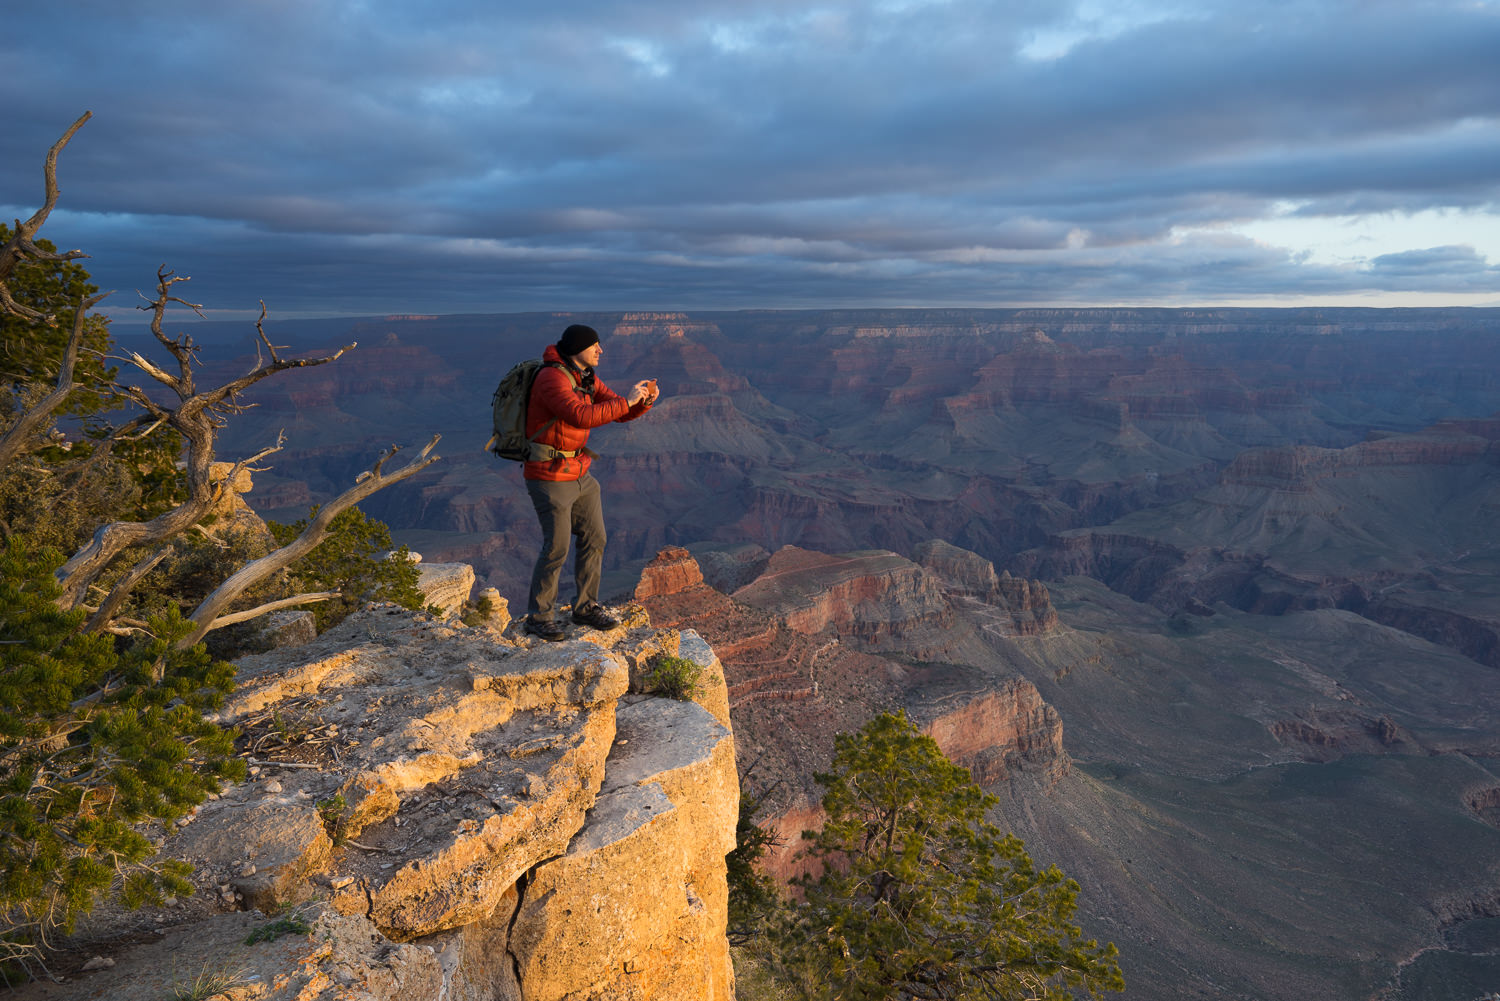
Once you have found a scene you want to capture, jump in the camera app and change over to manual mode. From here you can select how long you wish your Shutter Speed to be. For the above image of me light painting a rock at a place called “White Pocket” in Nothern Arizona, I used a 8 second exposure. In order for the camera to find focus, I had to shine my bright flashlights on the rock itself while my friend tapped on the screen to find focus before taking the photo. By using a 10 second shutter delay and achieving focus before hand, we were able to come away with a pretty awesome photo that wouldn’t of been possible on nearly any other smart phone.
HDR Mode
HDR stands for High Dynamic Range. Essentially an HDR photo contains a larger spectrum of light than a single image, which can be handy in certain situations, such as when you have a bright sky but dark foreground. Most normal cameras (including professional ones) can’t handle such a contrast in light throughout a scene. When you enable the HDR Mode on the G4, it will attempt to create a single JPEG image that contains an expanded dynamic range by combining number of different images at different exposures.
While the G4’s HDR mode does a good job of expanding the DR of a scene, you do lose some texture details in the process. While this isn’t a big deal for 95% of use cases out there where people will simply be sharing these images on social media or making small prints, the other 5% of users might be disappointed if they try to print these photos large. Although to be fair, if someone is serious about wanting a print something using this phone, they should be shooting in manual mode and use DNG image files anyway.
Quick Tips
Check out these three quick tips to help you get the most out of the LG G4 camera app.

Quick Shot – If you are in a hurry and see someting that you want to capture right away, simply press down the volume button (found on the back of the phone) twice. It will automatically open up the camera app and instantly take a photo for you.
Taking a Photo – With a 5.5-inch display, the G4 might be too big for you to easily hold with one hand. If you are trying to take a photo single handedly and having trouble getting your thumb over the shutter button, simply tap the volume up or down key once while the app is open to snap a photo.
Selfie Count Down – No matter if you love or hate selfies, they are here to stay. With the G4, you can now easily take single selfie or four (4) consecutively. To do so, turn the selfie mode on in the camera app and than hold up your hand like you are going to give the camera a high five. If you are doing it right, the app will recognize your hand and a green box will appear around your hand. If you want to take a single selfie, close your hand and open it again just once. If you want to take a sequence of images (4), close and open your hand quickly twice. The camera app will than begin a count down allowing you to prepare for your epic selfies.
JPEG vs RAW/DNG
One of the most common debates between photographers is the use of JPEG vs RAW image files, no matter what camera is being used. While I could talk for hours about this topic alone, I will try to give you the best “cliff notes” version I know since the LG G4 has RAW image support in the form of DNG files.
JPEG images are the most common form of the digital photo and are essentially finalized images. By this I mean that the computer inside your camera has already looked at the photo and said, this image needs a certain amount of saturation, contrast and sharpness applied to it before it shrinks the image file size down to make it more easily shareable. While you can still edit JPEG files, you generally can’t push them very far before causing unwanted results. The idea is that these images are ready to go as soon as you look at them, which is probably suitable for most people out there. However if you are like me and like to have more control over your images (and are serious about printing a few), than you have probably been asking for RAW image support in mobile phones for ages.
In comparison to a JPEG image, a RAW image (in LG’s case…a DNG file) retains ALL image data. There is NO sharpness, saturation or contrast added to your image and it hasn’t been compressed or shrunken down in file size. The benefit to this is that you have much more flexibility when it comes to processing/editing these images because of the image data that is preserved. It is important to note that you will need photo editing software to take advantage of this image file format, such as Adobe Lightroom or Photoshop (among other options).
So how does the LG G4 handle both file types? Well just about as you would suspect. The JPEG files coming out of the camera look nice and are essentially ready for Facebook. But like the HDR mode I mentioned above, they (like most mobile phones) get a little to aggressive with noise reduction and can lose a bit of texture detail in parts of your image. The G4’s DNG files on the other hand look great. They contain much more image data and since no adjustments have been made to these images, their sharpness is maintained much more consistently.
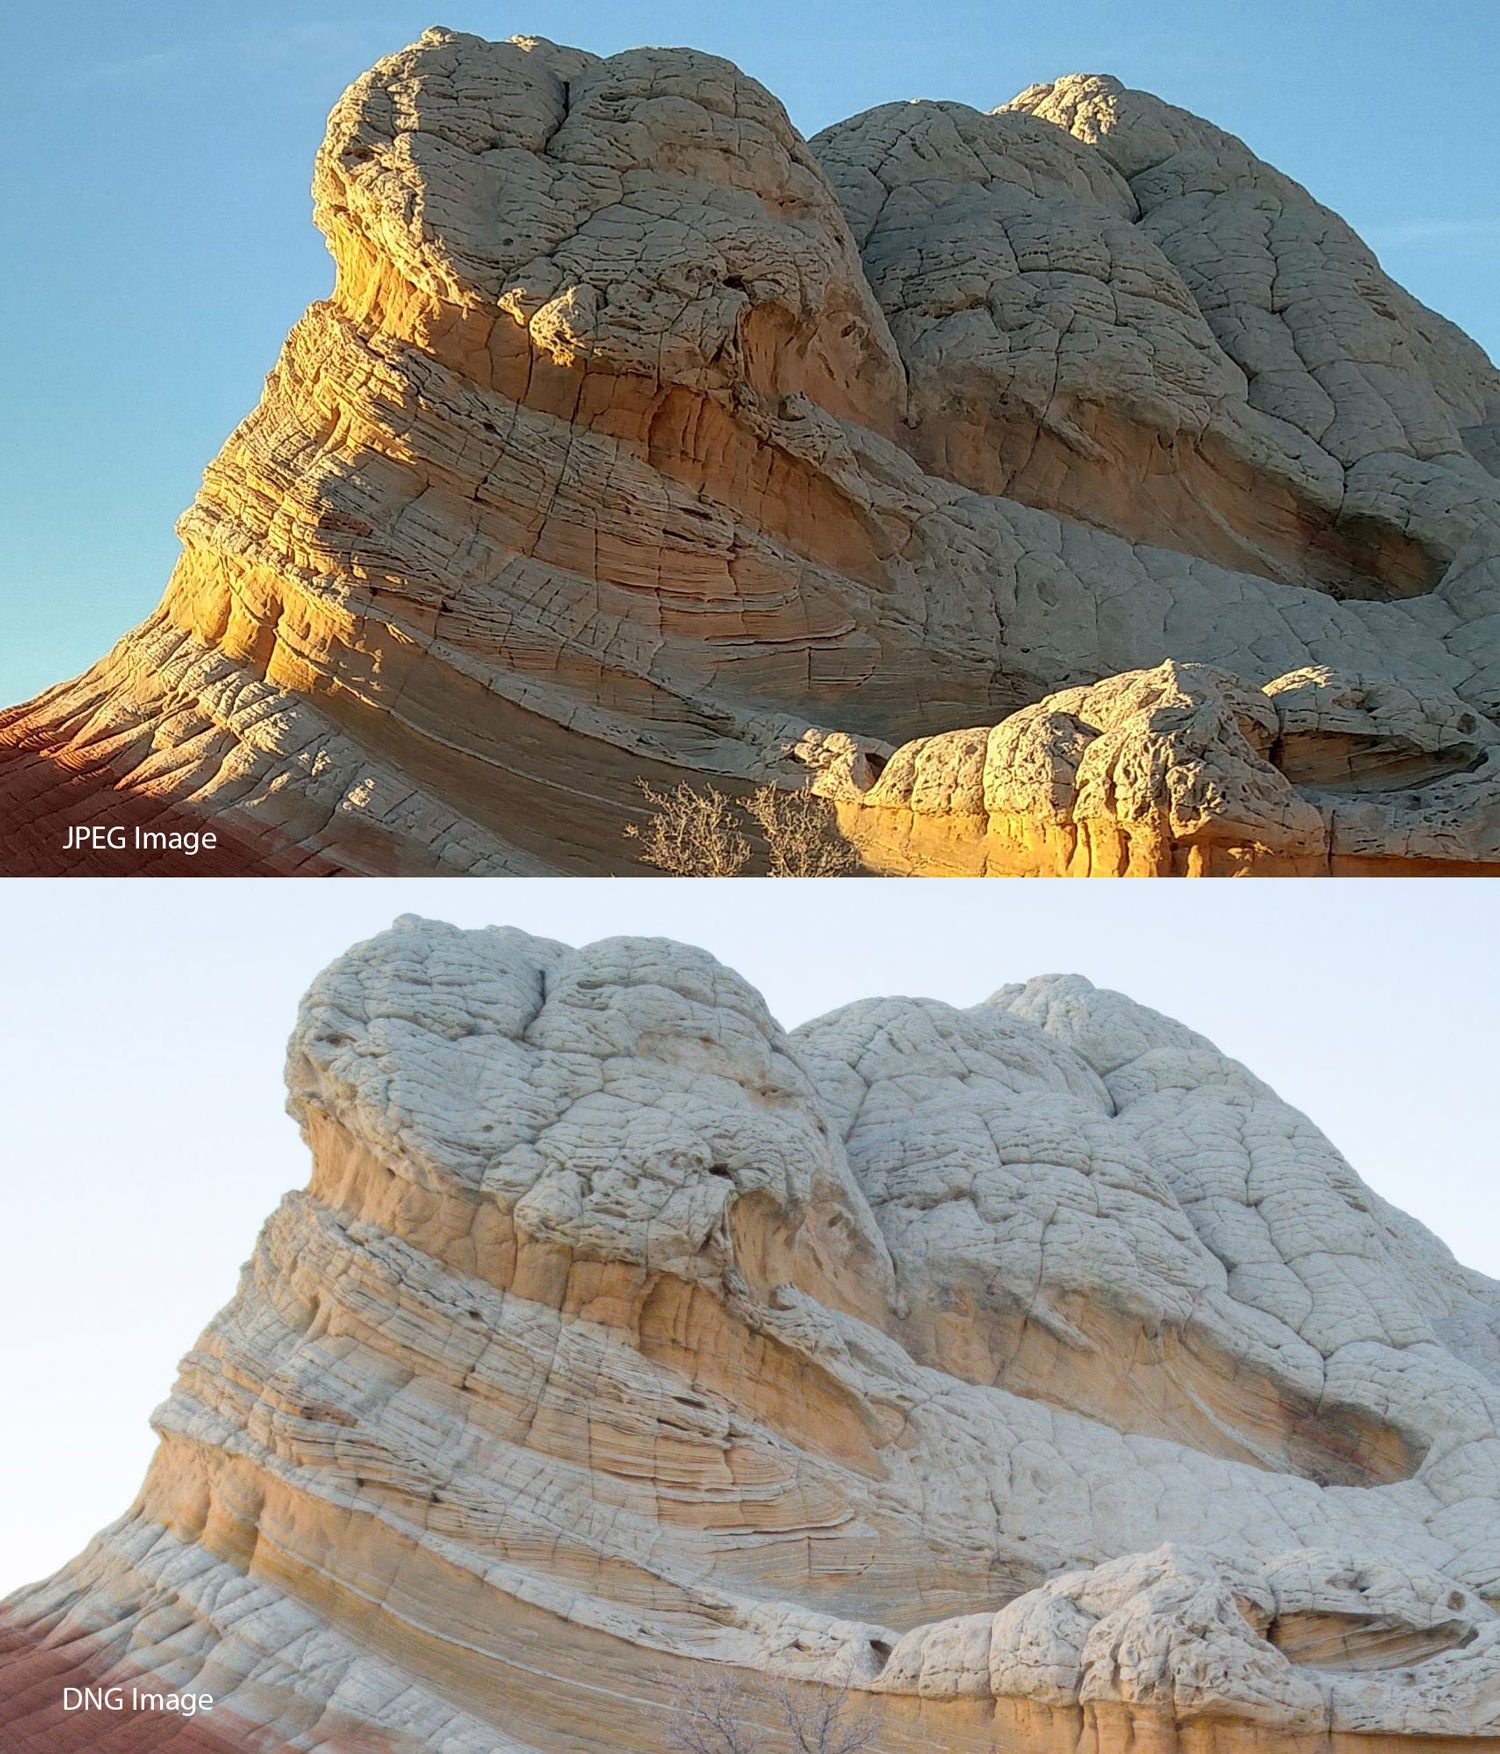
The trade off? DNG files are MUCH larger in size, sometimes coming in 2x or 3x as large as their JPEG cousins on the G4. If you are constantly backing your images up to the cloud (Dropbox, Box, Google Drive), this isn’t an issue, but if you aren’t…you might find yourself running out of room on your phone sooner than you thought…even with expandable storage.
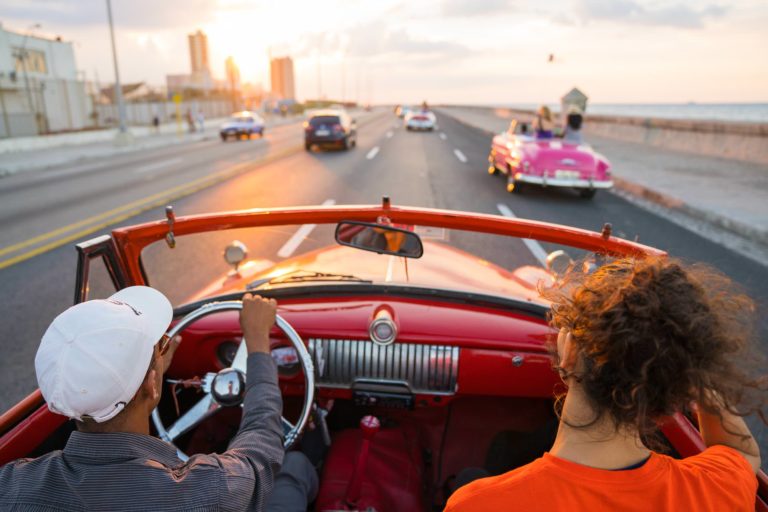
Auto vs Manual
While the differences between these two camera modes is fairly obvious, I wanted to share with you a real world example.
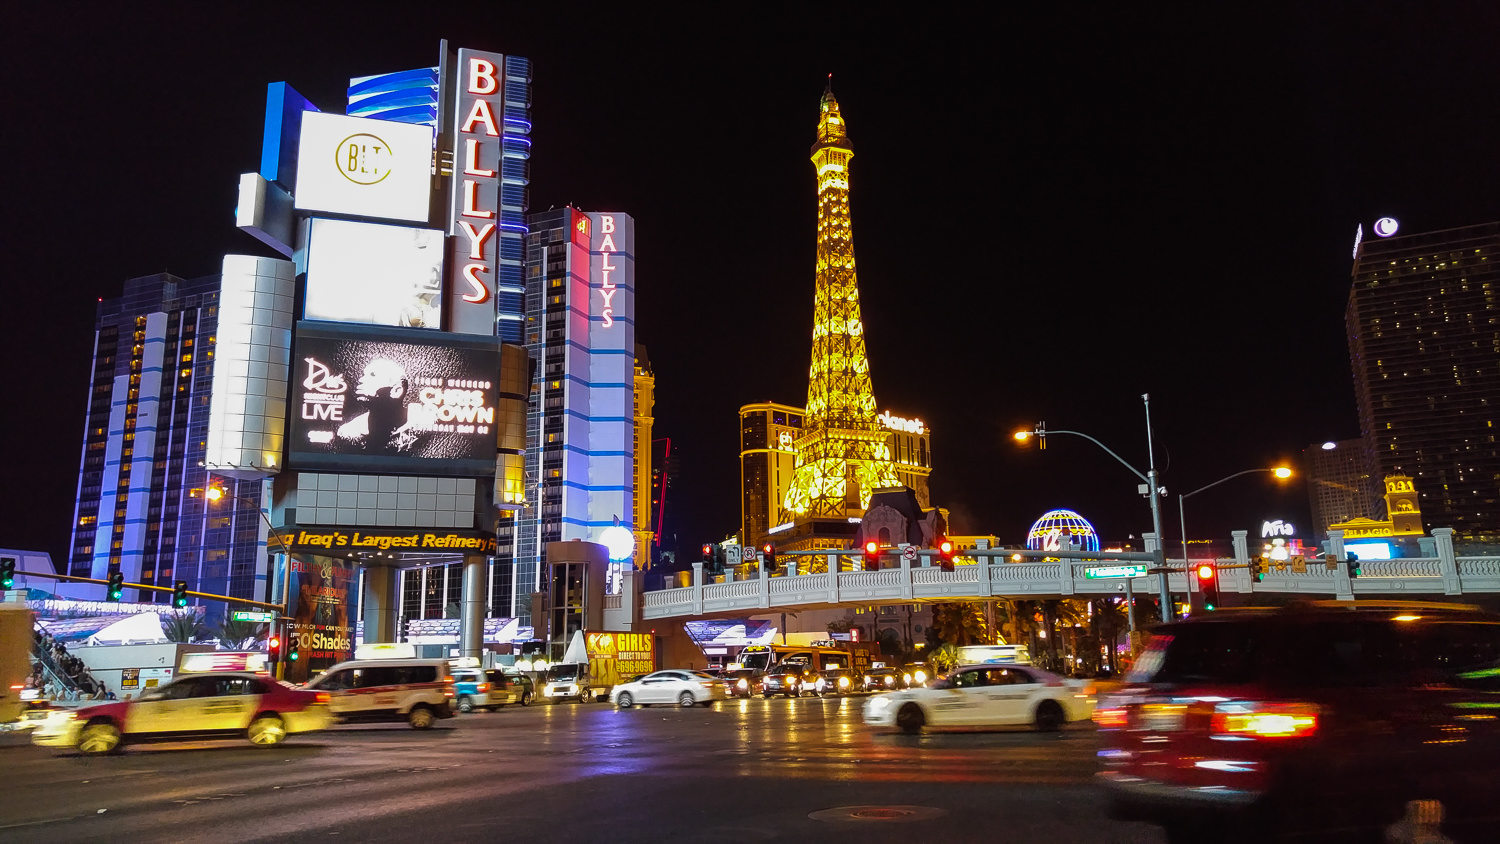
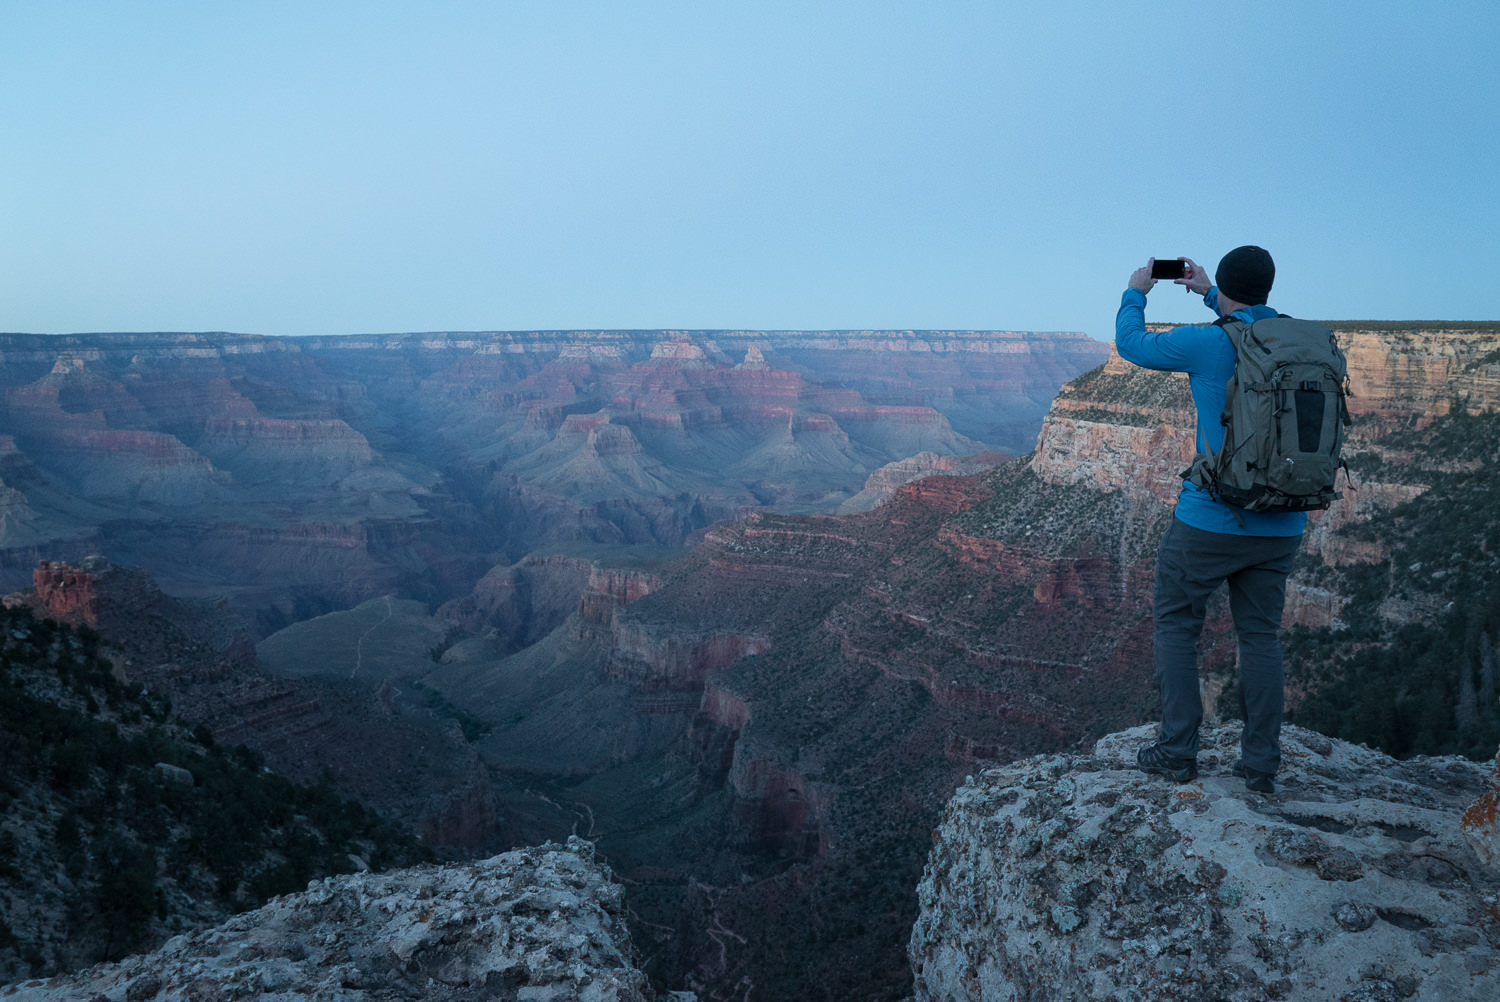
When using the G4’s Auto Mode (Basic or Normal) the final look of your image is determined by the camera itself, but not you. While you can choose where to focus, most of the rest is up to the phone. In this image we have pretty good details all around and even a little movement in the passing cars.
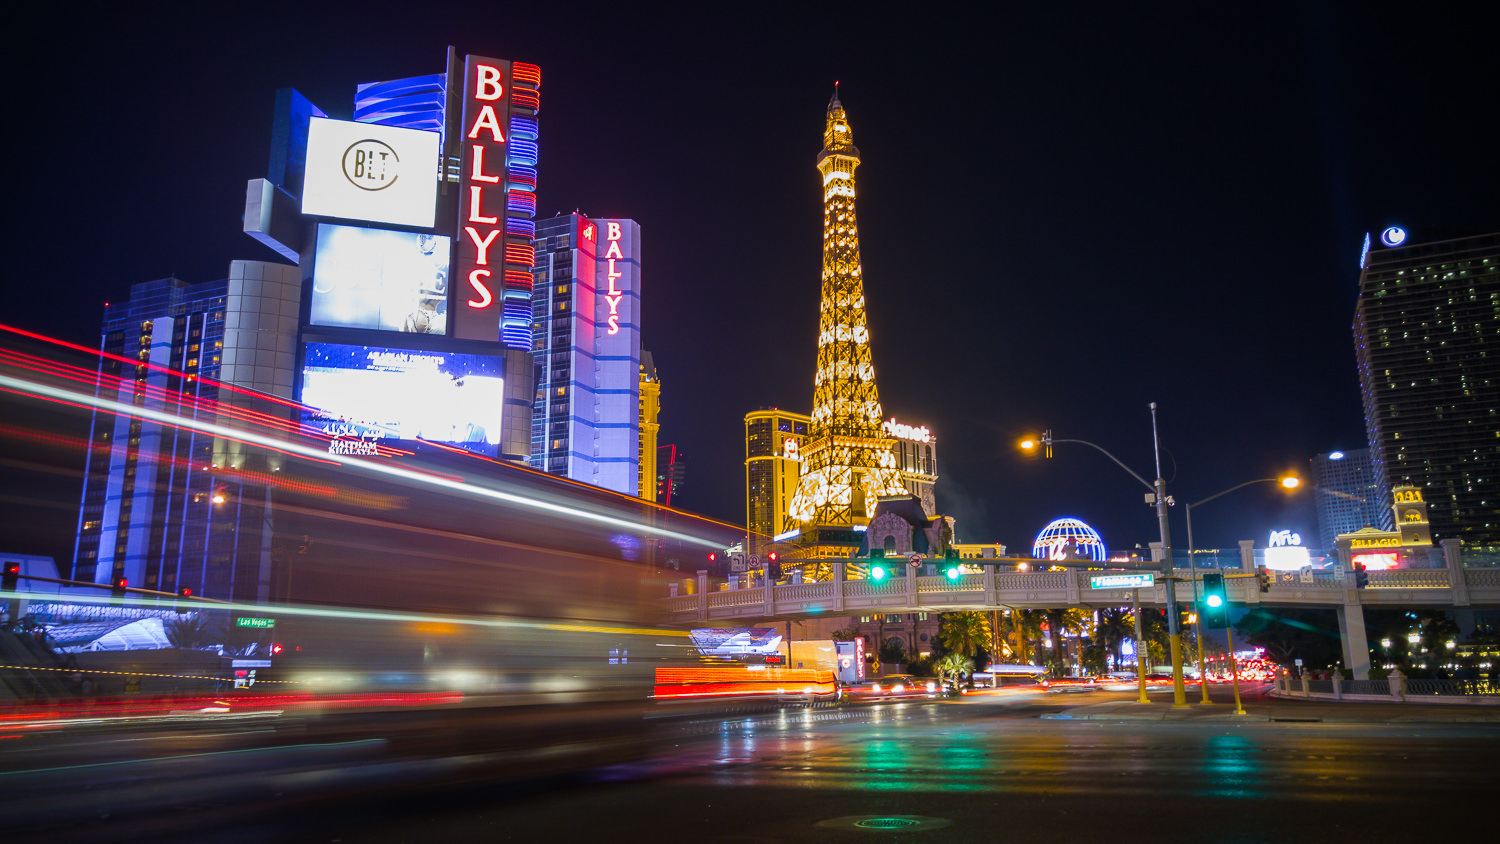
When you switch into manual mode and begin adjusting the settings manually, you might be surprised at just how impressive the results can be, especially for a mobile phone. Plus you can capture DNG files in manual mode!
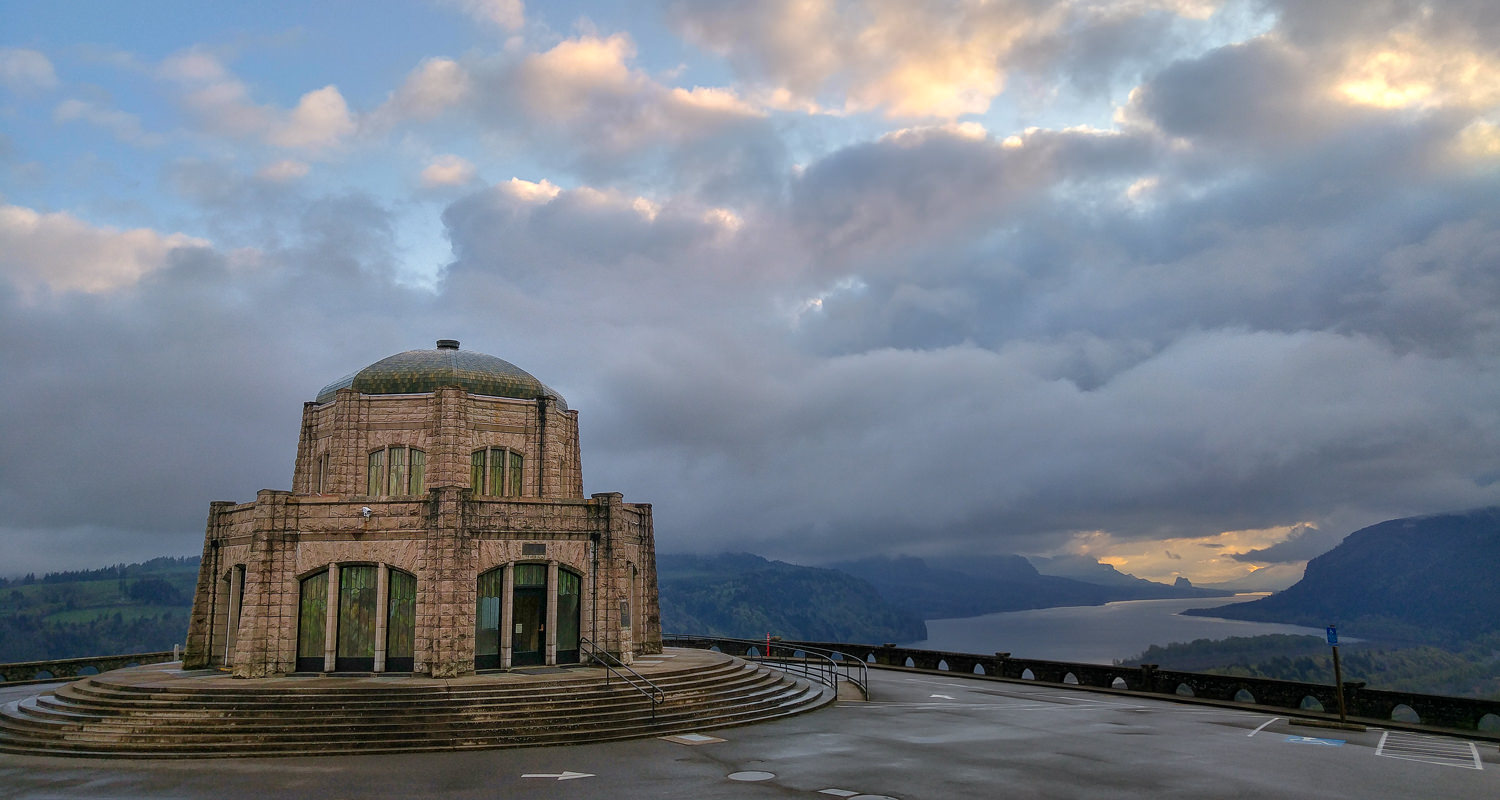
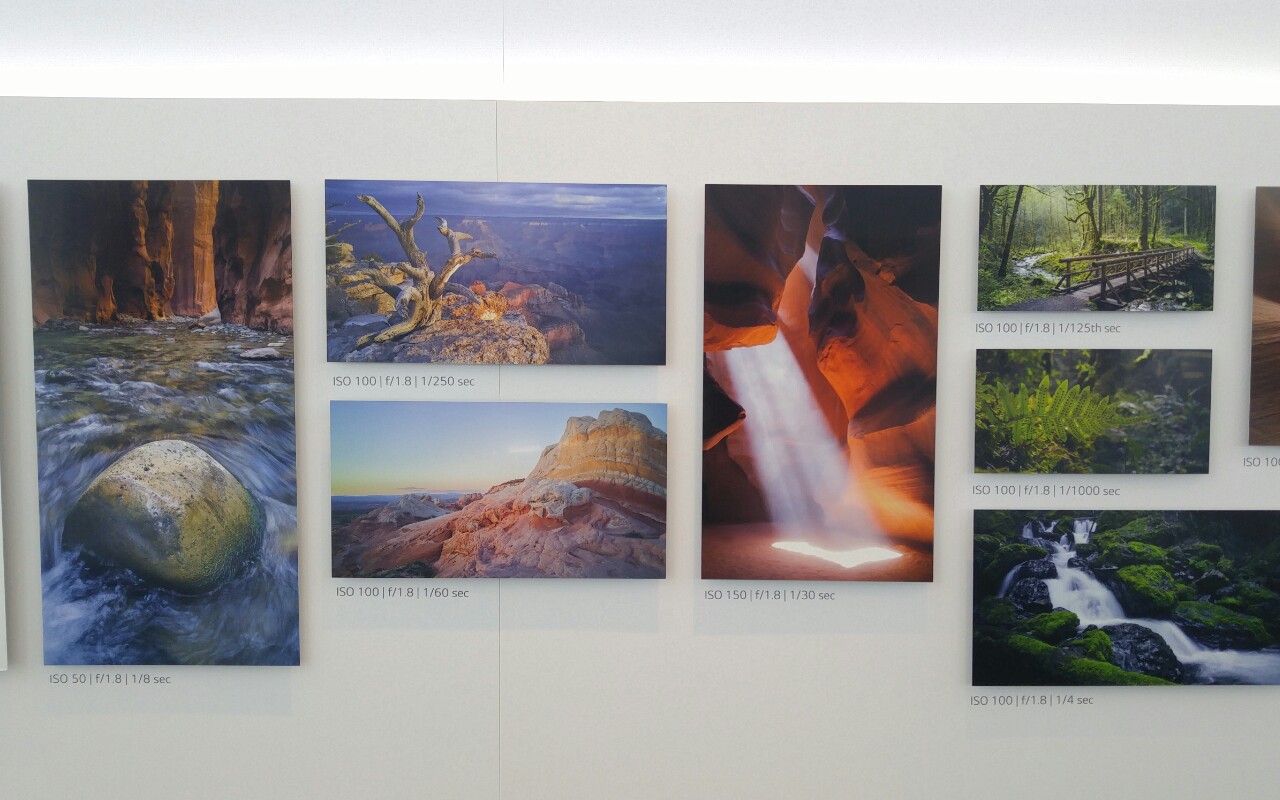
SOTC Images
The term SOTC stands for Straight Out of The Camera. This small gallery represents a number of images taken with the LG G4 (Both JPEG & DNG) with zero photo editing applied to them after the fact.


Edited Images
This gallery of images represents what is possible with the images files coming out of the LG G4. Each of these images have had some post processing applied to them, but as a whole…it has been minimal. The spent on average no more than a few minutes editing these images.


Full Resolution Images
While the above images are great for showing off what photos out of the G4 look like, it can be helpful to dive into the details a bit. The following two images have links to FULL RESOLUTION versions of the files in their captions. Now please keep in mind, that the software on my G4 is NOT the finalized software. Updates have come out internally with LG to improve the output of the camera beyond the already impressive results that you have seen in this review.
Final Thoughts
It is always great to see mobile phone manufactures really put the extra effort into making the camera aspect of their devices truly something special. After spending a month with the LG G4, I think it is safe to say that I have come away very impressed. LG has done a wonderful job of balancing features and a good user interface for both amateurs and professionals alike. Overall, the quality of images that have come out of this device are truly hard to argue with as you can see here in this review.
While I would prefer a slightly softer touch in terms of noise reduction with the JPEG images, the truth is that the power of the manual mode inside the camera app mixed with support for DNG simply make this one of the best, if not the best mobile camera phone currently on the the market.
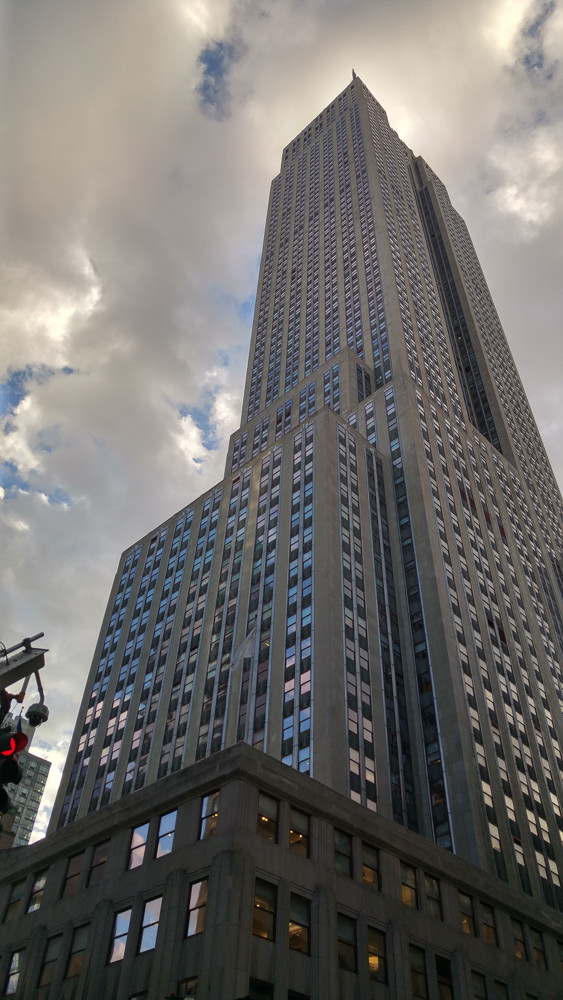
For the launch of the LG G4 I worked with LG to get 15 images printed on metal (using Bay Photo) to be put on display in both New York and Korea. Even blowing the images in sizes up to 32″ garnered pretty incredible results. In some ways I still can’t believe that many of the images were taken with a mobile phone.
On top of all this, the software I have on the G4 that is sitting right next to me is NOT the final software that will ship with the G4. I was told by LG that an update that just came out internally has improved noise levels, AF and sharpness throughout, so keep that in mind.
What are your thoughts? What would you of liked to see in the LG G4? Leave your thoughts in the comments below…
Full Disclosure
While I partnered with LG to create both images and videos to help promote the global launch of the LG G4, they never asked me or payed me to write this review. These thoughts and opinions are mine and mine alone. Even if you think that I am biased because of our business arrangement, I have provided enough details and high resolution images for you to come to your own conclusions about this device.