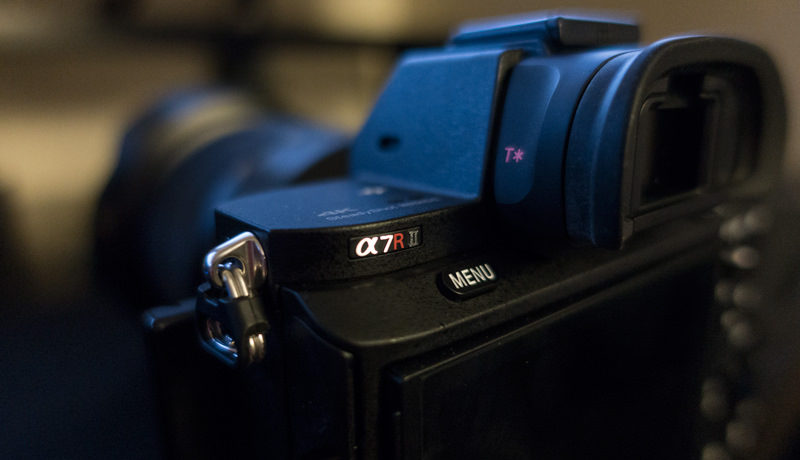
With the release of the Sony a7rII, there is no doubt that the photo industry is talking…and for good reason. Sony has really pushed the boundaries with this full frame 42mp mirrorless camera this time around. For many, this was the final nail in the coffin that allowed them to make the move from a DSLR to a smaller (and mostly lighter) mirrorless system. And with every new camera, there are new menu systems to learn, new custom button functions to remember and new features to wrap your head around. So no matter if you are brand new to Sony or a long time user who just picked up the latest flagship camera, I have compiled a list of 15 of my favorite tips to help you get the most of your brand new Sony a7rII.
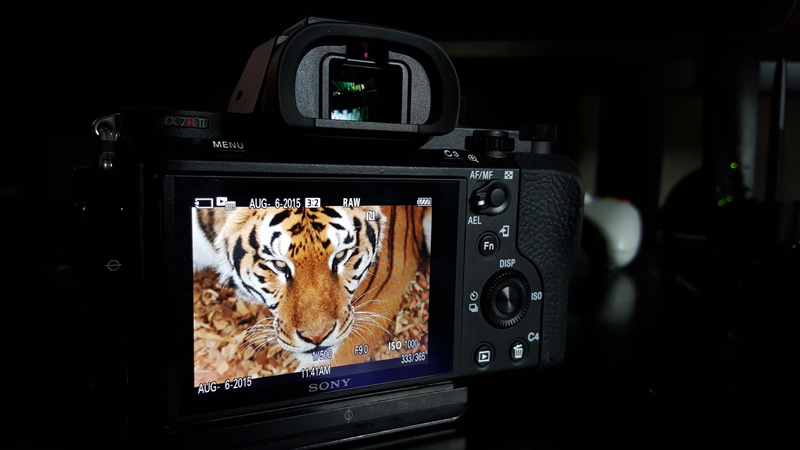
Shoot In RAW
The first thing you will want to do after picking up your a7rII (well most of you) is change the image file format from the default (JPEG) to RAW (or RAW+JPEG if you are into that sort of thing). The a7rII has an incredibly powerful 42mp sensor and by shooting in RAW you are harnessing all that it has to offer. You might be surprised at how many people forget to change this setting with a brand new camera.
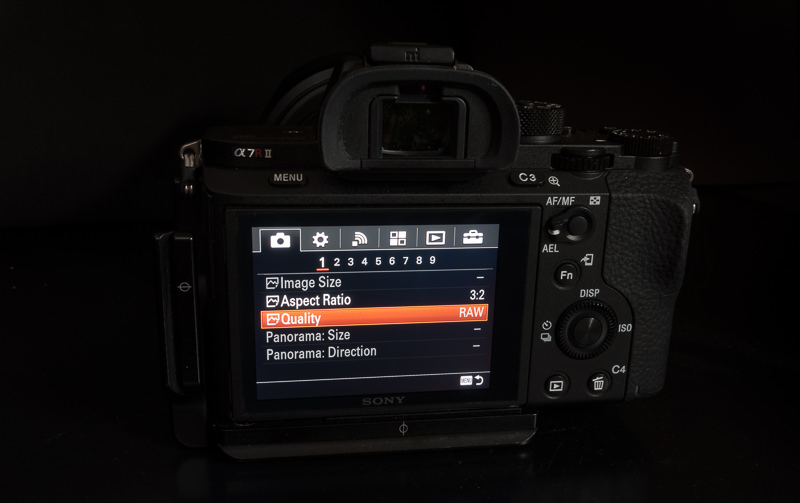
To do this, hit the Menu button and navigate to the camera settings (camera icon). In the first section of this tab, you will find “Quality”. Select it and change it to the desired mode.
Pick Up An L-Bracket & Wireless Remote
Two of the most important accessories you can pick up for your new Sony a7rII are an L-Bracket and a Wireless Remote. An L-Bracket will allow you to easily switch from horizontal to vertical modes while always maintaining a proper center of gravity with your tripod While a wireless remote will help you avoid unnecessary camera shake when taking an image as well as open up easy use of the cameras BULB feature to take photos longer than 30 seconds in length.
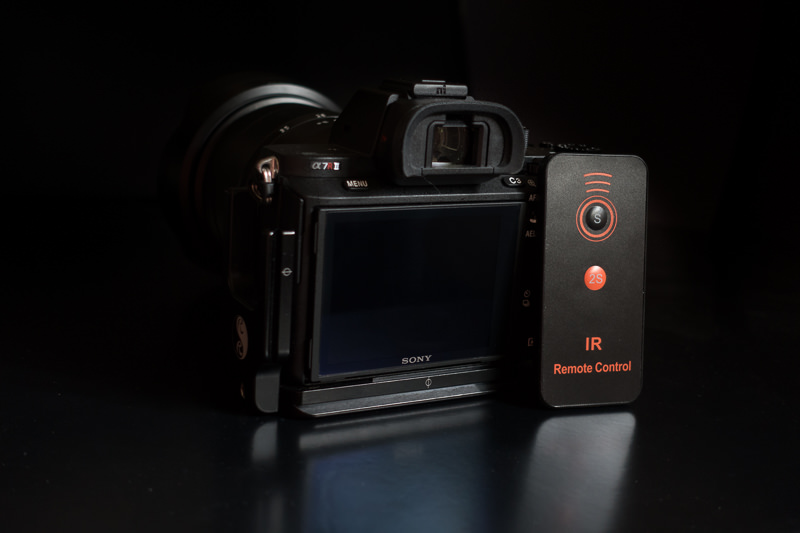
When it comes to L-Brackets, I highly recommend Really Right Stuff. They are well built and offer great customer service, although they are expensive. Two other options are Markins and Neewer. When it comes to picking up a wireless remote, you can opt for the Sony branded model if you want, but it is expensive for some reason. Instead, I recommend heading to Amazon and picking up a $9.99 Foto & Tech wireless IR remote.
* Do note that the wireless remote will NOT work with your default a7rII settings. You have to jump into the Menu system, move to “Toolbox” tab (far right) and then to Section 3. There you will find a “Remote Ctrl” option. Make sure it is set to “On”.
Make The Most Out Of Your EVF
One of the upgrades from the first generation a7r is the EVF (Electronic View Finder). The new EVF has a higher resolution, is wider (.78x) and is sharper. However, if you zoom-in to check focus, you might find the details look a touch too “pixelated” for your tastes. Luckily there is an option to engage in “High” quality EVF output. Just be warned that this can eat more battery life.
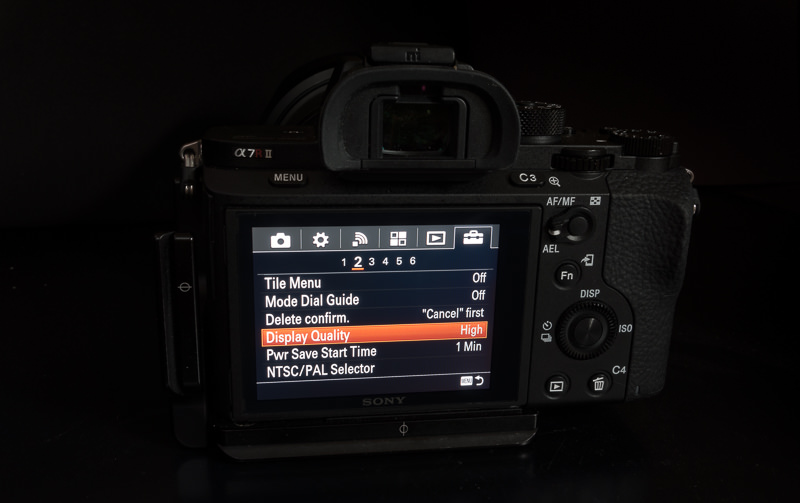
To change your EVF quality, press the menu button and return to the “Toolbox” menu (far right), move to the 2nd section and you will find “Display Quality”. Change it from “Standard” to “High” and reap the benefits.
Allow Vertical Images to Look Great
When viewing images on the back of my camera, there is nothing more annoying than taking a vertical image and being forced to look at a tiny compressed version of it on your LCD. To fix this, you can adjust the rotation of your images being displayed, allowing the image to take up the entire LCD screen when you rotate your camera on its side.
To do this, jump into the menu and move to the “Playback” tab (looks like a Play button on a DVD player) and then in Section 1 you will find “Display Rotation”. Make sure it is set to “AUTO”.
Turn Off Noise Reduction & DRO
Another important feature to turn off (at least for me) is both DRO and Noise Reduction settings, both of which are turned on by default. What do these settings do? DRO (Dynamic Range Optimizer) will essentially brighten some of your shadows and darken some of your highlights to expand the Dynamic Range of your shot. As for Noise Reduction, the two settings you have to look for are “Long Exposure NR” and “High ISO NR”. While both of these features can be helpful to eliminate noise from your images, I prefer to do this in post processing, where I have much more control over how it happens and which parts of my images are being affected.
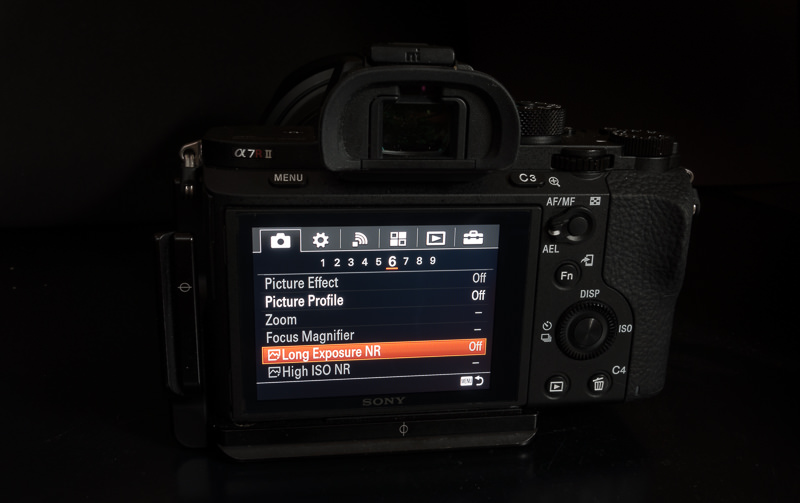
To do this, jump into the menu system and move to the “Camera Settings” (looks like a Camera). From there head to Section 5 & 6 respectively. Switch DRO from “AUTO” to “Off” and then make sure “Long Exposure NR” and “High ISO NR” are both set to off (High ISO is only on with JPEG images).
Set Minimum Shutter Speed for Auto ISO
One feature that I have been asking Sony for for years is the ability to set a minimum shutter speed with the Auto ISO. Why is this important? Imagine using the Aperture Priority Mode to capture an image of a person. You set the aperture to f/4 because you want some decent bokeh (background blur) and you know you want to use the lowest ISO possible (to avoid noise and get the cleanest looking colors). The problem is that light is fading and you know that your shutter speed is going to have to drop in order to capture enough light in your image. By setting a minimum shutter speed (of say 1/60th of a sec) and turning on Auto ISO, you force the camera to only increase the ISO if the shutter speed drops below your set limit. This way you don’t have to worry about camera shake, because your shutter speed will never go below your minimum limit.
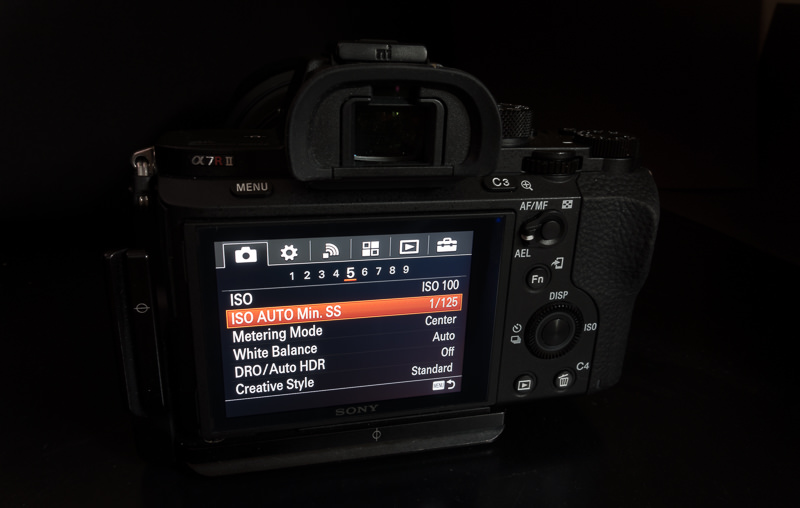
To do this, open up the menu system and move to the “Camera Settings” tab and then Section 5. Here you will find the “ISO AUTO Min. SS”. Set your minimum limit and from then on, any time you jump in AUTO ISO, it will be set for you.
Stop Accidentally Recording Movies
A common complaint from most Sony a7 series camera users is the fact that they accidentally hit the movie record button on the back of their cameras while either taking a still image or simply picking up the camera. Luckily there is an easy fix that only allows that button to work when you are specifically in the “Movie” camera mode.
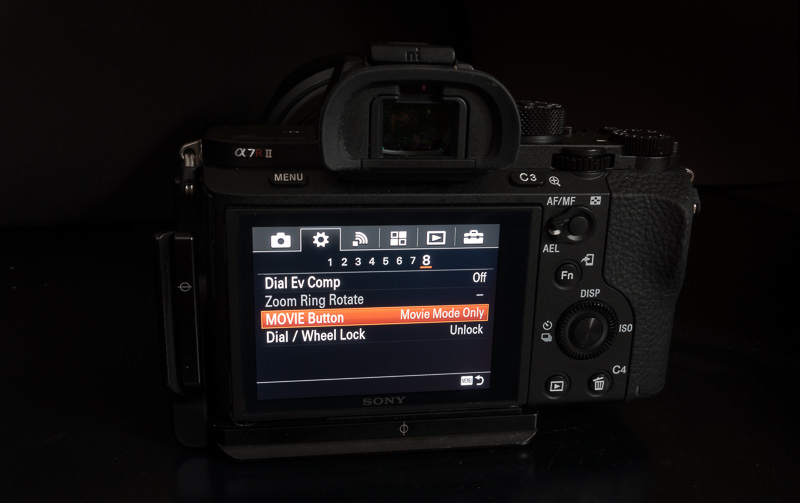
To fix this issue, press the menu button and head to the “Settings” tab (looks like a gear). Move to Section 8 and there you will find the “MOVIE Button” menu item. Click on it and select “Movie Mode Only”.
Set Up Focus Peaking for MF
One of my favorite features of Sony’s mirrorless cameras is the ability to utilize “Focus Peaking” when manually focusing images. This adds a small color overlay to your image that helps you determine when parts of your photo is in focus. However, it is important to note that this is meant to be more of a guideline rather than a definitive way to make sure your images are tac sharp. I find that does a great job of getting me “pretty close” to tac sharp (when the red color begins to appear), where I then have to pay close attention and make sure I have achieved perfect focus.
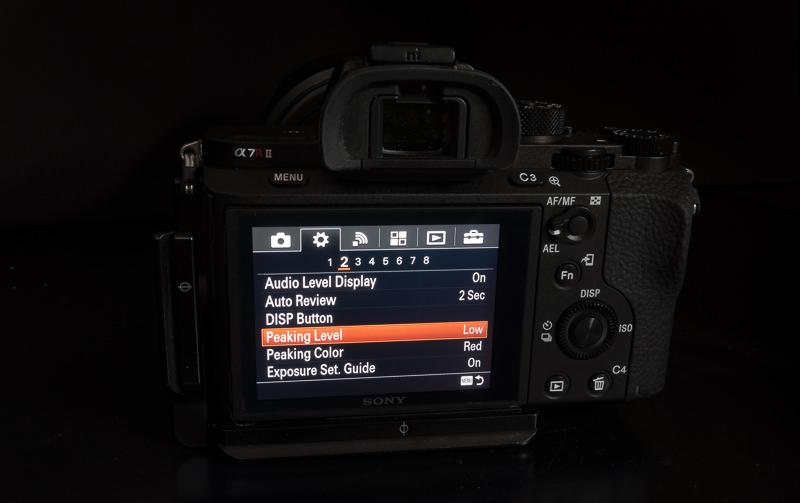
To turn Focus Peaking on, press the Menu button and move to the “Settings” tab (2nd from the left). Then move to Section 2 and select the “Peaking Level” menu item. Change this to “Low”. Then select “Peaking Color” and change it to “Red”. I have found those two settings together to a good job of not only being unobtrusive but also pretty helpful in helping you find focus.
Set Self Timer for Auto Image Brackets
Probably the most requested feature by landscape photographers is the ability to use the self-timer feature with auto bracketing (something most other camera manufacturers have allowed for years). Historically the issue has been that both these features were in the same menu, but Sony only allowed you to use one at a time, forcing you to choose between the two. No longer!
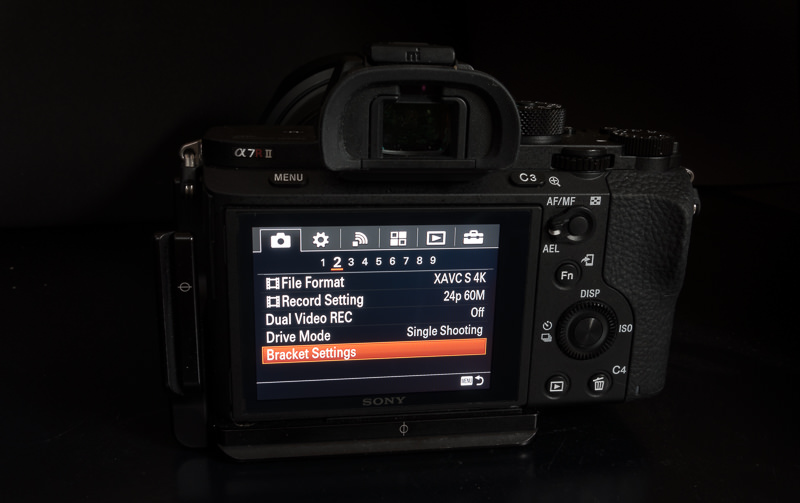
To turn on the self-timer feature with auto bracketing, press the menu button and move to the “Camera Settings” tab (1st from the left). Move to Section 2 and find “Bracket Settings”. Once you open up that menu item, you should see “Selftimer during Brkt”. Click on it and set 2, 5 or 10-second delay.
Customize Your Cameras Buttons
One of the best ways to truly customize your experience with the Sony a7rII is by changing the function of the buttons on your camera to your liking. Do you find yourself constantly digging through the menu system for a setting? Try setting it to one of the four custom buttons, the back wheel or if we are being honest…nearly any button on the camera. In addition, you can also control which items show up in the “Function Menu” when you press the “Fn” button on the back of your camera. Bottom line, there is no universal “right” way to set up these buttons, so be prepared to experiment to find what setup works best for you!
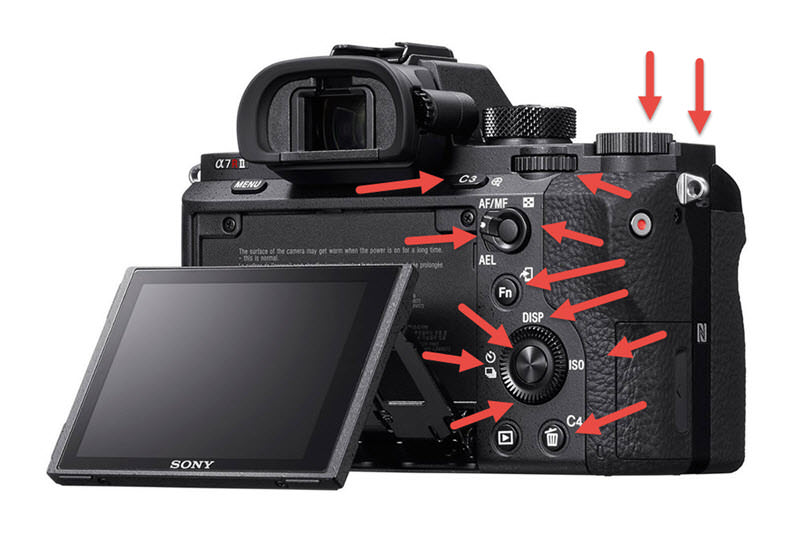
To start adjusting the functionality of the buttons on your camera, jump into the menu system and head to the “Settings” tab and Section 7. From there the two key areas you are looking for are “Function Menu Set” and “Custom Key Settings”. In there you will see all of the different ways you can adjust your user experience with this camera. The following three tips talk about setting two of my favorite custom buttons.
Setup Back Button Auto Focus
Many photographers coming from DSLRs (especially wildlife & sports photography) have a fondness of separating their shutter release button from their focus button. Why? Because it is very easy to accidentally take an image when all you wanted to do was achieve focus. This can cause you to miss “THE” shot if it happens at an inopportune time. By keeping them separate, you can make sure your focus is locked before pressing the shutter button, which you know will simply take the photo and not try to find focus once again.
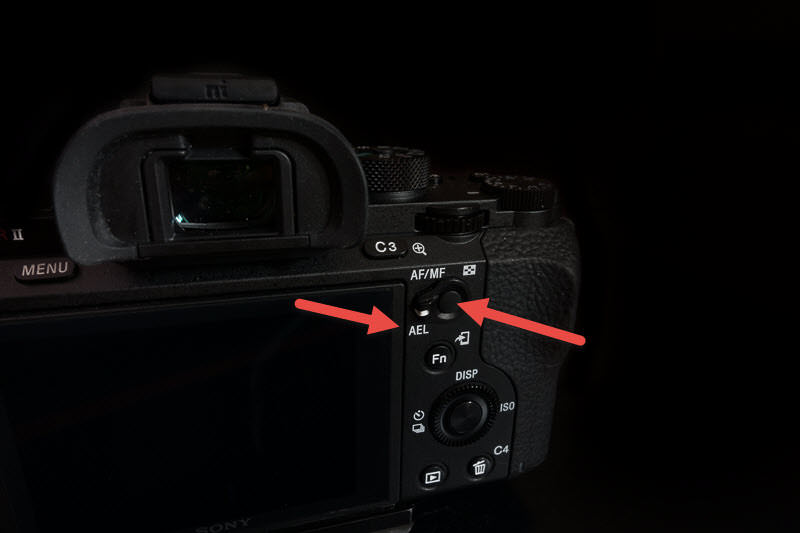
To do this, you have to make three changes in your camera’s menu system. First find the “Settings” tab (2nd from the left) and move to Section 7. Here you will find “Custom Key Settings”. Click on that and then scroll to the right until you see “AEL Button”. Make sure that is set to “AF On. Now find the “AF/MF Button” menu item and make sure it is set to “AF/MF Ctrl Toggle”. Lastly press the “Menu” button until you are back at the main menu system and move to Section 5 of the “Settings” tab. Here you will find “AF w/ shutter”. Make sure it is set to “Off”. Now you are done. From now on the button near the “AF/MF/AEL” switch on the back of your camera will control AF (when in “AEL” mode) while your Shutter button will simply capture an image.
Easily Adjust Your Focal Point
With the a7rII you have a few AF areas to choose from when it comes to using your cameras pretty incredible AF system. While “Wide” & “Center” make the choice for AF simple from the users stand point, but the “Zone” & “Flexible Spot” options contain AF areas that can be adjusted as needed on the fly. To easily do this, you can set the center button on the back of your cameras dial be in charge of moving your AF point. Simply press it once, move your AF point to the desired area of your image and press again to confirm.
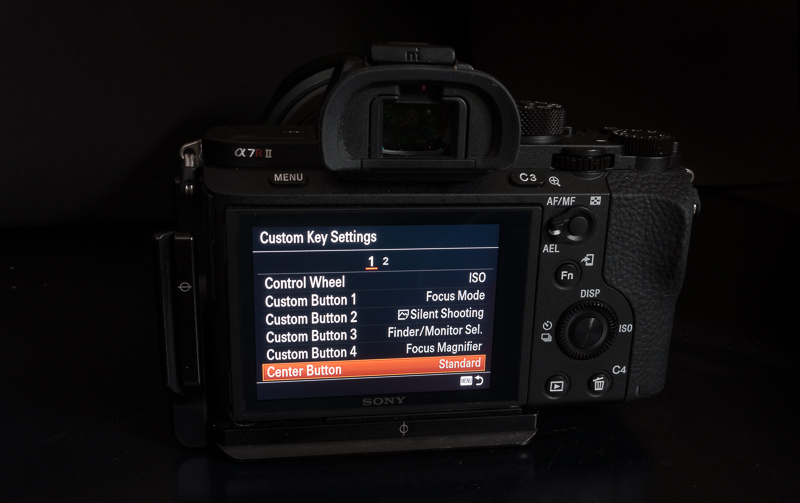
To do this, press the menu button and move to the “Settings” tab (2nd from the left). Find Section 7 and move to “Custom Key Settings”. Once inside, scroll down to “Center Button” and make sure it is set on “Standard”. Thats it!
Use APS-C Mode As Needed
One of the nicest aspects of using a camera with a 42mp sensor is the ability to crop into your images and still maintain a ton of image detail and resolution. If you are using a telephoto lens and want a little extra reach, you can force the a7rII to think it is using an APS-C lens, allowing you to take advantage of the 1.5x crop of such a sensor. This will drop your Megapixels from 42 to 18, but it can come in handy when photographing wildlife or a sports events when that extra reach can mean the difference in getting “THE” shot.
To enable APS-C Mode, jump into the camera’s menu system and select the “Settings” tab (2nd from the left). Move to Section 6 and select “APS-C/Super 35mm” menu item. Change it from “AUTO” to “ON”. In Auto mode, the camera will automatically change into APS-C mode for you when using lenses made for that cropped sensor and turn off when using FF lenses.
Install The Timelapse Camera App
Having the ability to install 3rd party apps onto your camera to increase its functionality is one of my favorite things about Sony’s mirrorless line of cameras. By far, the most popular (and my favorite) app is the Time-Lapse app. With it you can easily setup your camera to not only start creating a time-lapse, but it will compile it for you (and save your RAW files if you ask it to).
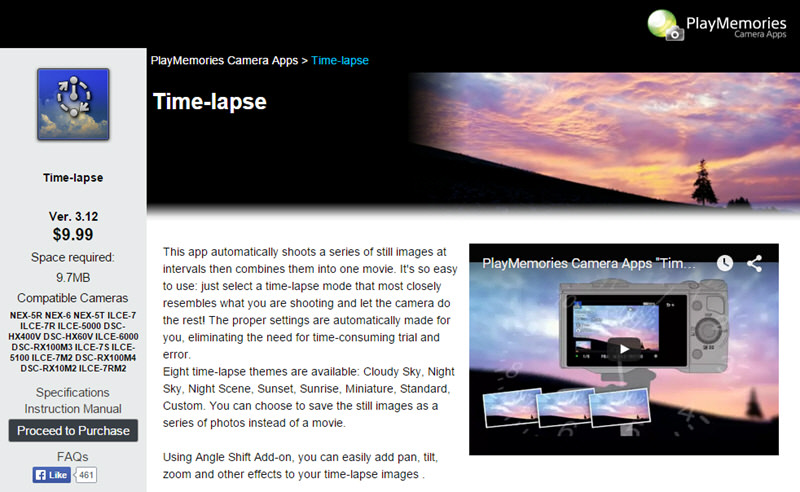
To learn the easiest ways to install apps (including the Time-lapse App) onto your camera, check out my recent blog post, “Installing and Updating Apps on Your Sony Camera With Ease“.
Charge Your Camera Externally
One of the few drawbacks to moving to a mirrorless camera system is the fact that batteries are significantly smaller than their DSLR counterparts. This can come into play during long shooting sessions, including creating time-lapses like we talked about above. Until now you had no way to charge your camera while using it as the camera would automatically go into a “USB Mode” the moment you plugged in a USB cord to charge your battery. This is no longer the case with the a7rII. Now you can easily charge your camera while shooting, making those long nights of shooting much easier to cope with.
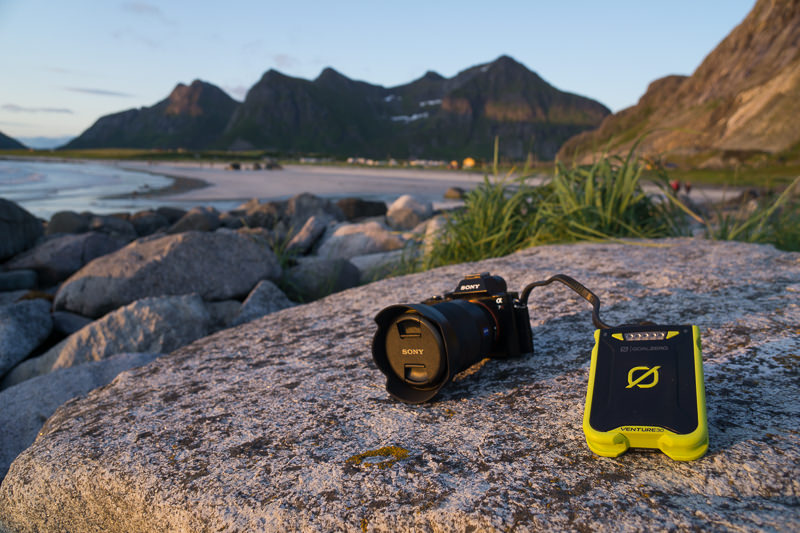
To start charging your camera, simply find the plug covers on the left side of your camera body and pull them out. Insert a micro USB cord attached to something like the Goal Zero Venture 30 ( which can charge 3 full Sony batteries) and keep on shooting![/x_text][/x_column][/x_row][/x_section]
SHARE YOUR OWN TIPS
While I didn’t cover everything in this article, I hope this while get you started on making your new Sony a7rII feel more like it is YOUR camera. In the comments below, feel free to share your own tips or tricks that you have found while setting up the a7rII. You are also free to share one of your favorite images you have taken with the a7rII since picking it up. Enjoy!