34 Tips & Tricks for Setting Up Your Sony a7R IV

With the launch of the highly anticipated Sony a7R IV 61 MP mirrorless camera (Initial Impressions), there are going to be a lot of people rushing to set up their new camera so they can get out into the field and begin to use it as soon as it ships. Regardless if you are a seasoned Sony shooter or new to the Sony family, it can be daunting to set up a new camera body while making sure it works to match your needs as a photographer. That is why I created this setup guide! To make things easier for you, I have broken this article up into four different sections; Core Settings, New Settings, Customizing Your a7R IV and Recommended Accessories.

As usual, if you have any questions, please leave them in the comments below and I will be happy to address them. Enjoy!

Core Settings Worth Changing

If you are brand new to Sony or simply turning on your a7R IV for the first time, I recommend you take a quick look at the following settings that I find myself changing on nearly every Sony Mirrorless camera I own.

Setting Time, Date and Area

When you turn on your Sony a7R IV for the first time, you will need to select the language you want the camera to use right off the bat. This is followed by selecting your time zone and then setting the correct time for your camera. This is an important set that you shouldn’t skip, especially if you often find yourself shooting with multiple camera bodies. Speaking from experience, It can be frustrating to look back at a shoot and try to find a specific image when you have two cameras that are out of sync when it comes to accurately embedding the time each photo was taken.

Setting Language Sony a7R IV
Setting the Time Zone Sony a7R IV
Setting the Correct Time Sony a7R IV

RAW or RAW + JPEG

Next, I always want to make sure that I have the right file format selected. To maximize the the power, resolution and dynamic range of this camera’s sensor, you will want to shoot in RAW or in the very least RAW + JPEG. Now that both SD card slots are UHS-II (more on that later), the a7R IV can handle simultaneous writing to both cards with incredibly fast speeds.

This is the fist setting found in the 1st Camera Menu Tab under “File Format”.

Changing File Format on Sony a7R IV
Changing File Format on Sony a7R IV to RAW

Uncompressed vs Compressed RAW

If there is one setting that has caused controversy with Sony’s mirrorless cameras, it would probably have to do with the choice to shoot in Uncompressed or Compressed RAW images. While I won’t get too much into the technical side of this issue, the idea behind these options hasn’t changed in the last few years. If you are shooting in high contrasting scenes with bright highlights and dark shadows (such as astrophotography), you will want to shoot in Uncompressed mode which outputs an uncompressed 120mb file. For just about everything else, Sony’s “Compressed RAW” mode should work great for you. This will allow you to shoot more images per SD card while having a larger image buffer since the file sizes are smaller. In my 6 years of shooting Sony, the only time I have ever seen a difference between Uncompressed and Compressed RAW files has been when photographing the night sky or a city skyline at night.

To change this setting, find “RAW File Type” in the first camera tab in the menu system.

Changing the RAW File Type with the Sony a7R IV
Choosing Uncompressed or Compressed RAW files with Sony a7R IV

Turn Off Long Exposure Noise Reduction

When it comes to noise reduction, I am the kind of photographer that prefers that my camera doesn’t decide things for me. I want to be in control of not only how much noise is being applied to my images, but where it is being applied to as well. I recommend turning off this setting and instead investing some time in learning how to properly apply noise reduction to your own images during the post-processing stage.

This setting is found in the 1st Camera tab under the second menu page.

Long Exposure Noise Reduction Sony a7R IV

Bracket Settings

When it comes to bracketing images, the Sony a7R IV has a few options for you to check out. However, the most important one in my mind has to do with setting the shutter delay.  Any time I turn on bracketing via the Drive Menu, I want a 2-second delay set. This will help you mitigate any potential camera shake when shooting from a tripod, which could potentially ruin a bracketed image set.

These settings can be found in the 1st camera tab under the 3rd menu via “Bracket Settings”.

Bracketing Settings Sony a7R IV
Self timer bracketing settings Sony a7R IV
2 Second Delay Bracketing Settings Sony a7R IV

Taking Advantage of Memory Recall Features

Another commonly overlooked feature of the Sony mirrorless system is the ability to save your camera settings to custom Mode Dials labeled 1, 2 or 3 on the a7R IV. This can come in handy if you find yourself shooting a variety of different situations often. For my setup, I have a mode set for landscapes, one for wildlife and another for shooting movies, each with very different settings on by default.

To register new settings to this function, first fully adjust your camera to reflect the settings you want to be saved. This includes ISO, Aperture, and Shutter-speed, but also Camera Mode, such as shooting in Manual or one of the Priority Modes. Just about every setting can be saved, included AF settings, so be sure to dial things in just how you like it. When you are ready, jump into the menu system under Camera Tab 1 and head to the 3rd menu page. Here you will find “MR 1/2 Memory” at the bottom of the page. Once inside this setting, all you need to do is select 1, 2 or 3 from the drop of the screen and hit the select button (middle of the rear wheel next to the rear LCD). This will register your settings under the number you selected. 

Memory Recall Functions Sony a7R IV
Changing Memory Recall Settings Sony a7R IV
New Registered Settings Sony a7R IV

To access these settings, simply change the Camera Mode Dial on the top of the camera to the right number and all your saved settings should appear on the camera. Do note that M1, M2, M3 and M4 can also save settings, but these settings are saved to your SD card. If you format that card, all those settings will be deleted, which is why I usually don’t use that aspect of Sony’s Memory Recall Features.

AF w/ Shutter

With the a7R IV, you have a dedicated back button focus button, which is awesome! But by default, the shutter button will still attempt to achieve focus for you when it is half-pressed, which kind of defeats the whole purpose of a back button AF button. To solve this issue, simply turn off the “AF w/ Shutter” option.

This setting is found in the 1st Camera Tab in the AF2 section of the menu (6/15).

AF On with Shutter Sony a7R IV
Turning Off AF with Shutter Sony a7R IV

Turn Off DRO

While this setting truly only affects JPEG files, having DRO on will affect the JPEG preview images you see on your raw files when previewing them in-camera. Essentially this effect digitally increases the dynamic range of your image by pulling up shadows and down highlights artificially, as it doesn’t actually increase the dynamic range captured in your image. I simply prefer to do all this by hand via my discretion when processing my images.

This setting is found in the 1st Camera Tab under the page “Color/WB/Img. Processing1” page (12/15).

DRO Setting Sony a7R IV
Turning Off DRO on Sony a7R IV

Focus Peaking Settings

If you find yourself manually focusing with your Sony a7R IV, I highly recommend you adjust your Focus Peaking options. Focus Peaking is a handy tool that illuminates the parts of your image are become in focus as you are adjusting the focus ring. It is important to note that seeing the Focus Peaking color appear on your LCD does not mean you have achieved tac sharp results, but simply that you are close. It is meant to be more of a guideline then definitive proof of perfect sharpness.

The Peaking Settings can be found in the 1st Camera tab in the menu system under “Focus Assist” (14/15).

Focus Peaking Settings Sony a7R IV

Core Movie Settings

It is easy to forget to adjust your cameras video settings, but I highly recommend you take a look at them. It can save you a lot of time out in the field if you decide to capture a some b-roll footage at some point. First, I would change the Exposure Mode to something that works for you. I often shoot in Manual Mode so that I can fully control the exposure of my videos. Next you will want to change your File Format, so that you can shoot in 4k. Lastly you will want to choose the right Record Setting. Here you can choose to shoot in 30p, which is often more of a standard with internet videos or 24p for a more cinematic and professional look. Additionally you need to pick a Bit Rate of either 100 or 60. The larger the Bit Rate the more data that is captured with each video, which also increase file size.

All of these settings can be found in the 2nd Camera Menu tab, under “Movie 1” (1/1).

Movies Settings Sony a7R IV
Adjusting File Format for Video Mode Sony a7R IV
Record Settings Movie Mode Sony a7R IV

Sony’s S&Q Movie Mode (Slow & Quick) is also worth taking a look at. With S&Q you can shoot videos at high FPS, such as 120fps at 1080p, which can provide a slow motion like look with the footage you shoot. For these settings, I usually leave the Record Setting on 24p for that cinematic look and pick 120fps for the frame rate.

S&Q Settings for Sony a7R IV
120fps Settings for S&Q Sony a7R IV

Increase Finder Frame Rate

If you want to increase the refresh rate of the viewfinder so that moving subjects look smoother, you need to set the Finder Frame Rate to High. Just know that when you do this, it will lower the resolution of the display slightly to counter for the faster frame rate. This only effects the Viewfinder and will have no effect on the rear LCD screen.

This setting can be found in the 2nd Camera Menu tab under “Display/ Auto Review1” (7/11).

Finder Frame Rate Setting Sony a7R IV
Setting Finder Frame Rate to High on Sony a7R IV

Movie Button Fuctionality

In the past there have been times when I accidentally hit the movie start/stop button while out in the field, only to realize the accident later after recording 30 minutes of 4k video footage and dealing with a drained battery. To make sure this never happens to you, you can make it so that the start/stop movie button only works when you are in the Movie camera mode.

You can adjust this setting in the 2nd Camera tab in the menu under the “Custom Operation2” page (10/11).

Sony a7R IV Movie Button Settings
Adjusting the Movie Button on Sony a7R IV

Turn Off Audio Signals

If you are like me, you probably hate the various different beeps our camera make while out in the field. The worst offender tends to be the count down timer for shutter delay. To turn off all of these additional noises, find “Audio Signals” in the menu system and switch it to “Off”.

This setting is found in the 2nd Camera menu tab under “Custom Operation3” (11/11).

Audio Signals Sony a7R IV Settings
Turning off Audio Signals Sony a7R IV

Set Viewfinder Brightness to Manual

While the rear LCD screen is set to manual brightness by default, the Viewfinder is set to auto, which means that it will adjust how bright it is based on how much light is around you. This can potentially cause you to think your images are brighter than they actually are.  In my opinion, it is best to change this setting to manual and leave it at the default value. This should provide you with a consistent viewing experience so that you have a better idea of how exposed your images truly are.

Adjusting the Brightness of your Viewfinder Sony a7R IV
Changing Brightness of Viewfinder Sony a7R IV

Set Display Quality to High

If you want to maximize the resolution of the rear LCD, you will want to turn “Display Quality” from “Standard” to “High”. According to Sony, this could cause a slightly faster battery drain, but I haven’t noticed any difference and I have this setting turned on with all my Sony mirrorless cameras.

The Display Quality settings is found in the Tool Box menu under “Setup2” (2/7).

Changing the Display Quality on the Sony a7R IV
High Display Quality Setting Sony a7R IV

Enable Touch Focus

By default, the “Touch Screen” setting on the Sony a7R IV is set to off. You will want to turn this on so that you can utilize the new Touch AF features with the camera, which now includes AF tracking, which I will show you how to enable later in this article.

This setting is found in the Gear Box menu under “Setup2” (2/7).

Touch Support Setting Sony a7R IV
Turning on Touch Operation for Sony a7R IV

Add Copyright Info to Your Images

As a security measure, I highly recommend that you add your Copyright info to your RAW & JPEG images from within the camera. This is just one of many ways you can attempt to protect your image’s copyrights. If you ever ended up in court over a copyright law suit, you will need to prove that you actively attempted to protect your copyright. Embedded Copyright info is a great way to do that.

You can turn Copyright Info on via the Tool Box Menu under “Setup5” (5/7).

Finding Copyright Info Sony a7R IV
Copyright Settings Sony a7R IV
Turning on Copyright Settings Sony a7R IV

What Is New With the Sony a7R IV

While there are a number of settings and features on the Sony a7R IV that are similar or exactly the same as the rIII, there are also alot of new functionality built into this camera. Here is a collection of some of my favorite new settings.

Interval Shooting/Timelapse Mode

Relatively new to the Sony a7 series is the built in intervelometer feature that allow you to easily setup time-lapse shooting in camera. While this mode won’t compile a time-lapse video for you, it does give you solid controls to help you capture all the images you would need to create your own time-lapses when you get back to your computer.

These settings can be found in the first Camera Menu tab under “Shoot Mode/Drive1” (3/15).

Setting Up Interval Shooting Timelapse Mode Sony a7R IV

When it comes down to using the “RIGHT” settings for a time-lapse, there are a lot of variables you should take into account and a handful of questions you should ask yourself. How long of video clip do I want? How fast is my subject moving? What type of movement am I after? The time-lapses I capture are usually intended for 24fps videos, so if I want a 10 second clip, I need a 240 image time-lapse (24×10). The speed of my subject, such as moving clouds, then dictates the Shooting Interval. If clouds are moving slowly, I often go for 5 seconds intervals between images, but if a storm is passing through quickly, anywhere between 1-3 seconds has worked well for me. This little bit of info should help you get started, but if you are keen to learn more about time-lapses, I highly recommend you look for a good tutorial or workshop to help you out!

New Pixel Shift Mode Settings

While the Pixel Shift feature was included in the Sony a7R III, you do have more to play with this time around. The default version of Pixel Shift will take 4 images just 1 pixel apart from eachother, which ultimately gives you a much more detailed final image that is said to reflect medium format type of quality. New to the a7R IV is the ability to shoot a 16 image Pixel Shift that has a .5 pixel difference between each image. This gives you a 240mp final image once you have processed the files through Sony’s  Imaging Edge software. Pixel Shift tends to work best with static subjects that aren’t moving, so please do keep that in mind!

All of your Pixel Shift settings can be found in the 1st Camera tab menu under “Shoot Mode/Drive1” (3/15).

Turning on Pixel Shift Sony a7R IV
4 Shot Pixel Shift Sony a7R IV

Face/Eye AF Settings

While the Sony a7R III and a7 III got significant upgrades to their AF systems in April (2019) that included new Face and Eye AF features, the a7R IV improves on that technology. Not only do you get real-time face and Eye AF tracking, but the ability for the camera to use Eye AF with wildlife. Currently, this mostly works with cats and dogs, but it will continue to expand to new species and get better through firmware and AI updates over time. Currently, Sony is the only camera manufacturer on the planet that offers Eye AF for animals.

Adjusting Eye AF Settings Sony a7R IV
Settings for Eye AF Sony a7R IV
Subject Detection Eye AF Sony a7R IV
Selecting Animal Eye AF Sony a7R IV

The Sony Eye AF settings are found in the 1st Camera Menu tab under “AF2” (6/15). Once inside you can make sure Face/Eye AF is on, change subject detection (Human or Animal), select the default eye you would prefer (Right or Left), display the AF frame for Face/Eye detection and choose to display when Animal Eye AF has locked on.

Focus Frame Color

One of my favorite new settings gives you the ability to change the adjustable AF point color. Previously this was set to grey, which was incredibly difficult to see in low light situations. Luckily you now have the ability to change the color of these adjustable AF points to either white or red. I recommend red as it is easier to see in most situations.

This setting is found in the 1st Camera tab menu under “AF3” (7/15).

Changing Focus Frame Color for Sony a7R IV
Setting Red for Focus Frame Color for Sony a7R IV

New Touch Focus Tracking

A great new addition to the Sony a7R IV is the ability to use Touch AF on the rear LCD screen and have it track the subject you selected. In the past, it would only single focus. Now it can track the subject throughout your frame with the cameras new and improved AF system that pulls alot from the Sony a9.

This is found in the 2nd Camera Menu tab under “Custom Operation2” (10/11).

Touch Focus Setting Sony a7R IV
Touch Focus Tracking Sony a7R IV

Write Serial Number to Images

In addition to adding your copyright to your images taken with the a7R IV, you should also think about adding your cameras serial number to those images as well. This could help you track down your camera if it was ever lost or stolen.

This setting is found in the Tool Box Menu under “Setup5” (5/7).

Writing Serial Number to Sony a7R IV
Turning on Serial Number for Sony a7R IV

Save/Load Camera Settings

One of the best new features on the Sony a7R IV is that you now have the ability to save all of your settings for your camera onto an SD card and then load them onto a new camera. While this can be handy if you own two a7R IV cameras, it is also beneficial if you want to load other photographers settings onto your camera as well. For example, I have created a saved file for all of the settings found in this setup guide, which you can load onto your own SD card and instantly have your camera setup exactly like I have here! How cool is that?

Saving Camera Settings Sony a7R IV
Load Settings Sony a7R IV
Load Settings for Sony a7R IV

To save or load settings onto your Sony a7R IV, head to the Toolbox Menu and navigate to “Setup7” (7/7).

Sign Up For My Newsletter &
Get My a7R IV Setup Files for FREE!

Customizing Your Sony a7R IV

One of the best things about the Sony mirrorless camera lineup is the ability to fully customize just about every button on the camera itself. This allows you to make sure that the most important features that you find yourself using the most are always just a button press away. This setup works for me, but feel free to create your own based on your own shooting style and needs!

Customizing Your Camera Buttons

One of the first things I do whenever I get a new Sony camera is customize the buttons on the camera body itself. The settings I want here are those that I want the fastest access to. You can’t attach every setting to these buttons, but Sony does give you plenty to work with. Additionally, Sony lets you customize the buttons and wheels found on your a7R IV specifically for photo, video or display/review modes. This means a single button can have multiple functions depending on if you are capturing images, shooting video or looking at what you just took.

To customize your camera’s buttons, head to the Camera Menu tab 2 and find “Custom Operation1” (9/11). There you will find three different setting groups; Photo, Video, and Review. Select the right group and then start customizing.

Customizing the Rear Buttons on a Sony a7R IV
Customizing the top buttons on a Sony a7R IV
Customizing the Lens Hold Button on a Sony a7R IV

Because still photography is my main focus professionally, I only customized my camera for photos and reviewing images, letting the video camera modes duplicate what I have for still images. As you can see above, my setup involves a mixture of default settings for some buttons and custom options for others. Most notably, you can see that I have set “Bright Monitoring” to C4. This is a handy tool when shooting Astro/Night photography as it allows me to compose in near darkness by temporarily increasing the ISO of the Rear LCD screen. I also have set “APS-C S35 / Full Frame Select” to C5, which allows me to quickly crop in on a subject that is far away, which changes the image file size from 61mp to 26mp in the process. Additionally, I set “Focus Mode” to C1 and “Focus Area” to C2, which makes it easy for me to fully adjust my AF system on the fly.

Below you will also see screenshots of the buttons I customize for Image Review. The only change is the functionality of C1, which is now set to “Rating”. This allows me to quickly rate images in the field.

Customizing the Review Buttons Sony a7R IV

Setting the Fn. Menu Up To Suit Your Needs

One of the most under-rated ways you can customize your Sony a7R IV is through the Fn. (Function) Menu that is accessible via the Fn. button on the back of the camera. Here you will want to include settings that you want quick access to that you haven’t already customized to one of the many buttons on the camera. New to the a7R IV is the ability to customize the Fn. menu to be fully unique to both Still and Video shooting, allowing you to set completely different Fn options for each main camera mode.

Setting the Custom Fn Menu Sony a7R IV
Customizing the Function Menu Set Sony a7R IV

Photo

  • Shoot Mode
  • File Format (JPEG vs RAW)
  • APS-C/Super 35mm
  • Subject Detection (Eye AF for Animals or Humans)
  • Right/Left Eye Select
  • Metering Mode
  • Interval Shooting (Timelapses)
  • Pixel Shift Multi Shoot
  • Touch Operation
  • Steadyshot
  • Silent Shooting
  • Prioritize Rec. Media

Video

  • Shoot Mode
  • Focus Mode (AF vs Manual)
  • APS-C/Super 35mm
  • Subject Detection (Eye AF for Animals or Humans)
  • Right/Left Eye Select
  • Metering Mode
  • Picture Profile (SLOG2, SLOG3, HLG)
  • Zebra Display (Helps Protect Against Over Exposure)
  • S&Q Frame Rate
  • Touch Operation
  • Steady Shot
  • Prioritize Rec. Media

My Menu Settings

For any setting that is left that you haven’t already assigned to a button or the Fn. Menu, you might want to add to the “My Menu” system. For my Sony a7R IV, I added File Format, Bracket Settings, Interval Shoot Func Settings, Area Settings, Rec. Media Settings and Formatt. This menu section is found under the Star tab on the far right of your menu system.

Customizing Your My Menu Settings Sony a7R IV
Adding Items to My Menu Sony a7R IV

Recommended Accessories for the Sony a7R IV

When it comes to maximizing your time with the new Sony a7R IV, I have put together this extensive list of 3rd party accessories that will make your life as an a7R IV shooter that much more enjoyable.

UHS II SD Cards

With two UHS-II SD card slots, the Sony a7R IV has finally fixed one of the major complaints of the Sony a7R III. Now more then ever, it is important that you purchase the faster UHS-II SD cards to use with both slots in this camera. Personally, I recommend Sony’s new Tough SD card line as they are incredibly fast and durable. No matter how much I have tried, I simply haven’t been able to break one of these cards 🙂

L Bracket

As something I recommend for just about every camera, a L-bracket essentially  allows you to easily connect your camera to a tripod or monopod by adding arca-swiss compatible attachment points to the bottom and left side of the camera. This allows you to keep the camera right over the center of your tripod or monopod, alleviating the need of having your camera leaning off the side of your tripod when attempting to shoot in portrait or vertical mode.

There are a number of L-Bracket options available for the Sony a7R IV and my favorite is from Stabil LSIV. It can be found HERE.

Wireless Remote Control

If you plan on shooting a lot of long exposure photography or if you simply want to mitigate any potential tripod shake from your workflow, picking up a wireless remote control can help. While Sony does make a wireless remote, I find it to be more expensive then it needs to be. Instead, you can find a simple cheap 3rd party IR remote on Amazon from Foto & Tech that still gets the job done.

Dual Battery Charger

While the Z100 batteries found in the Sony a7R IV can last for a very long time, you will probably end up picking up a few extra batteries just in case (LINK). To help keep these new batteries charged, you might want to invest into a dual battery charger so that you can charge two batteries at once. There are a number of them on Amazon that is worth checking out, but THESE are my personal favorites. I simply use the charger and not the 3rd party batteries.

External Battery Charger

With the Sony a7R IV, you can charge the battery inside the camera by connecting the body to a charger using either USB-C or Micro-USB. This is why I often bring a Power Brick with me when I work remotely and don’t have the ability to recharge my batteries. I can usually charge 8-10 batteries with one of THESE from Anker. Of course it also can charge your phone or anything else that might need charging as well.

Anker Power Brick for Charging Sony z100 batteries

Learn More about the Sony a7R IV

To learn more about the Sony a7R IV, please check out one of my latests articles on the camera, “Taking the Sony a7R IV to Alaska“. In it you will find a lot of information, hands-on experience and images that cover my two weeks up North as I photographed Alaskan Coastal Brown Bears and other wildlife in the region.

What Questions Do You Have?

When it comes to setting up your Sony a7R IV, what questions do you have? Do you need to know what a specific setting does? Leave a comment below and I will try to help you out as best I can! If you haven’t already read my article about using the Sony a7R IV in Alaska for two weeks, be sure to check it out as well!

About the Author

Upcoming Photo Workshop Adventures...

Discover Cuba

February 1st – 8th, 2025
 
With this adventure, our focus will be on capturing the beauty of the Cuban people, culture, and architecture throughout the Island of Cuba. From the classic cars and ocean side highways in Havana to the cobblestone streets of Trinidad and everything in between. With so much uncertainty in the US/Cuban relationship, NOW is the time to go!

Wildlife Photography Workshop in Brazil Jaguars of the Pantanal

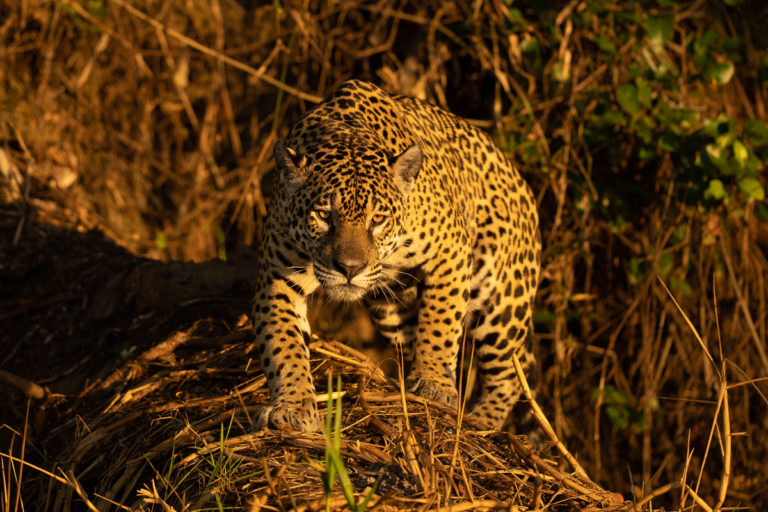
July 31st – Aug. 7th, 2025
 
The Pantanal region of Brazil is known as the land of the Jaguar. Nowhere else on Earth is there a higher concentration of these elusive big cats than this remote region of Southern Brazil, close to the Southern Amazon Basin. In addition to Jaguars, you will see Caimen, Capybara and a wide assortment of birds.

Seljalandsfoss Waterfall Iceland Summer Photo Workshop

Iceland Summer Photography Workshop

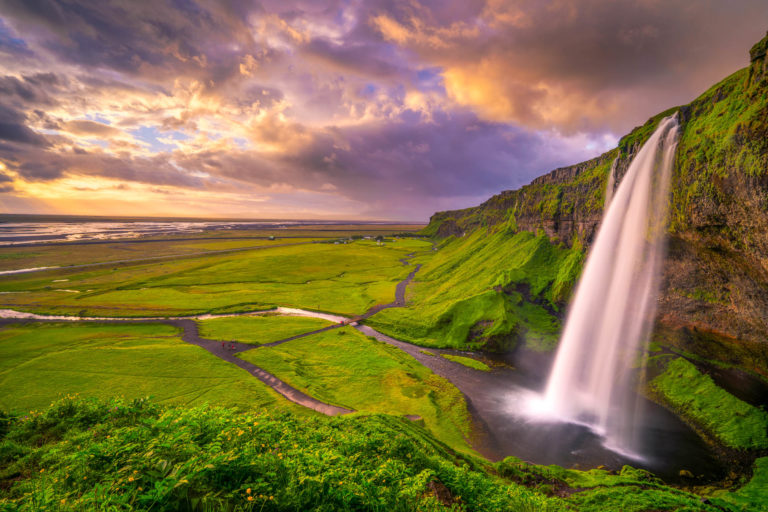
July 8th – 13th, 2023
 
Visiting Iceland in the Summer is one of the best times to explore this amazing country. Not only are lupines in bloom and waterfalls at peak flow, but the midnight sun provides endless hours of soft beautiful light as sunset and sunrise converge, often providing up to 6 hrs of golden light each evening!

Patagonia Photography Workshop Adventure

April 1st – 10th, 2025
 
Patagonia is one of the most wild, beautiful & dramatic mountain ranges on the planet. We split our time between the incredible Torres del Paine National Park in Southern Chile and Los Glaciares National Park in Argentina, home to both Cerro Torre and Mt. Fitz Roy.

Leave a comment