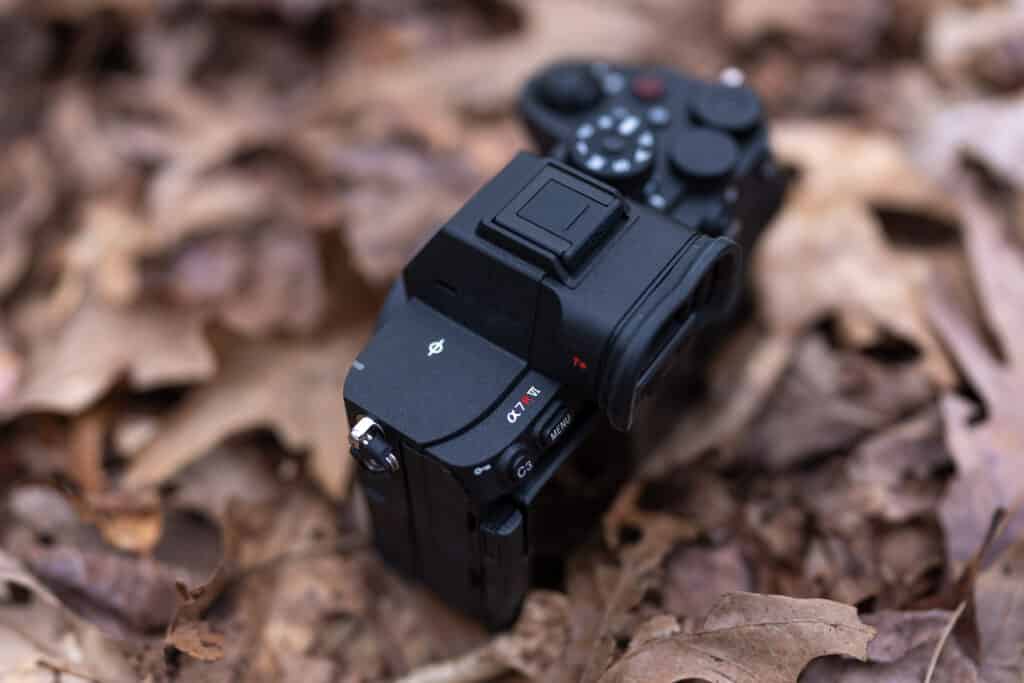
Many photographers don’t realize that nearly every button and dial on the Sony a7R VI can be fully customized—but it doesn’t stop there. The “Fn. Menu” (Function Menu) and the “My Menu” features can also be tailored to your specific shooting style.
The way I look at it is this: Any critical feature or setting I need quick access to while shooting should be exactly one button click away. Other secondary settings can be tucked into the Fn. Menu, if I don’t mind two clicks to access them. Finally, any deep camera menu items I want to find quickly should live right in my camera’s “My Menu” section. No one should be fumbling with their camera menus in the field, trying to change a setting or turn on a feature, only to miss the shot.
That is why I wrote this comprehensive guide to Customizing Your Sony a7R VI! My goal is not only to show you what’s possible with Sony’s latest menu system but also to share exactly how I choose to configure my cameras as a professional wildlife and travel photographer.
To make things even easier, I will share my personal saved Sony a7R VI settings file with you at the end of this blog article, allowing you to load up all of my custom button layouts in less than 30 seconds.
While this guide is invaluable for optimizing your physical controls, it doesn’t break down every single menu item in the camera. For a deep dive into every menu option, you’ll want to check out The Complete Setup Guide to the Sony a7R VI. But for everyone ready to optimize their camera controls right now, we have a lot of ground to cover. Let’s get started!
Customizing the Buttons & Dials for Photo & Video
The first and most crucial step in optimizing your camera is configuring the Sony a7R VI custom buttons and dials. Why? Because any critical setting you need immediate access to while shooting should live right on the camera body itself.
When I’m looking through the electronic viewfinder, I don’t want to dig into a complex menu system; I want to quickly shift my AF area, adjust my ISO, or toggle the new RAW Pre-Capture feature on and off. On the Sony a7R VI, you can independently configure up to 17 different buttons and dials for each specific camera mode: photo, video, or image playback. Personally, I find it confusing to drastically alter the functionality of every single button between these three modes. Instead, I make a few tactical, high-impact changes that streamline my workflow across the board, which you’ll see broken down below.
It is also important to note that while Sony’s menu system is incredibly robust, not every single setting can be assigned to a physical custom key or even the Fn Menu. There are a few baseline limitations to keep in mind, but for the most part, I’ve been able to map out my Sony a7R VI button layout to fit my needs as a field photographer nearly perfectly.
To make changes to your own buttons and dials on the a7R VI, go to the “Setup” menu and select “3: Operational Customize”. There you will see “Custom Key/Dial Set” for Photo, Video, and Playback.
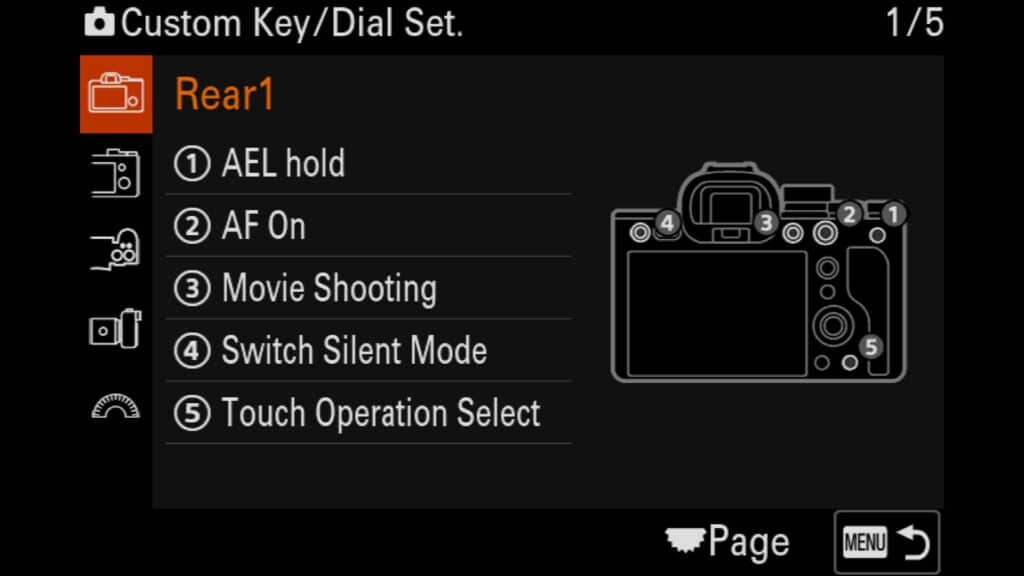
Rear 1
- AEL hold – While I don’t often use the “Priority” camera modes, I find that locking in the exposure in those modes is helpful. AEL stands for “Auto Exposure Lock” and will keep the camera from changing your exposure in those priority modes.
- AF On – I am an old-school shooter and prefer to use back-button AF on my Sony a7R VI. By default, the camera is set up for this.
- Movie Shooting – With the a7R VI, the video button is on the top of the camera, but I found this distracting when coming from my A1 II and a9 III camera bodies. I moved it to the C1 button instead, which is where it is on those other Sony mirrorless cameras.
- Switch Silent Mode – While I mostly shoot in “Silent” mode with the a7R VI, there are times when I need to quickly jump into the Mechanical Shutter (such as when on safari and we are using LED lights to light up subjects for a night drive). In that situation, I must jump out of “Silent” mode before changing from Electronic Shutter to Mechanical.
- Touch Operation Select – Allows you to turn “Touch Support” for the rear LCD screen on and off quickly. While I often use Touch focus/tracking with my a7R VI, I sometimes find my nose accidentally taps the screen when I look through the viewfinder to take a photo. I can quickly turn the setting off when it isn’t needed.
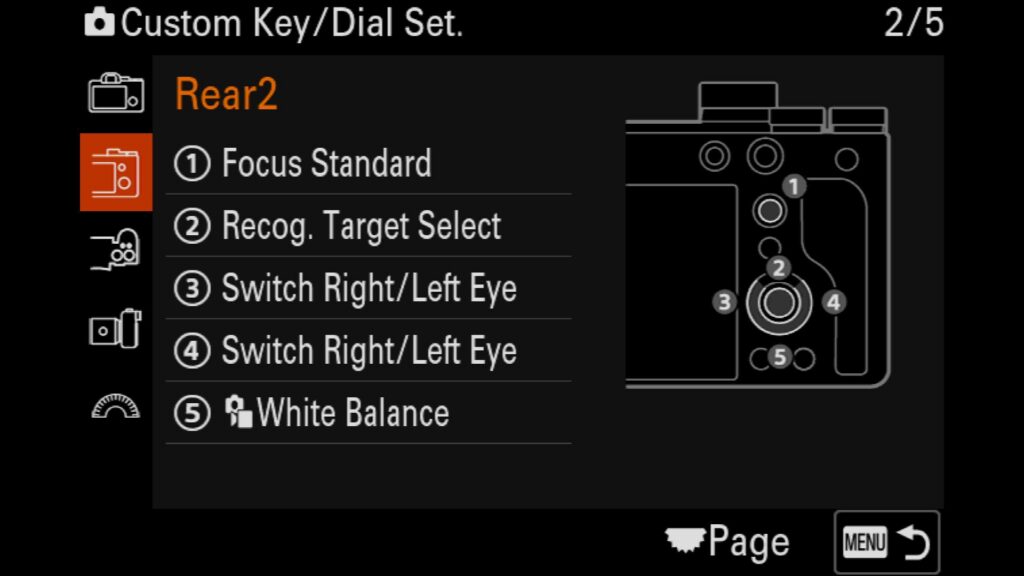
Rear 2
Focus Standard – I leave this set to the default Focus Standard mapping. This ensures that using the joystick (multi-selector) allows you to seamlessly move your AF area point around the frame while tracking a subject. If you press the joystick straight down, it instantly resets your autofocus box right back to the dead center.
Recog. Target Select (Recognition Target Selection) – I configure the center button of the rear control wheel to quickly cycle between different AI subject detection modes. With a quick press, I can switch the camera’s focus priority among Human, Animal/Bird, Bird, and Insect. When you activate this option in the Sony menu system, you can actually limit the rotation to only show the specific subject types you photograph most often, saving you from scrolling past modes you don’t use.
Switch Right/Left Eye (Right Button) – Thanks to the massive upgrades to Sony’s real-time AI Eye AF system on the Sony a7R VI, you can manually dictate which eye the camera prioritizes. To keep my workflow intuitive in the field, I map the right button on the rear control wheel to instantly toggle focus between the subject’s left and right eye.
Switch Right/Left Eye (Left Button) – For symmetry and to avoid muscle-memory confusion while looking through the electronic viewfinder, I apply the exact same function to the left button on the rear wheel. Pressing either side instantly overrides the auto-eye selection when a profile view or branch interferes with the shot.
White Balance – If I need to adjust the color temperature on the fly, I map it to the down button on the rear control wheel. Even though I shoot strictly in compressed RAW and can adjust the white balance later in post-processing, getting the white balance close in-camera gives me a much more accurate sense of the scene’s natural tones, exposure, and mood right on the LCD screen.
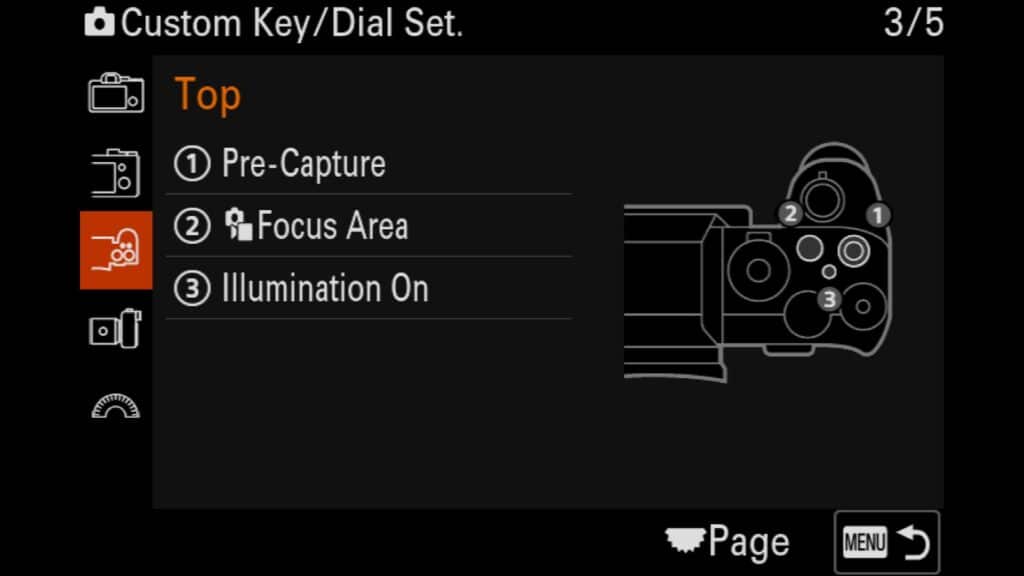
Top
Pre-Capture (RAW Pre-Capture) – One of my absolute favorite new additions to the Sony a7R VI is the RAW Pre-Capture feature. This is a massive game-changer for bird photography and wildlife tracking, where split-second, sudden movements make all the difference. However, I don’t keep this enabled 100% of the time, especially when photographing static subjects that aren’t moving often. Having the ability to instantly toggle Pre-Capture on or off depending on the behavior of the animal in front of you will save you an immense amount of time during the image culling process after a long day of shooting.
Focus Area (Autofocus Area Mode) – The setting I find myself changing more than almost any other in the field is my Sony autofocus area. Depending on the environment and the subject, I frequently need to jump from a broad Zone to a precise Flexible Spot, or over to Wide Tracking. Mapping this function to a top custom button allows for seamless, on-the-fly adjustments.
Pro Tip: To make this even faster, go deep into the Sony menu system and limit your autofocus area choices to only the ones you actually use. Dropping it down to just your top 5 or 6 go-to options means you won’t have to scroll through 15 different factory choices every single time you press the button.
- Illumination On – New to the Sony a7R VI is the ability to have your buttons illuminate at night. This is an incredibly handy feature to have when you are shooting in dark environments.
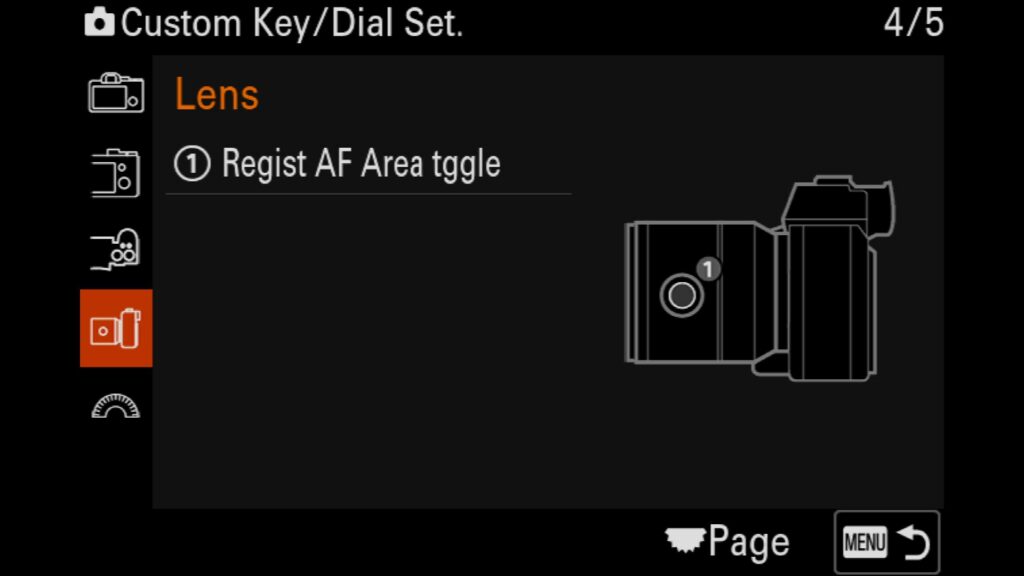
Lens
- Register AF Area Toggle – One of my favorite features as a wildlife photographer is having the ability to instantly change my AF Area to a preset (or pre-registered) type. Why? I often shoot in Zone or Zone Tracking modes, but occasionally, I am working with a tiny subject, and the AF system needs some help to know exactly what I want to focus on. I can instantly recall the Medium Adjustable Spot I registered with the camera by pressing this button. If I press it again, it returns to the Zone AF area I was in previously. I don’t have to go into the menu or fumble around a scrolling list of options. I instantly press the button and change my AF area to the one I need.
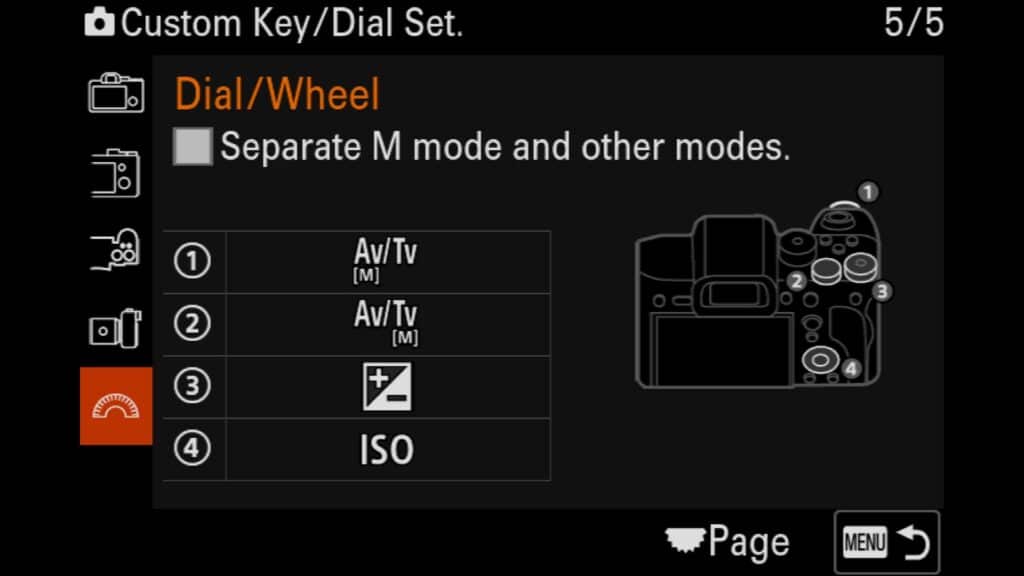
Dial/Wheel
Aperture Dial – I leave this set to the factory default to maintain dedicated control over my aperture settings.
Shutter Speed Dial – This also stays at the default setting for quick, physical control over my shutter speed in the field.
Exposure Compensation Dial – This dial allows you to manually adjust the exposure value (EV) of an image or video on the fly. It’s incredibly useful when you’re shooting in either of the semi-automated Priority Modes (Aperture Priority or Shutter Speed Priority) or when utilizing Auto ISO. Simply rotate the dial to the left to darken your exposure or to the right to brighten the scene.
ISO (Rear Control Wheel) – I map the rear control wheel to adjust my ISO directly, allowing for immediate exposure adjustments. By default, Sony requires you to press the right side of the directional pad before changing the ISO value, but I prefer a more streamlined setup. With this customization, a quick spin of the wheel raises or lowers your ISO instantly.
*A Quick Note on Rear Wheel ISO Control*
Some photographers are hesitant to map ISO directly to the rear control wheel because they worry about accidentally bumping it and shifting their exposure. While that’s a valid concern if you’re new to the system, I’ve been using this exact method on my Sony camera bodies for years. Once you build up the muscle memory, accidental shifts rarely, if ever, happen—and the sheer speed it adds to your field workflow is completely worth it.
Custom Buttons for Playback Mode
When reviewing your images and video, it is essential to understand the tools and features you have at your disposal. I don’t make any sweeping customizations to the functions of these buttons, but I make a few changes from the default settings.
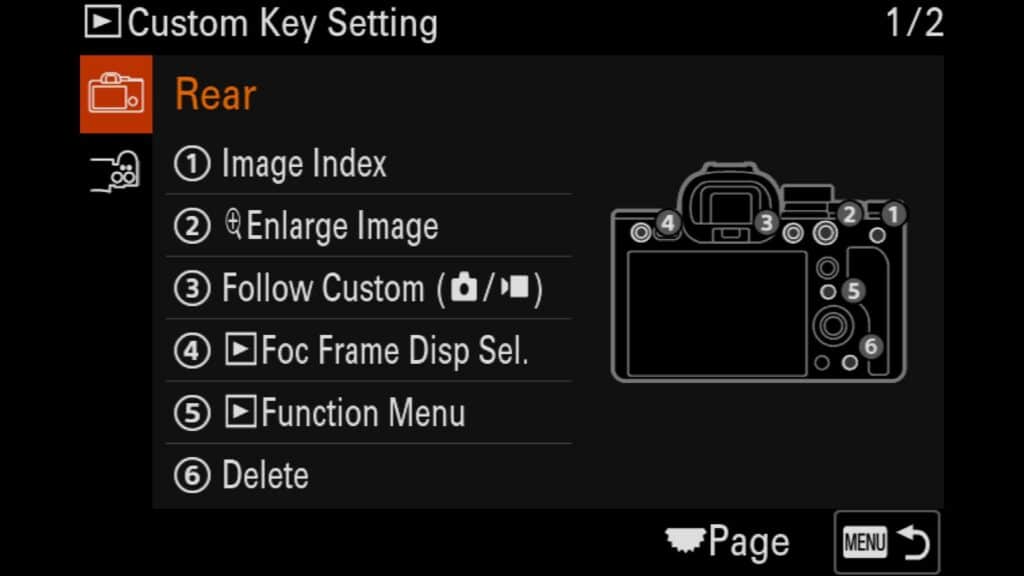
Rear
Image Index – This button opens the index view, zooming out to display a grid of thumbnails of all the photos and videos stored on your memory card. It is an incredibly handy feature when you need to quickly locate a specific file without scrolling through hundreds of individual shots.
Enlarge Image – When you need to check critical focus and sharpness on the Sony a7R VI’s massive 67MP files, this is your go-to button. The first press instantly zooms past 100% directly into your photo. Each subsequent press zooms in slightly further for a pixel-level inspection. Simply tap the “Menu” button to return to the full-frame view.
Follow Custom (from Photo/Video) – By default, this is mapped to mirror your camera’s custom shooting configurations or initiate a quick video recording.
Focus Frame Display – If you have ever wanted to quickly see where your camera focused while reviewing your images, you can customize this button to turn this feature on and off as you review images from a shooting session.
Function Menu (Fn Button) – This opens up the playback-specific Fn Menu, which can be entirely customized. Personally, I leave the playback Fn menu at its factory default settings, as it already includes all the quick-access review tools I need.
Delete – This one is entirely self-explanatory. Pressing this button will permanently delete the specific photo or video you are currently reviewing.
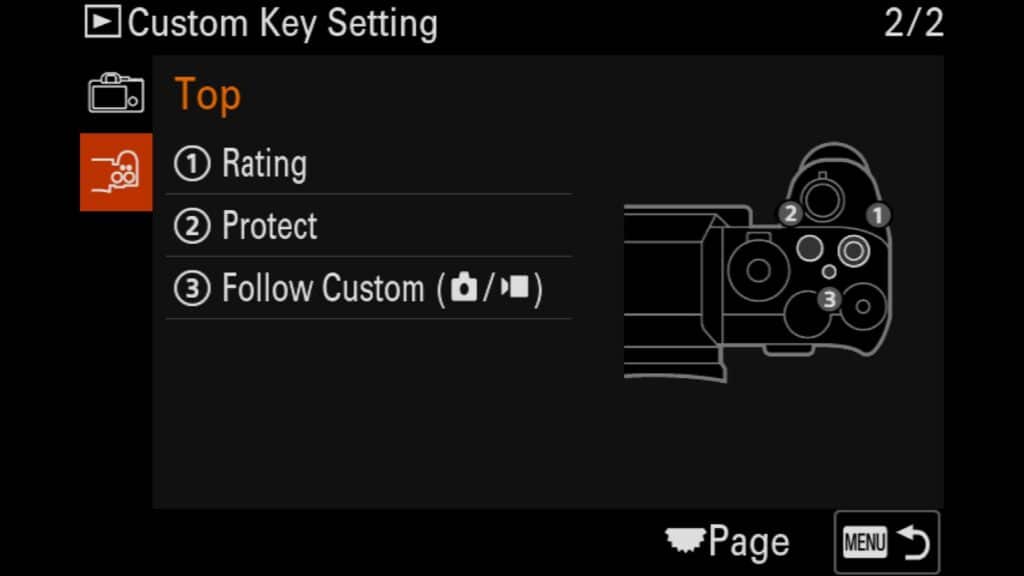
Top
- Rating (Star Ratings) – This feature allows you to embed a 1-to-5 star rating directly into any image file on your Sony a7R VI, metadata that seamlessly carries over to Adobe Lightroom Classic or Adobe Bridge. This is a massive timesaver for tagging your favorite photos in-camera so you know exactly which ones to look at first. Once I import my files into Lightroom, I simply filter the catalog by star rating. It makes it incredibly easy to instantly isolate the best photos from a shoot for a closer look and immediate editing.
Protect – This essential tool helps ensure you never accidentally delete a prized image or video. While a “protected” file cannot be individually deleted, keep in mind it will still be wiped if you format the memory card.
Pro Tip: Culling Wildlife Bursts in the Field
I frequently use the Protect feature alongside the Sony a7R VI’s 30 FPS burst mode to streamline my bird photography workflow. If I capture a massive action sequence of a bird in flight, I might end up with a stack of 100+ images. With the camera’s “Display as Group” feature turned on, I can quickly scroll through the entire burst stack and tap this button to “protect” only my absolute favorite, sharpest frames. Once my top shots are locked down, I simply delete the entire remaining group/stack. The camera purges the misses and leaves only my protected masterpieces. It is easily the best way to cull images and save memory card space while still out in the field.
Join the Photography Workshop Waitlist to learn more about any upcoming adventures...
Join the Workshop Waitlist to learn more about any upcoming adventures...
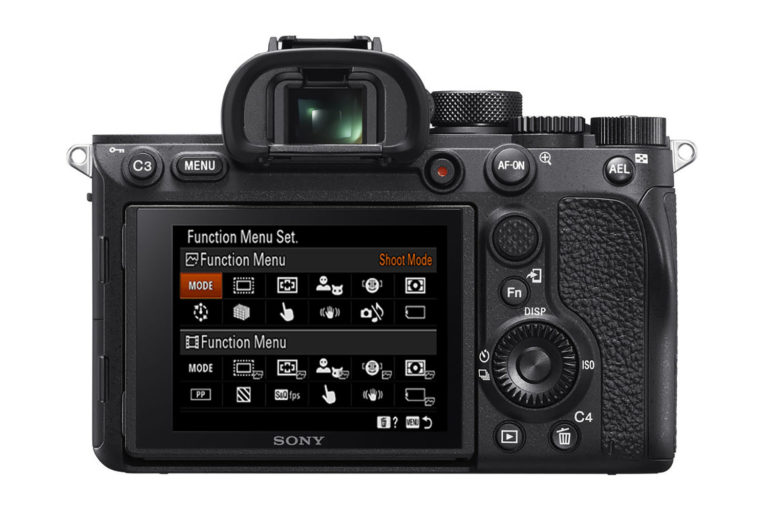
Setting Up the Fn Menu
The next best feature to customize is the Sony a7R VI Fn Menu, which you can instantly access by pressing the physical “Fn” button on the back of the camera body.
This menu allows you to choose up to 12 different settings for quick access. But just like with your physical custom buttons, Sony allows you to assign an entirely independent Function menu layout for different shooting modes. Because the Sony a7R VI is such a powerful hybrid camera, you can configure up to 24 distinct settings in total—12 for shooting still photos and 12 completely different options for shooting video.
Separating these two menus is precisely how I configure my camera. As a wildlife and travel photographer who frequently switches back and forth between capturing high-megapixel images and recording high-end video clips, the settings I need immediate access to for each medium are vastly different. Utilizing dual Fn menu settings ensures you never have to waste time digging into the main menu system when a moment is happening fast.
To change your Fn Menu, head to the “Setup” menu and find “3: Operation Customize”. There, you will see “Fn Menu Settings.”
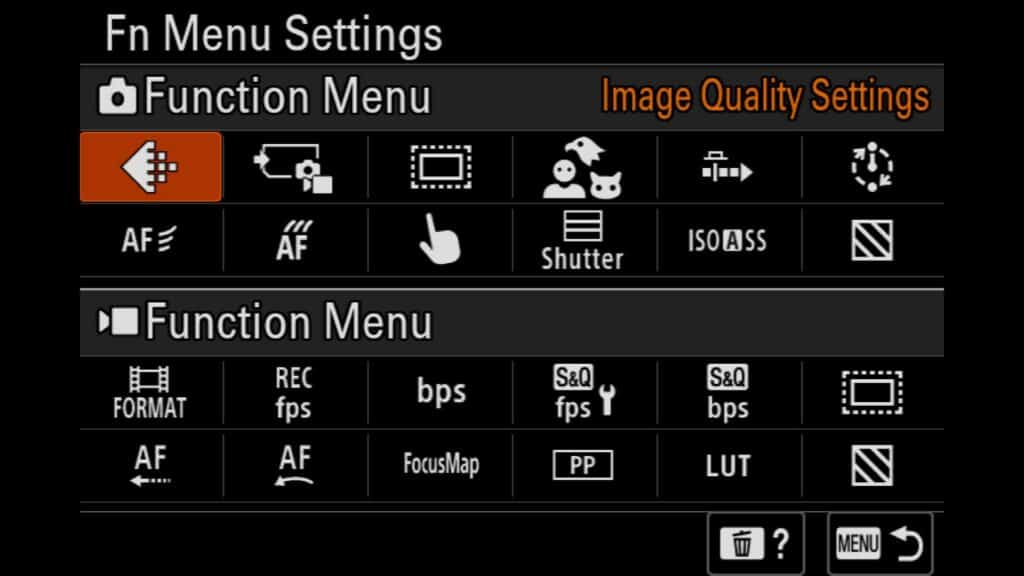
Photo Fn Menu - Upper Row from Left to Right
Image Quality Settings – This lets you instantly change the file format of your still images. It is incredibly convenient for jumping between different Sony a7R VI RAW file formats, such as switching from maximum-detail Lossless Compressed (L) for landscapes to standard Compressed RAW when you need to conserve buffer or memory card space during high-speed action.
Rec. Media Settings (Recording Media) – This setting lets you manage how data is routed to the camera’s dual memory card slots. You can quickly configure whether you are overflowing text/video data from slot 1 to slot 2, separating your RAW and JPEG files, or saving a backup to both cards simultaneously for an immediate in-camera safety copy.
APS-C Mode (Crop Mode) – Forcing the camera into APS-C mode mimics the field of view of a crop-sensor body. Because the Sony a7R VI features a massive 67MP sensor, shooting in APS-C crop mode still yields a highly usable 29MP image (giving you plenty of resolution to work with).
Pro Tip: While it’s great for previewing a tight composition in the electronic viewfinder, I rarely use it in practice. Ultimately, there is no technical advantage to shooting in-camera crop mode over simply cropping the full 67MP RAW file later in post-processing on your computer.
Recognition Target (AI Subject Detection) – A vital shortcut that lets you swap between different tracking targets for Sony’s advanced real-time AI autofocus system (including Human, Animal/Bird, Bird, Insect, and Vehicle). Beyond being a quick toggle, having this item in your Function menu serves as an excellent visual dashboard reminder of which tracking profile is currently active.
Pre-Capture – This setting lets you toggle the new Sony RAW Pre-Capture feature on or off seamlessly. While I map the physical engagement of this feature to the top C1 custom button on the camera body, keeping it visible here provides an easy secondary check to confirm whether Pre-Capture is actively engaged or turned off.
Interval Shooting (Time-Lapse Mode) – This shortcut enables or disables the built-in intervalometer. As a landscape and travel photographer, I use this extensively for shooting high-quality time-lapses because I prefer full control over the individual, uncompressed RAW files. This gives me far more dynamic range and editing flexibility in Lightroom compared to using automated in-camera time-lapse video modes that output a flattened file.
*Note: While this button turns the interval function on or off, you will still need to dive into the deeper Sony menu settings to adjust your specific shutter intervals and shot counts before starting your sequence.
Photo Fn Menu - Lower Row from Left to Right
AF Level for Crossing (Autofocus Tracking Sensitivity) – This crucial setting dictates the sensitivity—or “stickiness”—of your autofocus system when tracking an animal or bird. It controls how long the camera will hold focus on your primary subject before accidentally switching to an obstruction (like branches, trees, or another animal) that crosses directly in front of your frame.
AF Tracking for Speed Change – This autofocus customization lets you adjust how quickly the AF system responds to sudden changes in your subject’s speed. It is an invaluable setting for action and bird photography, ensuring the camera instantly locks onto a bird sudden-launching into flight or an animal breaking into a sprint.
Touch Function in Shooting – This shortcut lets you instantly adjust the rear LCD touchscreen’s behavior to match your current shooting scenario. With a quick tap, you can seamlessly cycle between Touch Focus, Touch Tracking, or Touch Shutter to best fit your immediate workflow.
Shutter Type – A dedicated toggle that lets you instantly switch your Sony a7R VI shutter type between the ultra-silent Electronic Shutter and the traditional Mechanical Shutter. This is perfect for jumping from dead-silent wildlife tracking to shooting under challenging artificial lights where you need to avoid banding.
ISO Auto Minimum Shutter Speed – This feature lets you set a baseline minimum shutter speed threshold when using Auto ISO in Aperture Priority mode. This is an incredibly popular configuration for wildlife photographers who want the creative depth-of-field control of Aperture Priority while ensuring their shutter speed never drops too low to freeze fast-moving action.
Zebra Display – This setting lets you instantly toggle the camera’s Zebra exposure stripes on or off. To prevent blowing out critical highlights in high-contrast environments, I configure my custom Zebra lower limit to 107+. This layout lets me push the exposure right to the edge without losing data. I break this down in complete detail in my companion article, The Complete Setup Guide to the Sony a7R VI.

Video Fn Menu - Upper Row from Left to Right
- File Format (Video Resolution) – This setting allows you to instantly toggle the recording resolution of your videos. With the Sony a7R VI, you can seamlessly jump between data-rich 8K recording, crisp oversampled 4K, and standard 1080p HD, depending on the requirements of your project.
- Record Frame Rate – This shortcut lets you quickly alter your cinematic frame rate on the fly. You can switch between cinematic 24p, standard 30p, smoother 60p, or high-speed 120p for slow-motion playback.
- Record Setting (Bitrate & Color Depth) – This is where you configure the specific compression, bitrate, and color depth (such as 10-bit 4:2:2 vs. 8-bit) of your video files. Adjusting this setting has a massive impact on the dynamic range of your footage and how quickly you fill your CFexpress Type A memory cards.
- S&Q Frame Rate Setting (Slow & Quick Motion) – This customization dictates both the captured frame rate and the ultimate playback speed of your video. It gives you precise control over exactly how much cinematic slow-motion (or fast-motion time-lapse) effect is baked directly into your S&Q video files in-camera.
- S&Q Record Setting – Similar to the standard record settings, this allows you to quickly adjust the bitrate, codec, and color depth specifically for your Slow & Quick motion footage, ensuring high-quality data retention during high-frame-rate capture.
- APS-C Mode (Super 35mm Crop) – This setting lets you manually force the camera into a Super 35 (S35) crop mode when recording video. It’s an incredibly useful tool for instantly extending the reach of your telephoto lenses in the field, or for utilizing dedicated cinema lenses designed for smaller sensor formats.
Video Fn Menu - Lower Row from Left to Right
AF Transition Speed – This setting dictates how quickly or smoothly the camera’s autofocus system drives focus when shifting from one subject to another during video recording. Adjusting this allows you to pull off intentional, cinematic rack focuses rather than abrupt, jarring jumps.
AF Subject Shift Sensitivity – This customization controls the “stickiness” of your autofocus once it locks onto a subject in video mode. Leaving it on a locked-on setting prevents the camera from accidentally racking focus to a passing object or background distraction, while a responsive setting lets you quickly switch targets on the fly.
Focus Map – A brilliant visual aid that toggles a color-blocked depth overlay on your screen while recording video. The Sony a7R VI Focus Map makes it incredibly easy to see exactly what parts of your frame are sharp, allowing you to instantly visualize your focal plane and distinguish your foreground from your background.
Picture Profile – This option gives you quick access to the camera’s built-in picture profiles to maximize your dynamic range and color grading potential. On the Sony a7R VI, this is incredibly useful for instantly jumping from standard profiles to PP11 (S-Cinetone), which delivers beautiful skin tones and a cinematic look right out of the camera without requiring intensive post-processing. I cover these options extensively in my companion article, The Complete Setup Guide to the Sony a7R VI.
Select LUT – This feature lets you apply and display a specific Look-Up Table (LUT) directly on your monitor when shooting in a flat profile like S-Log3. It allows you to preview a graded, lifelike image while recording, using either Sony’s built-in monitoring presets or custom user LUTs imported via your memory card.
Zebra Level – This lets you quickly adjust your zebra stripe exposure thresholds for video work. Because I utilize a specialized custom lower-limit of 107+ to protect highlights when shooting raw still images, I use this quick shortcut to pull the zebra level back down to the industry-standard 70 to properly judge skin tones and midtones when doing serious video recording.
Diving Into the My Menu System
Lastly, we have the Sony a7R VI My Menu system. This feature allows you to fully customize a dedicated section of your camera’s directory to display the exact settings you need frequent access to.
The items I place here are specific features that cannot be assigned to a physical custom button, control dial, or the Fn menu, but still require quick navigation. There is absolutely no reason you should ever have to waste time digging through the deep, multi-layered factory menus of the Sony a7R VI to find a setting you use on every shoot. Add your frequently adjusted parameters to your “My Menu” tabs, and you’re good to go.
*How to Configure Your Custom My Menu*
To build your personalized menu layout, navigate over to the Star (★) tab at the very top of the main Sony menu system and select My Menu Settings. From there, you can easily add, delete, and sort any camera settings into distinct, custom-named pages.
Personally, I use three customized “My Menu” pages broken down by specific photographic workflows, but you can easily scale up and add more pages if your shooting style requires it.
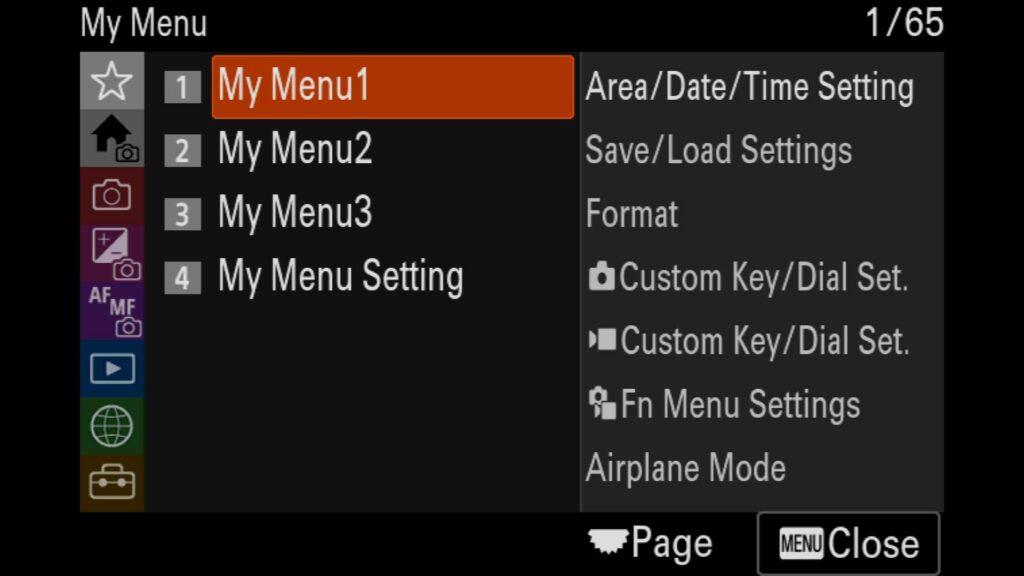
My Menu1 - General Settings
Area/Date/Time Setting – Essential for quickly updating your camera’s time zone, date, and local time. This is incredibly helpful for synchronizing internal clocks across multiple camera bodies on a large shoot, so all your images line up perfectly in chronological order when importing into Adobe Lightroom.
Save/Load Settings – This allows you to instantly save or load a comprehensive Sony a7R VI camera settings file to or from a memory card. In fact, I will share my custom settings file with you in the next section of this guide so you can match my exact button layouts and configurations in under 30 seconds.
Format – A high-priority shortcut to quickly format your high-speed SD cards or CFexpress Type A memory cards.
Custom Key/Dial Set – Gives you an instant portal back into your physical button customization menus, allowing you to make micro-adjustments to your control layouts on the fly.
Fn Menu Settings – A direct link to alter or update the 12 options displayed on your quick-access Function menus for both photo and video modes.
Airplane Mode – To drastically extend your Sony a7R VI battery life in the field, keep this shortcut handy to immediately disable all Bluetooth and Wi-Fi transmissions when they aren’t actively needed.
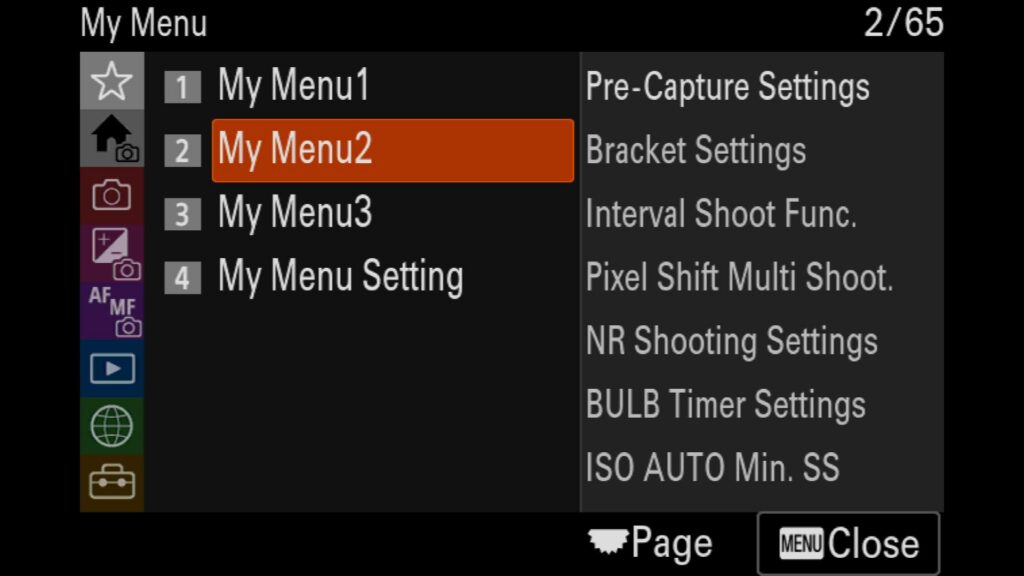
My Menu2 - Photo Related Settings
Pre-Capture Settings – This control center lets you toggle the new RAW Pre-Capture feature on or off, define your pre-record buffering time frame, and adjust exactly how the shutter button engagement triggers the burst.
Bracket Settings – Allows you to quickly switch your bracketing type (exposure, focus, or white balance), customize the self-timer delay during bracket sequences, change the bracket step order, and fine-tune your automatic focus bracketing intervals.
Interval Shoot Function – Your primary destination for time-lapse photography. This menu lets you toggle interval shooting, customize your start-delay timers, adjust precision shooting intervals, set your total frame counts, and tweak your Auto Exposure tracking sensitivity.
Pixel Shift Multi Shoot – Gives you immediate access to Sony’s ultra-high-resolution composite mode. You can toggle Pixel Shift on or off and switch between the 4-shot composite or the massive 16-shot composite mode to leverage the absolute maximum resolving power of the camera’s 67MP sensor.
Noise Reduction Shooting Settings – Seamlessly toggle advanced long-exposure or high-ISO noise-reduction features, select your target RAW file type, and set the multi-shot noise-reduction stack count.
BULB Timer Settings – A massive lifesaver for long-exposure landscape and astrophotography. This lets you activate the internal BULB timer and dial in precise exposure durations from 2 seconds to 900 seconds without an external cable release.
ISO AUTO Min. Shutter Speed – Quickly sets your safety-net minimum shutter speed threshold when relying on Auto ISO while shooting in Aperture Priority mode.
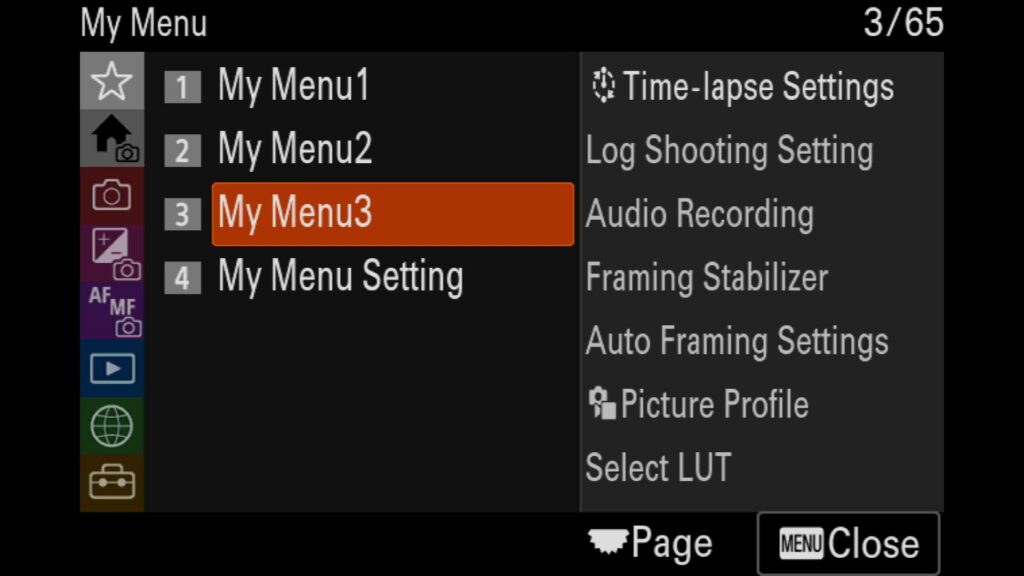
My Menu3 - Video Related Settings
Time-lapse Settings for Video – Allows you to configure frame rates, shot intervals, recording bitrates, and color depth specifically for the camera’s automated, in-camera time-lapse video generation mode.
Log Shooting Setting – Your control portal for advanced color workflows. This lets you turn on Log shooting, select your color gamut (such as S-Log3), and choose whether or not to embed your monitoring LUT data directly into the video file metadata.
Audio Recording – A fast shortcut to enable or completely disable internal or external microphone audio capture during video recording.
Framing Stabilizer – This cutting-edge stabilization feature dynamically locks your subject’s position within the frame while the camera body moves, delivering incredibly smooth tracking shots.
Auto Framing Settings – A powerful tool designed for tripod-based video creators. It automatically applies an intelligent crop into the high-resolution frame to track and center a moving subject, effectively mimicking the camera work of a dedicated operator. Here, you can adjust the auto-start timing, crop levels, and tracking speeds.
Picture Profile – Allows you to jump between different cinematic profiles, including the incredibly popular PP11 (S-Cinetone), which yields rich, production-ready colors straight out of the camera without mandatory color grading.
Select LUT – Gives you immediate access to manage, select, or import custom 3D LUT look-up tables to accurately monitor your exposure and contrast when shooting in flat log profiles.
Downloading My Settings File for the a7R VI
As promised, I want to give you the opportunity to download and use my personal Sony a7R VI settings file to help drastically speed up your custom camera configuration.
This downloadable file includes every single custom button layout, dial function, and Fn menu shortcut we discussed in this article, as well as the foundational configurations detailed in my companion piece, The Complete Setup Guide to the Sony a7R VI .
To get instant access to the download, all I ask is that you sign up for my photography newsletter below.
Did I Miss Something?
Do you think I missed something or do you need more clarification with something, please let me know in the comments below!